# Obsidian to NotionNext
[](https://github.com/jxpeng98/obsidian-to-NotionNext/actions/workflows/test.yml)
[](https://github.com/jxpeng98/obsidian-to-NotionNext/actions/workflows/release.yml)
[](https://GitHub.com/jxpeng98/obsidian-to-NotionNext/releases/)
[](https://github.com/jxpeng98/obsidian-to-NotionNext/releases/)
[//]: # ([](https://GitHub.com/jxpeng98/obsidian-to-NotionNext/releases/))
[//]: # ([中文文档](README-zh.md))
**Now, support both NotionNext and General databases with customised properties.**
**现在支持NotionNext和普通Notion数据库,可自定义数据库列表。**
## Precautions
### For customised database users
**⚠️⚠️⚠️: The existing customised database should be recreated if you want to update to version 2.3.0. The new version has a new database structure, and the old database structure is not compatible with the new version to build the index properly.**
### 自定义数据库用户
**⚠️⚠️⚠️: 如果你想要更新到2.3.0版本,你需要重新创建自定义数据库。新版本有一个新的数据库结构,旧的数据库结构无法构建索引。**
## TODO List
- [x] ~~Modify the Edit function for the custom properties. 改进自定义属性的编辑功能~~
- [ ] Support group upload with one click 支持一键多数据库上传
- [x] ~~Support custom properties for Notion General database. 支持自定义属性~~
- [x] ~~Support preview for database details in plugin settings. 支持预览数据库详情~~
- [x] ~~Support edit for database details in plugin settings. 支持编辑数据库详情~~
## How to use
If you want to use this plugin, you need to follow the following steps to set up the plugin. The steps can be divided into two parts: setting up the Notion API and setting up the plugin in Obsidian.
### 1. Setting up the Notion API
1). go to [Notion API](https://www.notion.com/my-integrations) to create a new integration, and **copy the token**.
2). Create a database in your Notion workspace.
Open Notion, click top-left `Create` a new page` -> You can give a title for the page and press "/" Select 'Database - Full page'.
Rename the database properties to `title` and `tags`.
**⚠️⚠️`title` is the title column! `tags` is lower case⚠️⚠️**
3). Add the Notion API integration.
Click the right-top '...' -> connections -> connect to -> find the integration you created and connect it.
4). Publish the database to the public.
Click the 'Share' -> 'Publish' -> 'Publish' -> **copy the database id from the URL**.
### 2. Setting up the plugin in Obsidian
1). Go to Obsidian settings -> community plugins -> search 'NotionNext' -> install it.

2). Open the plugin settings and create a new database.

### 3. Create a database
**You can create three types of databases:**
#### 1️⃣ General database
General database is the default database, which only has the `title` and `tags` columns. **⚠️⚠️`title` and `tags` are lowercase⚠️⚠️**

The general is as follows:
- Full Name: the full name that you would like to give to the database.
- Abbreviate Name: the abbreviation that you would like to give to the database.
- Notion tags sync: whether you want to sync the tags column to Notion.
- Customise title property: whether you want to change the `title` to another name (e.g., `name`).
- Notion API token: the token you copied from the Notion API page.
- Notion Database ID: the database ID you copied from the Notion database URL. (e.g., only copy `7158cd3f70ce4f60afd9da5bdf74fd0c` between `site/` and `?`. `https://jxpeng.notion.site/7158cd3f70ce4f60afd9da5bdf74fd0c?v=380317ac5373sadasdas3c13e618f&pvs=4**`)
After setting, it should look like this:

Once you click `save`, the new database will be created in the plugin settings and display in the detabase list.

#### 2️⃣ NotionNext database
If you use [NotionNext](https://github.com/tangly1024/NotionNext) to set up your website, you can use the NotionNext database. (**All the properties are in lowercase, and you do not need to change the properties**)

Like the general database, you need to fill in the following information:
- Full Name: the full name that you would like to give to the database.
- Abbreviate Name: the abbreviation that you would like to give to the database.
- Notion API token: the token you copied from the Notion API page.
- Notion Database ID: the database ID you copied from the Notion database URL.
#### 3️⃣ Custom database
The custom database is purely customised, and you can customise the properties you want to sync. (**All the properties are in lowercase, and you do not need to change the properties**)

The basic information is identical to the general database and NotionNext database. You need to fill in the following information:
- Full Name: the full name that you would like to give to the database.
- Abbreviate Name: the abbreviation that you would like to give to the database.
- Notion API token: the token you copied from the Notion API page.
- Notion Database ID: the database ID you copied from the Notion database URL.
After adding the information, You can click `Add New Property` to add the properties you want to sync. There is no limit to the number of properties you can add.

**⚠️⚠️⚠️**: **`Title column` is the main property in the Notion database, which has the open button to open the underlying page.** You can select the type of all other properties. **⚠️⚠️⚠️**

According to the previously shown database, you can use `title` as the `Title column`, and `Tags` as the property 1.

**Until now, you have set up the plugin in Obsidian. You can start syncing your notes to Notion.**
### 4. Start syncing
Create a new note in Obsidian, and fill in the front matter with the properties you want to sync.
#### 1️⃣ note for general database
For example, we can create a test note with the following front matter:
``` markdown
---
title: test
tags: [test, web]
---
This is a test file.
```
#### 2️⃣ note for NotionNext database
We use the following front matter for the NotionNext database:
```markdown
---
title: test-notionnext
titleicon: 📎
date: 2023-07-23
coverurl: https://img.jxpeng.dev/2023/08/843e27a210847f05a0f7cfb121fec100.jpg
type: Post
slug: test
status: Draft
category: test
summary: this is a summary for test post
icon: fa-solid fa-camera
password: "1234"
tags:
- test
- web
NotionID-pengjiaxin: 8ba573de-8fdf-4681-b063-c39d26e7860e
---
this is a test file
```
#### 3️⃣ note for custom database
##### sync title and tags
Use the previously created general database and rename `title` to `Name` and `tags` to `Tags` in Notion.
The front matter for the custom database is as follows:
```markdown
---
Name: test-custom
Tags:
- test
- web
---
This is a test file.
```
##### sync more properties
Add more property to the custom database. For example, we can add a `summary` and `date` property to the custom database.
1). Click `Edit` in the plugin settings.

2). Click `Add` and add the `summary` and `date` property.
3). After adding the properties, you can see the properties in the plugin settings.

4). Add the `summary` and `date` in Notion
5). Create a new note with the `summary` and `date` property.
```markdown
---
Name: test-custom-more
Tags:
- test
- web
summary: this is a summary for test custom
date: 2022-05-03
---
This is a test file.
```
6). Sync the note to Notion.
---
## Acknowledgment
Thanks to the [original author](https://github.com/EasyChris/obsidian-to-notion) for developing such a useful plugin that can synchronize Obsidian to Notion. However, the original repository can only sync Name and Tag information. For those like me who use [NotionNext](https://github.com/tangly1024/NotionNext) to set up their website, this presents some limitations. Every time I import, I need to make a lot of modifications.
Thus, based on the [original author's work](https://github.com/EasyChris/obsidian-to-notion), I've added a feature to match the [NotionNext](https://github.com/tangly1024/NotionNext) template. This way, you can edit directly in Obsidian and publish with a single click after organizing.
---
Original README.md
Many Thanks for the original author's work. I've only made some changes to the original author's work. If you find this plugin useful, please give the [original author](https://github.com/EasyChris/obsidian-to-notion) a star.
# Obsidian to Notion
[](https://github.com/Easychris/obsidian-to-notion/actions/workflows/CI.yml)
[](https://github.com/Easychris/obsidian-to-notion/actions/workflows/release.yml)
[](https://raw.githubusercontent.com/EasyChris/obsidian-to-notion/master/LICENSE)
[](https://GitHub.com/Easychris/obsidian-to-notion/releases/)
[](https://github.com/Easychris/obsidian-to-notion/releases)
Share of obsidian to Notion [中文文档](README-zh.md)
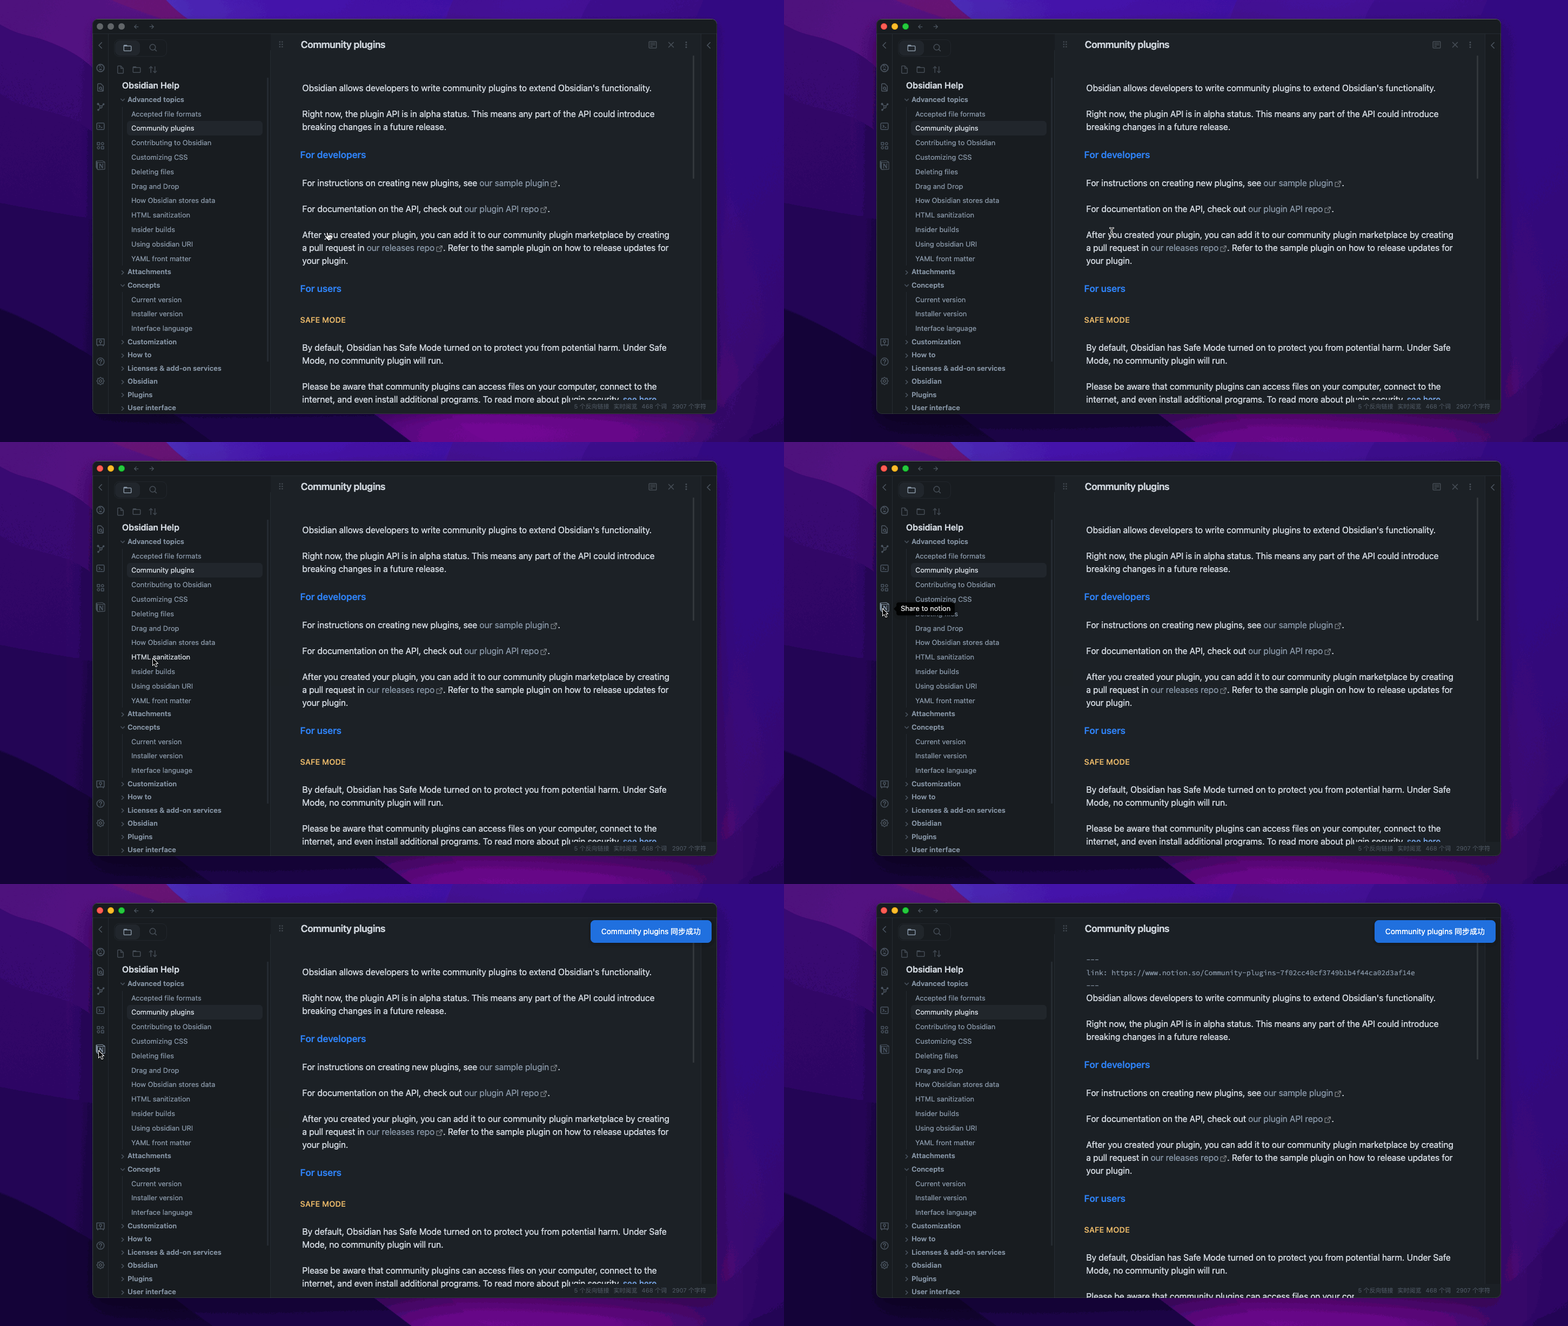
Sharing files from Obsidian to Notion with a single click, and Obsidian will automatically add the Notion share link
You are welcome to offer it a star if it can benefit you.
# TODO
### [TODO Board](https://github.com/users/EasyChris/projects/3/views/1)
- [x] support for custom page banner
- [x] update the exsit page
- [x] support for mult language
- [x] support for auto copy the share link to clipboard
- [x] support for mobile
- [x] support tags thank for [@jannikbuscha](https://github.com/jannikbuscha)
- [ ] transfer the bi-link format like [[]] into the format that Notion supports.
# How to use
## Install the plugin
### Marketplace download
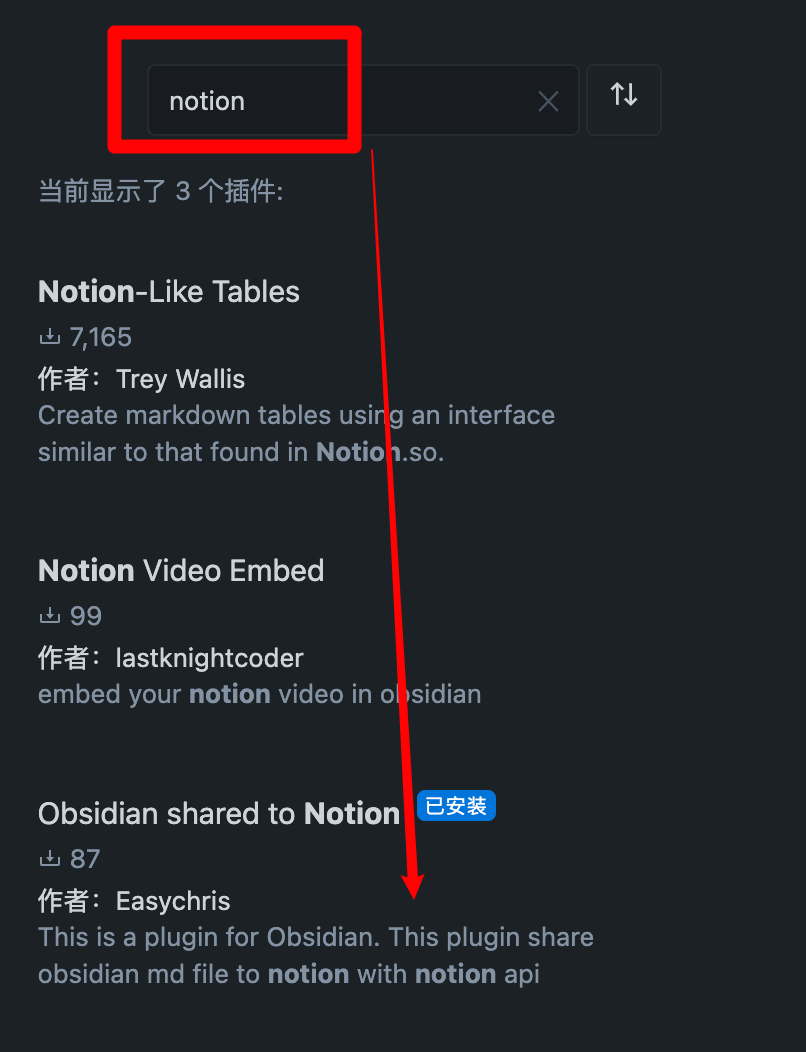
Open obsidian setting -> Add plugin -> Search -> notion
### BRAT
Enter `BRAT` into the plugin market center to find it.
Add `EasyChris/obsidian-to-notion` to the list of BRAT plugins that have been installed.
Return to the plugin center and turn it on.
### Manual installation
```
cd YOUR_OBSIDIAN_FOLDER/.obsidian/plugins/
git clone https://github.com/EasyChris/obsidian-to-notion.git
```
## Apply Notion API
Official reference documentation: [https://developers.notion.com/docs](https://developers.notion.com/docs)
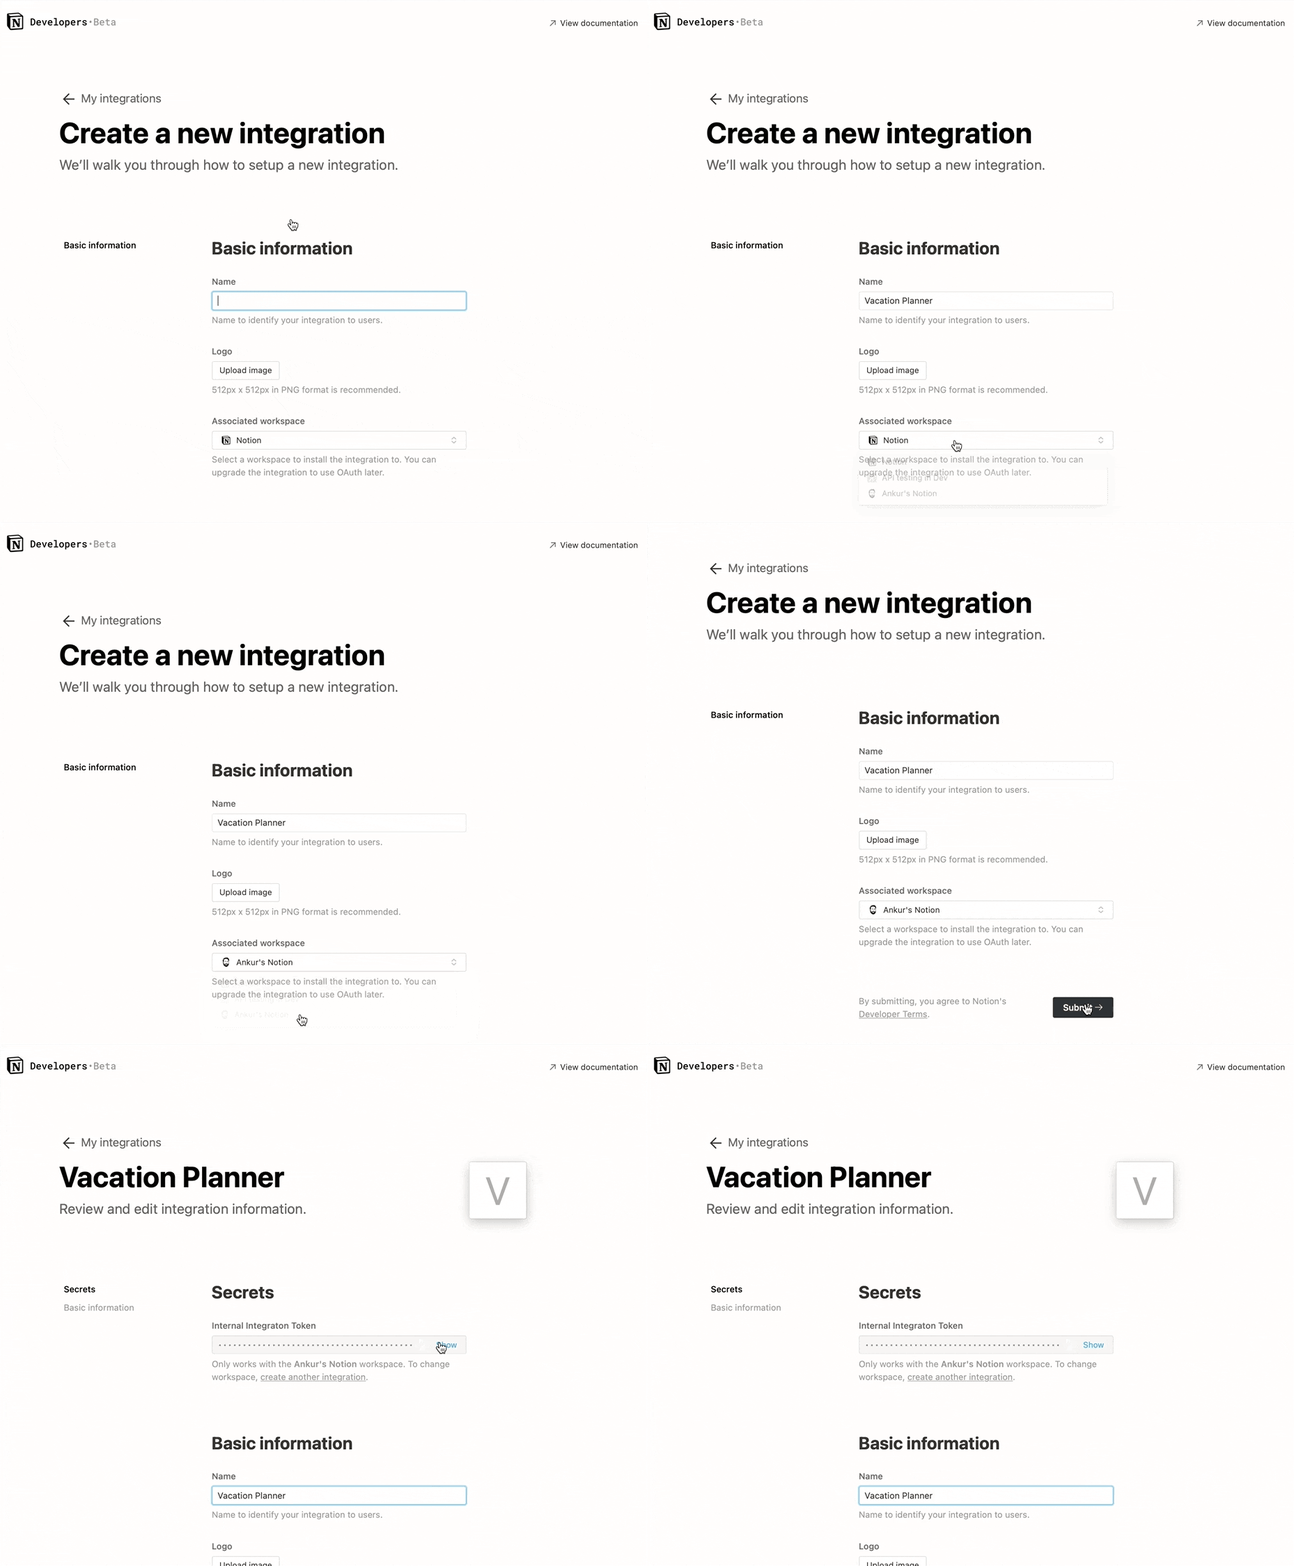
### Step 1: Create integration
Go to [https://www.notion.com/my-integrations](https://www.notion.com/my-integrations)
Once created, copy `secrets toekn`
#### Note
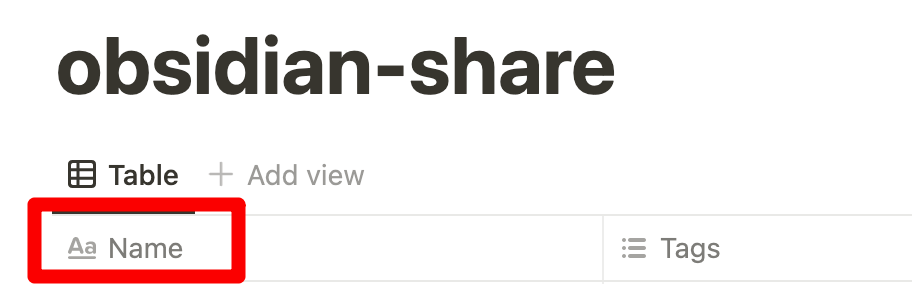
database first custom name must be "Name", otherwise sync to notion will be failed
### Step 2: Share a database with your integration
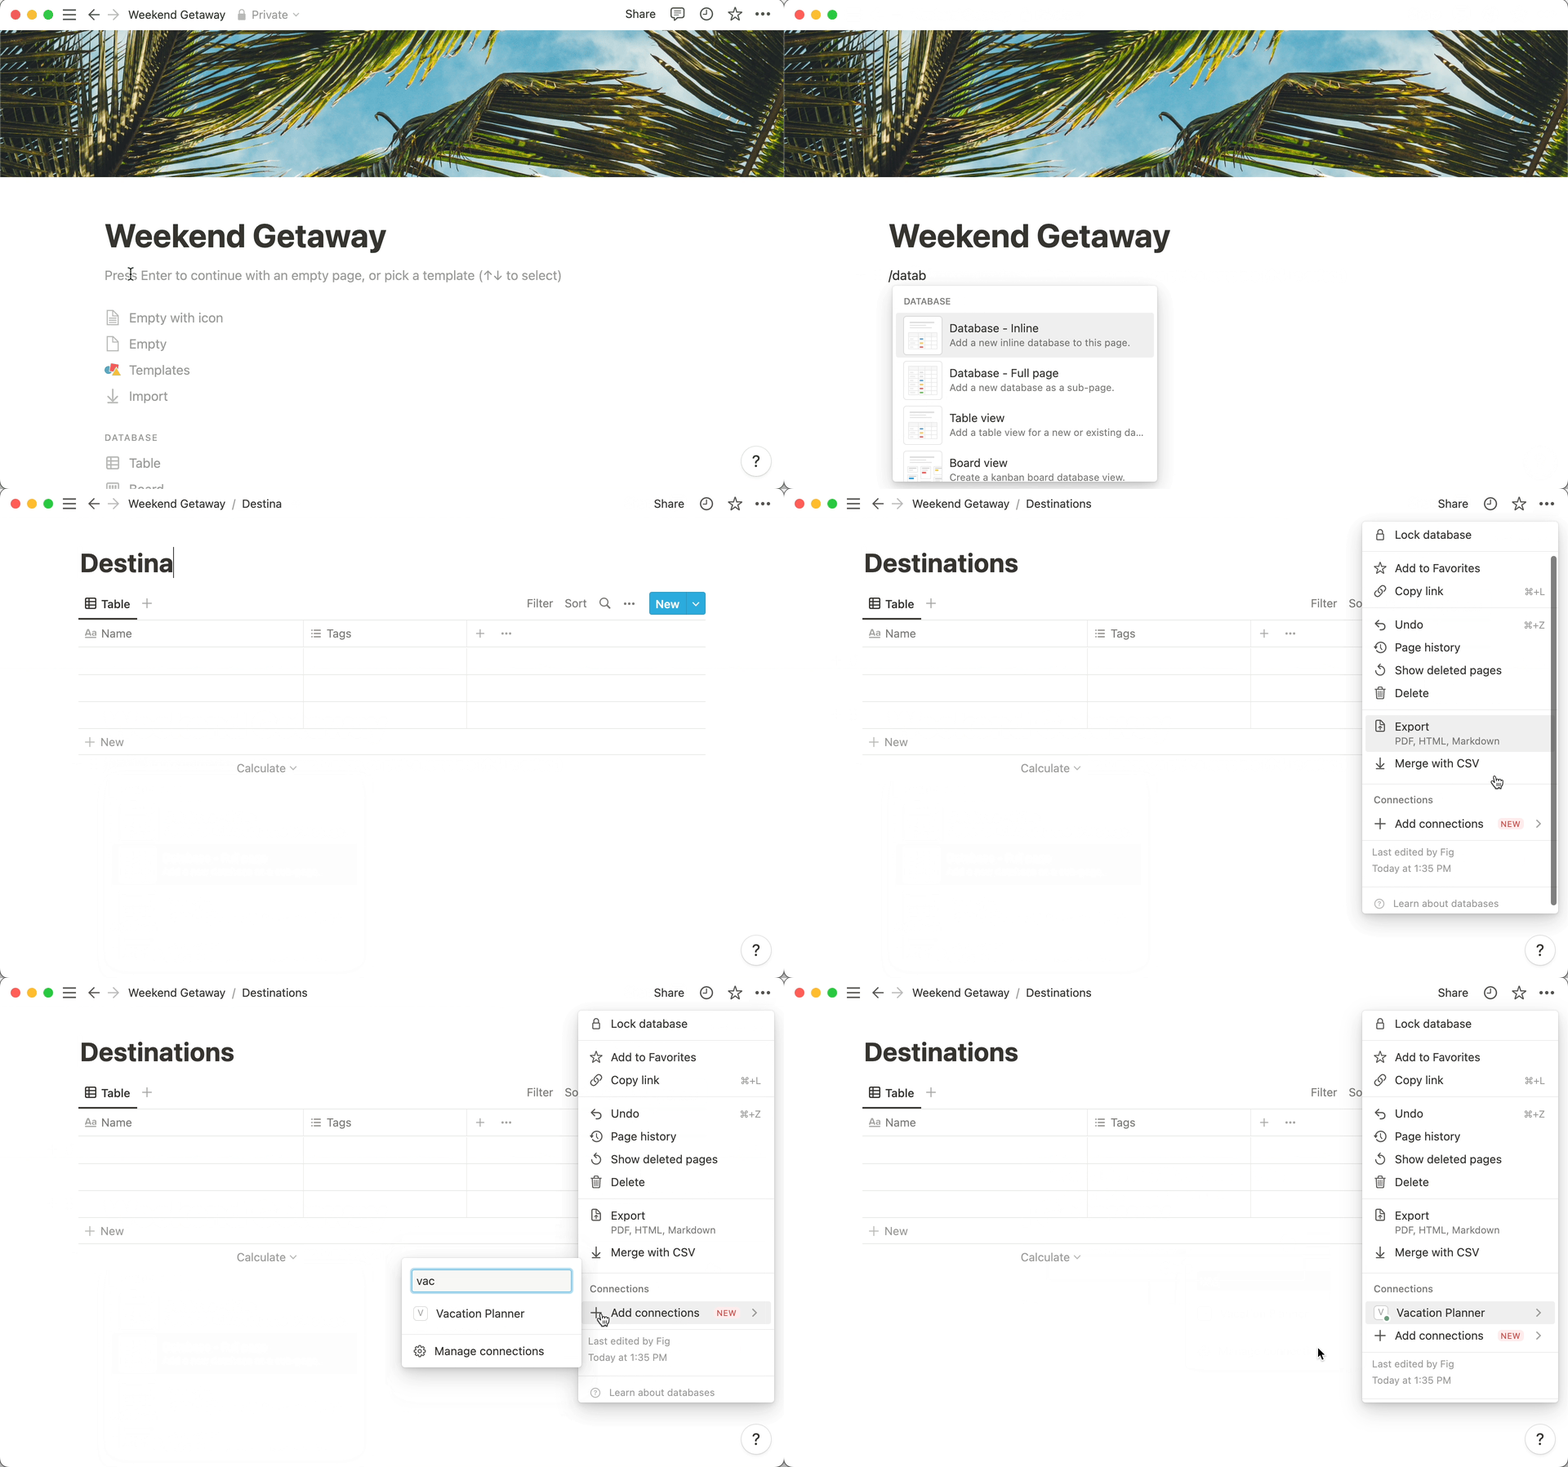
Create a new page (with public permissions)
Create a new database in the page -> you need `full page database`

Add `integration` to your new database
### Step 3: Copy the database ID
```
https://www.notion.so/myworkspace/a8aec43384f447ed84390e8e42c2e089?v=...
| --------- Database ID --------|
```
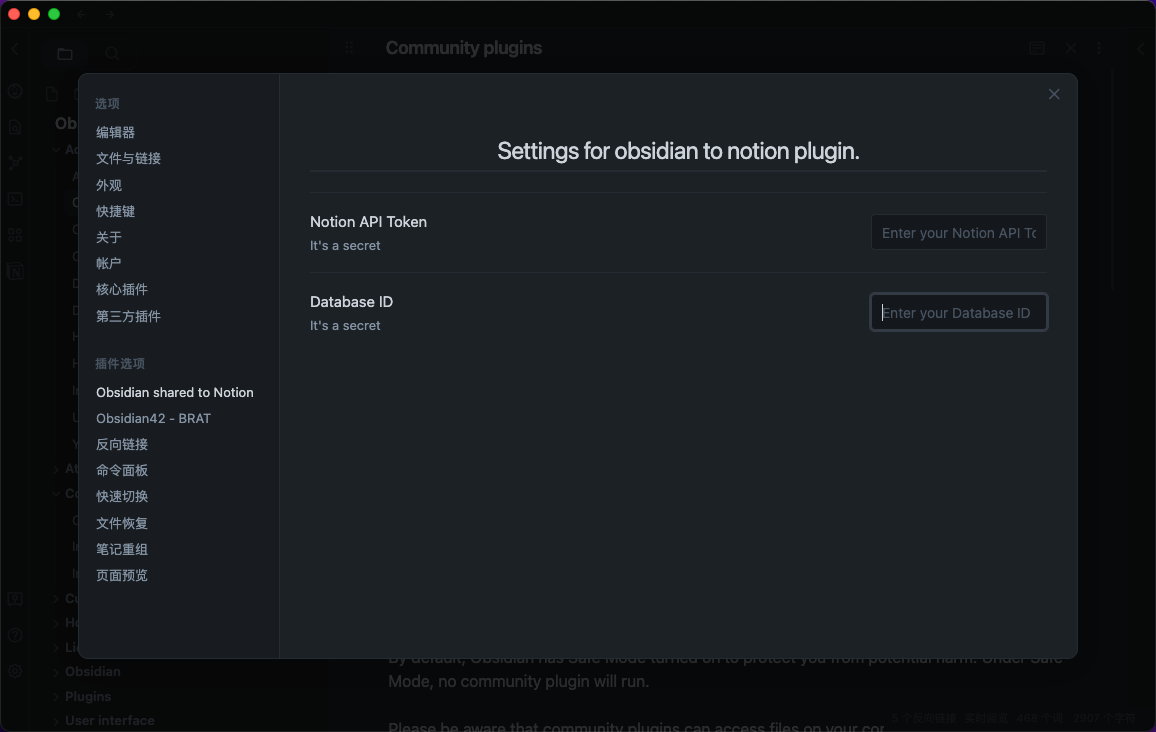
## Open the plugin configuration
Fill the configuration with the `NOTION_API_KEY` and `DATABASE_ID` you got
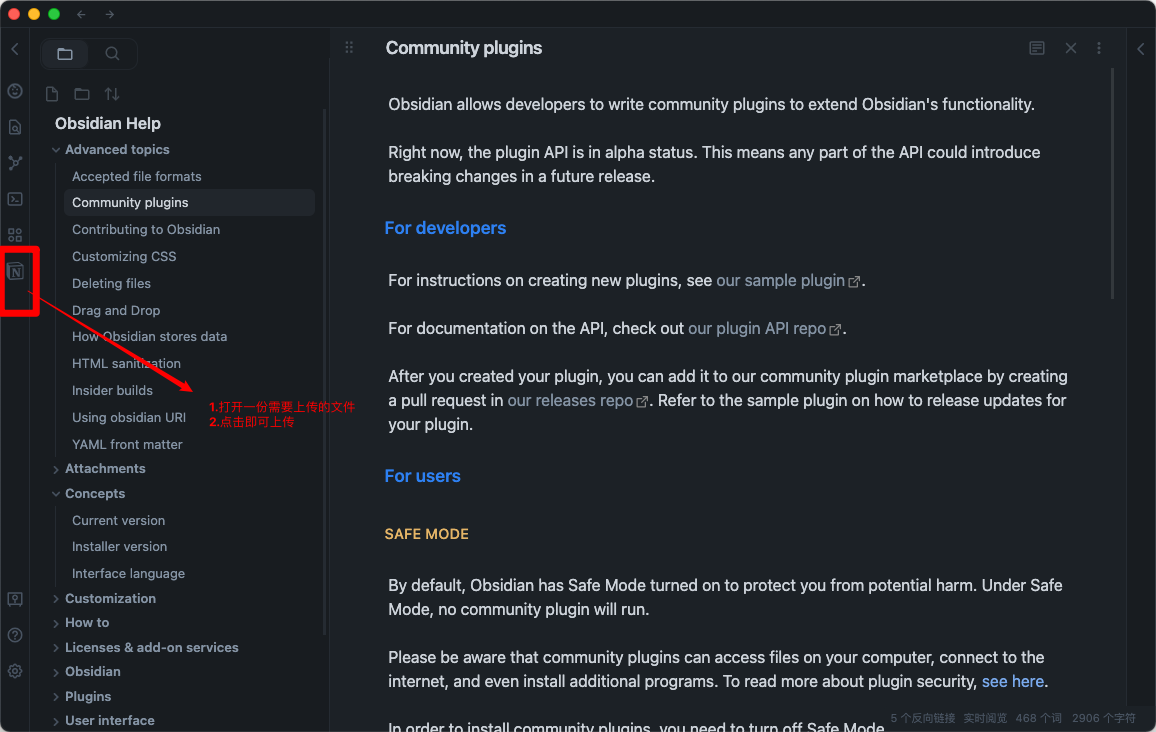
## Upload file content to notion
Click the uploadCommand notion button
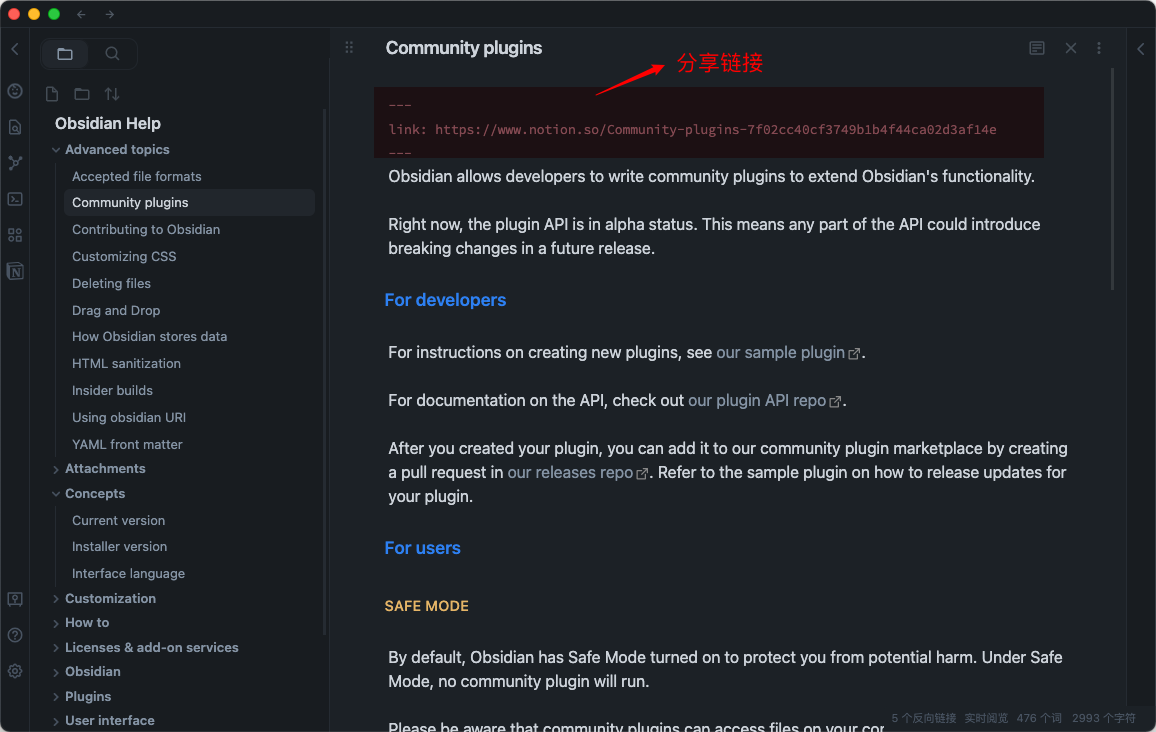
A share link will be automatically generated after successful uploadCommand
## Banner URL [option]
Banner url must be a image url like:
If you don't want to use banner, leave it blank
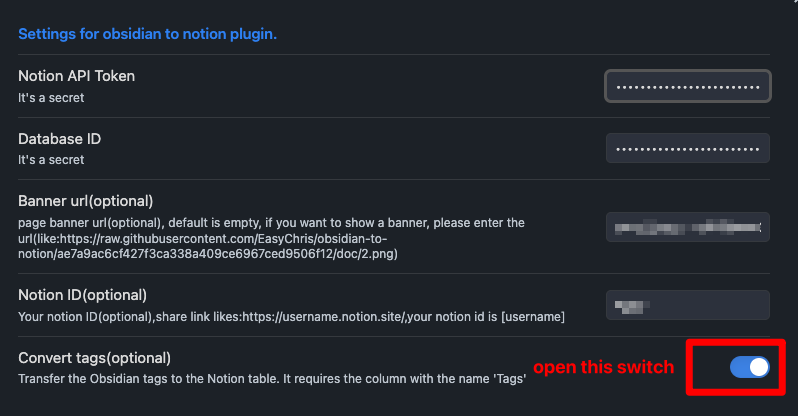
## Convert Tags [option]
Transfer the Obsidian tags to the Notion table.
It requires the column with the name 'Tags'.
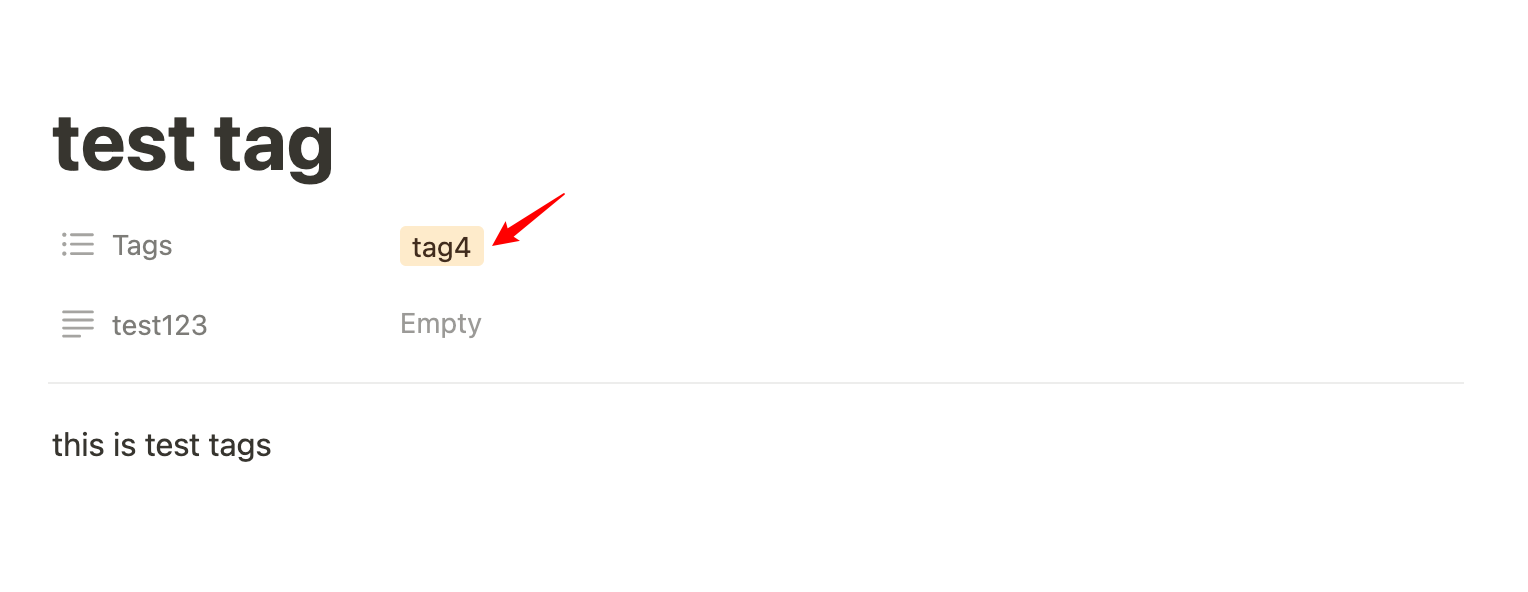
Add tags to your notion page
- open plugin convert tags
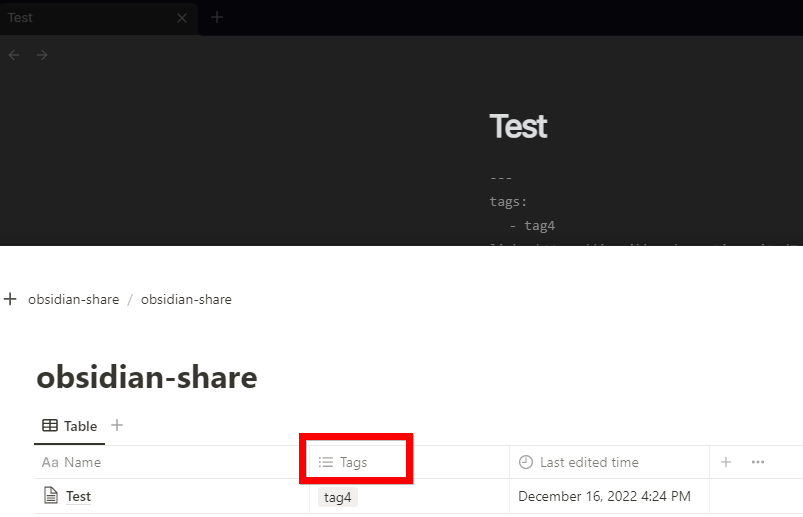
- add tags in the head
```markdown
---
tags: [tag1,tag2]
---
this is test tags
```
```markdown
---
tags:
- tag4
---
this is test tags
```

Thanks for [@jannikbuscha](https://github.com/jannikbuscha) contribution
## Notion ID [option]
Notion ID is the your notion site ID that you want to share the file to.
if you don't write it, notion will share to the default link like:
that visit this page need to redirect to your site url
if you write the Notion ID, it will share to the page link like:
.
The visiter don't need to redirect url.
## Sync image to Notion
To sync images to your oss or cos bucket, use the [Obsidian Image Auto Upload Plugin](https://github.com/renmu123/obsidian-image-auto-upload-plugin).
# Development
```
git clone https://github.com/EasyChris/obsidian-to-notion.git
yarn install
yarn dev
```
## Release
```
node update-version.js
./release.sh
```
# Thanks
[Development Process | Obsidian Plugin Development Documentation](https://luhaifeng666.github.io/obsidian-plugin-docs-zh/zh/getting-started/development-workflow.html)
[GitHub - devbean/obsidian-wordpress: An obsidian plugin for publishing docs to WordPress.](https://github.com/devbean/obsidian-wordpress)
[GitHub - obsidianmd/obsidian-api](https://github.com/obsidianmd/obsidian-api)
[GitHub - Easychris/obsidian-to-notion: Obsidian Weread Plugin is an plugin to sync Weread(微信读书) hightlights and annotations into your Obsidian Vault.](https://github.dev/zhaohongxuan/obsidian-weread-plugin)
[GitHub - Quorafind/Obsidian-Memos: A quick capture plugin for Obsidian, all data from your notes.](https://github.com/Quorafind/Obsidian-Memos)
[https://github.com/jannikbuscha/obsidian-to-notion](https://github.com/jannikbuscha)
# License
GNU GPLv3