mirror of
https://github.com/jxpeng98/obsidian-to-NotionNext
synced 2026-07-30 08:58:36 +08:00
Compare commits
3 Commits
a950e2e301
...
78d2a29c8a
| Author | SHA1 | Date | |
|---|---|---|---|

|
78d2a29c8a | ||
|
|
1156bd3809 | ||

|
b46e24f1ed |
18
README-zh.md
18
README-zh.md
@@ -44,21 +44,21 @@ tags:
|
||||
|
||||
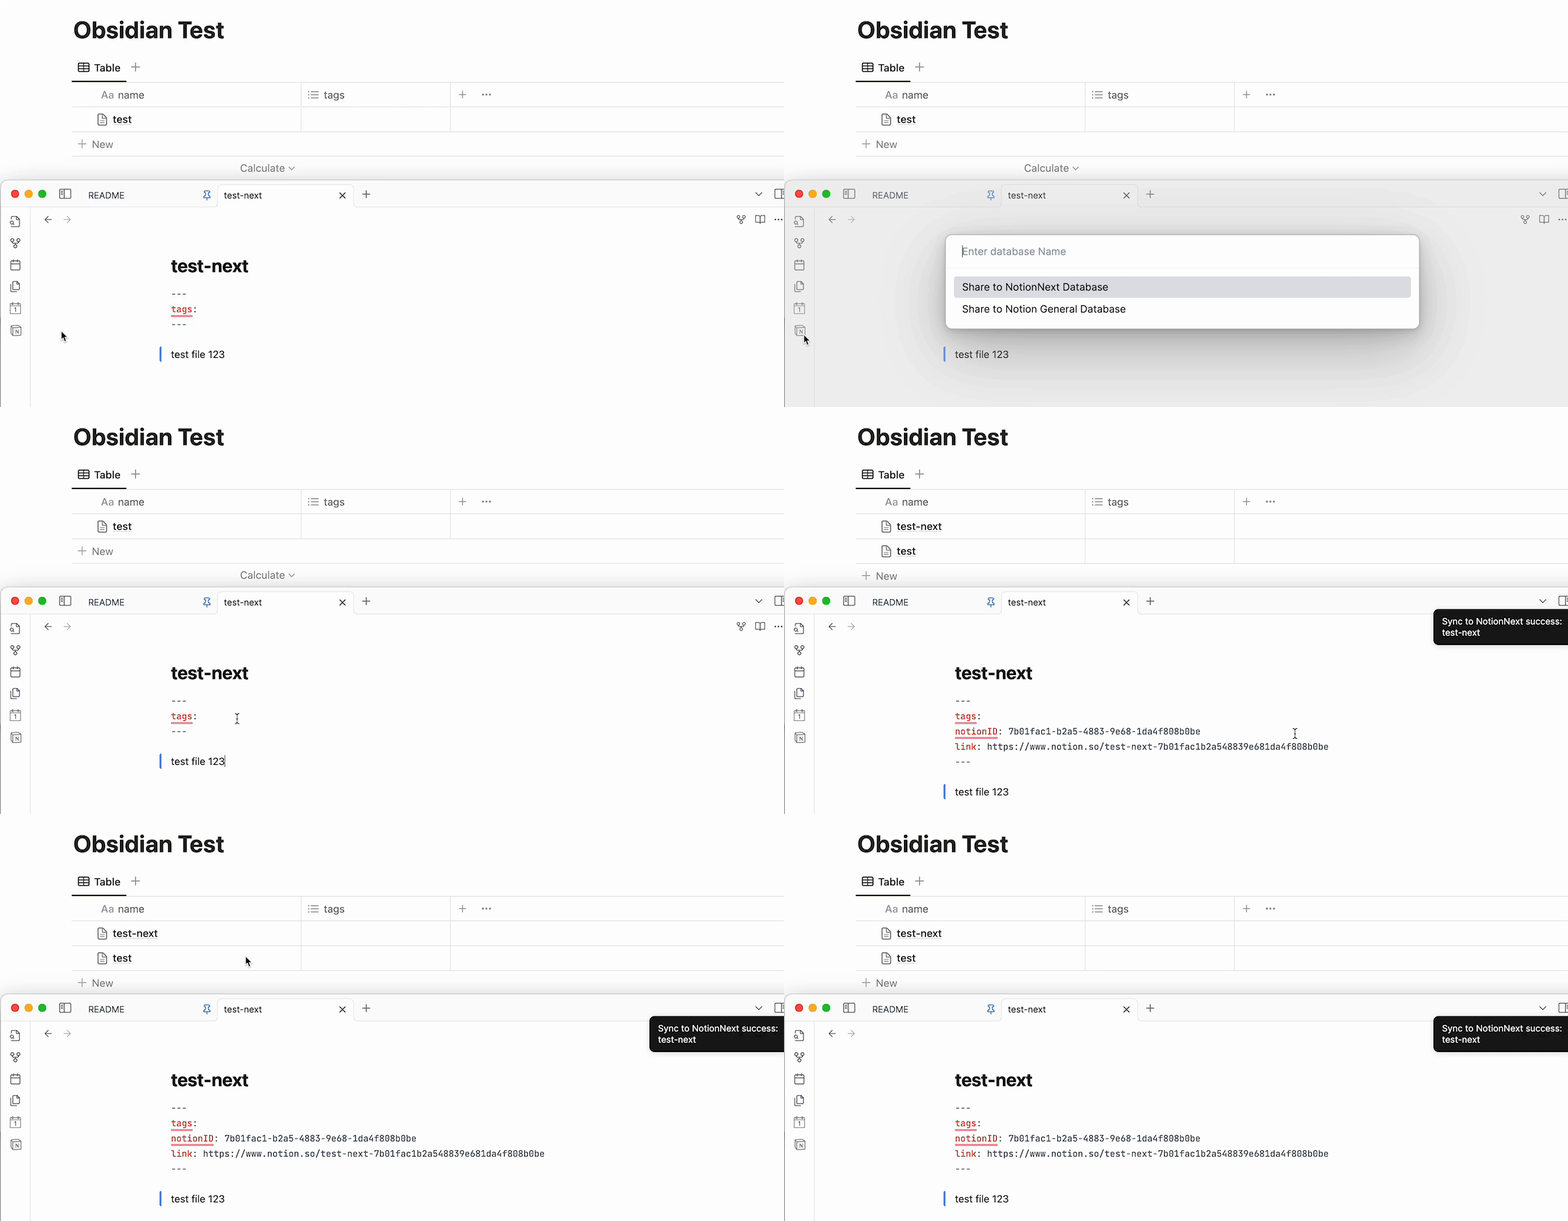
- 这个版本开始,你可以**任意修改第一列表头的名字 (标题列,默认:'title')**。 (**注意:你必须保证你的Notion数据库中有'tags‘这一列的存在,并且在markdown文件中把`tags:`添加到你的YAML表头中。否则会返回`400 错误`。但是你可以`tags:`设置为空。**)
|
||||
|
||||

|
||||

|
||||
例如这样:
|
||||

|
||||
|
||||
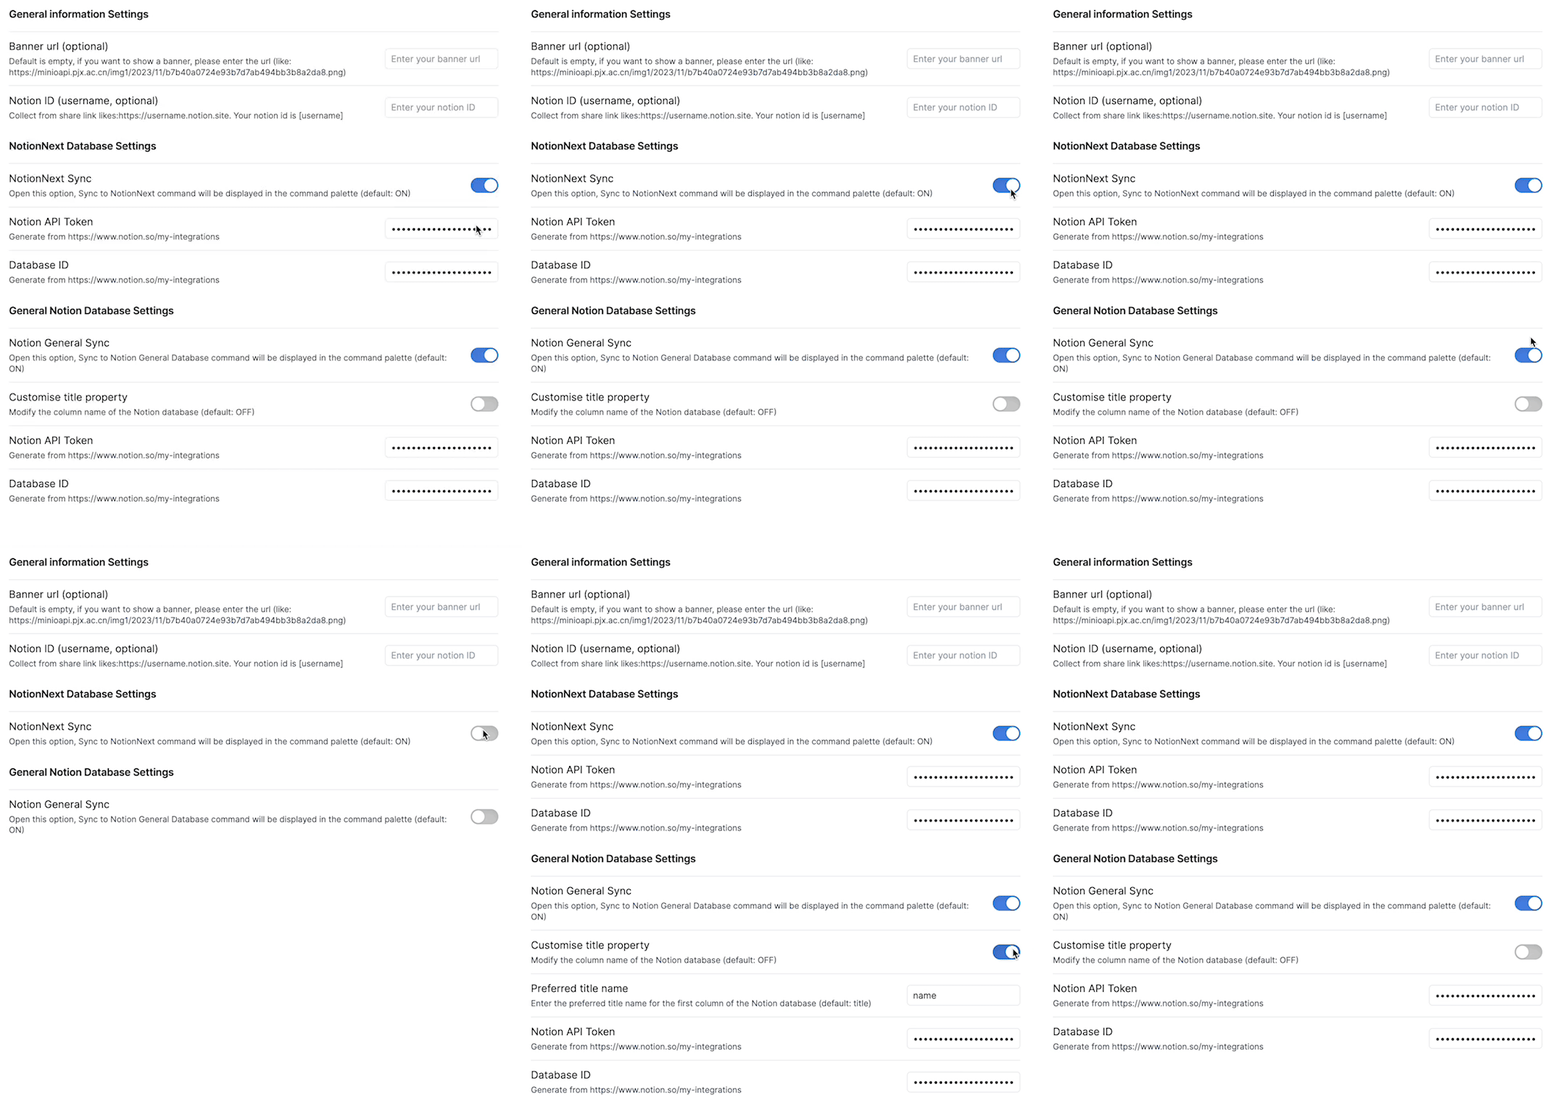
- 增加了一个控制按钮来控制是否开启当前数据库同步命令的功能。如果你关闭了这个按钮,你在上传命令列表中就不会出现当前数据库的选项。
|
||||
|
||||

|
||||
|
||||
|
||||
### 0.2.6
|
||||
|
||||
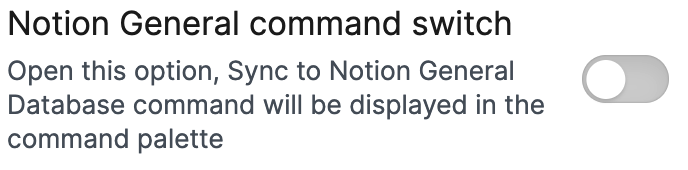
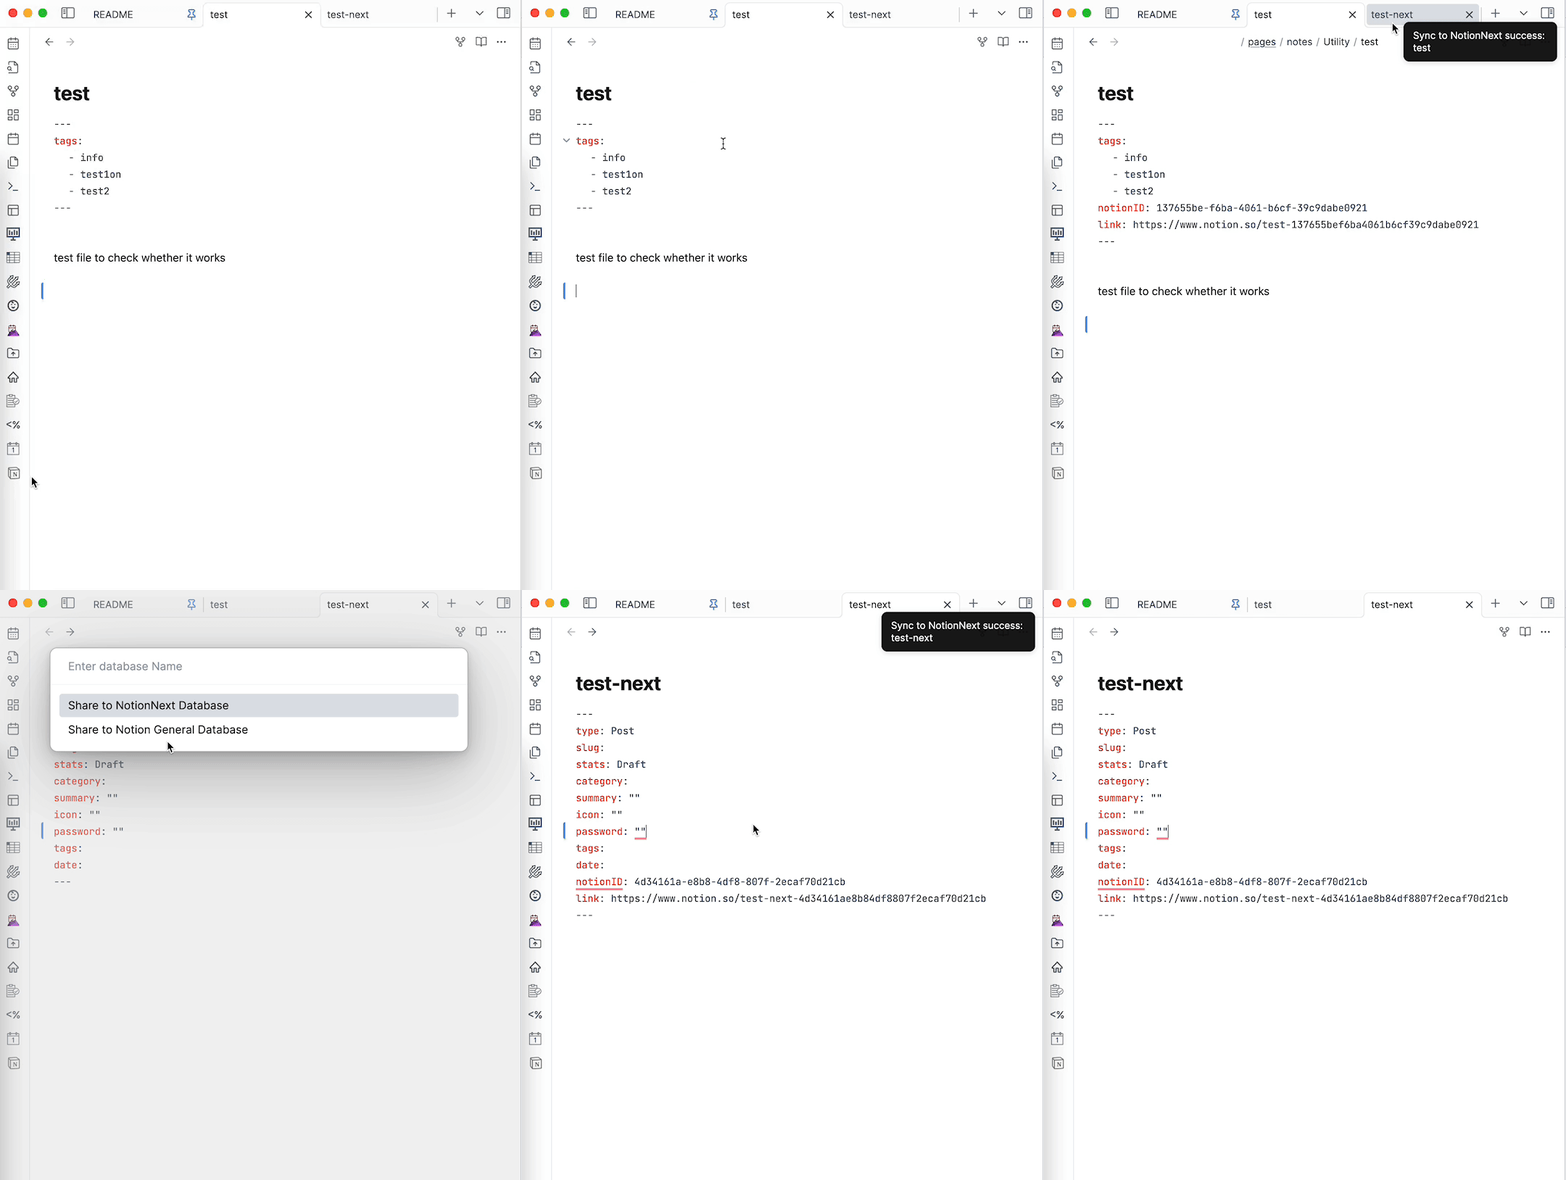
- 增加一个按钮用来控制是否在名列列表中显示如下数据库。
|
||||
|
||||

|
||||
|
||||
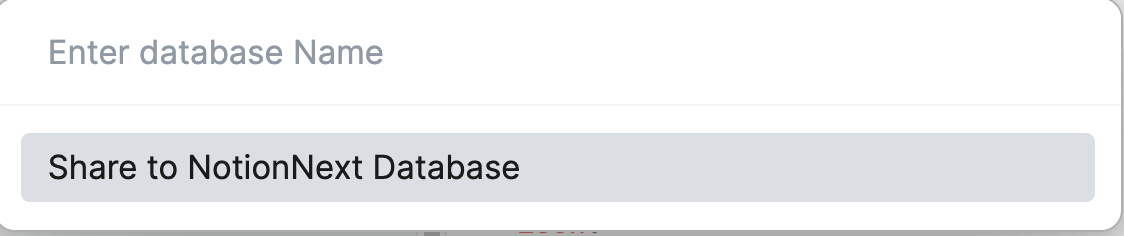
如果你关闭普通数据库的按钮,你在上传命令列表中就不会出现普通数据库的选项。如果你关闭NotionNext数据库的按钮,你在上传命令列表中就不会出现NotionNext数据库的选项。
|
||||
|
||||

|
||||
|
||||
|
||||
### 0.2.3
|
||||
|
||||
@@ -70,9 +70,9 @@ tags:
|
||||
- 你可以有一个NotionNext和一个普通Notion数据库。
|
||||
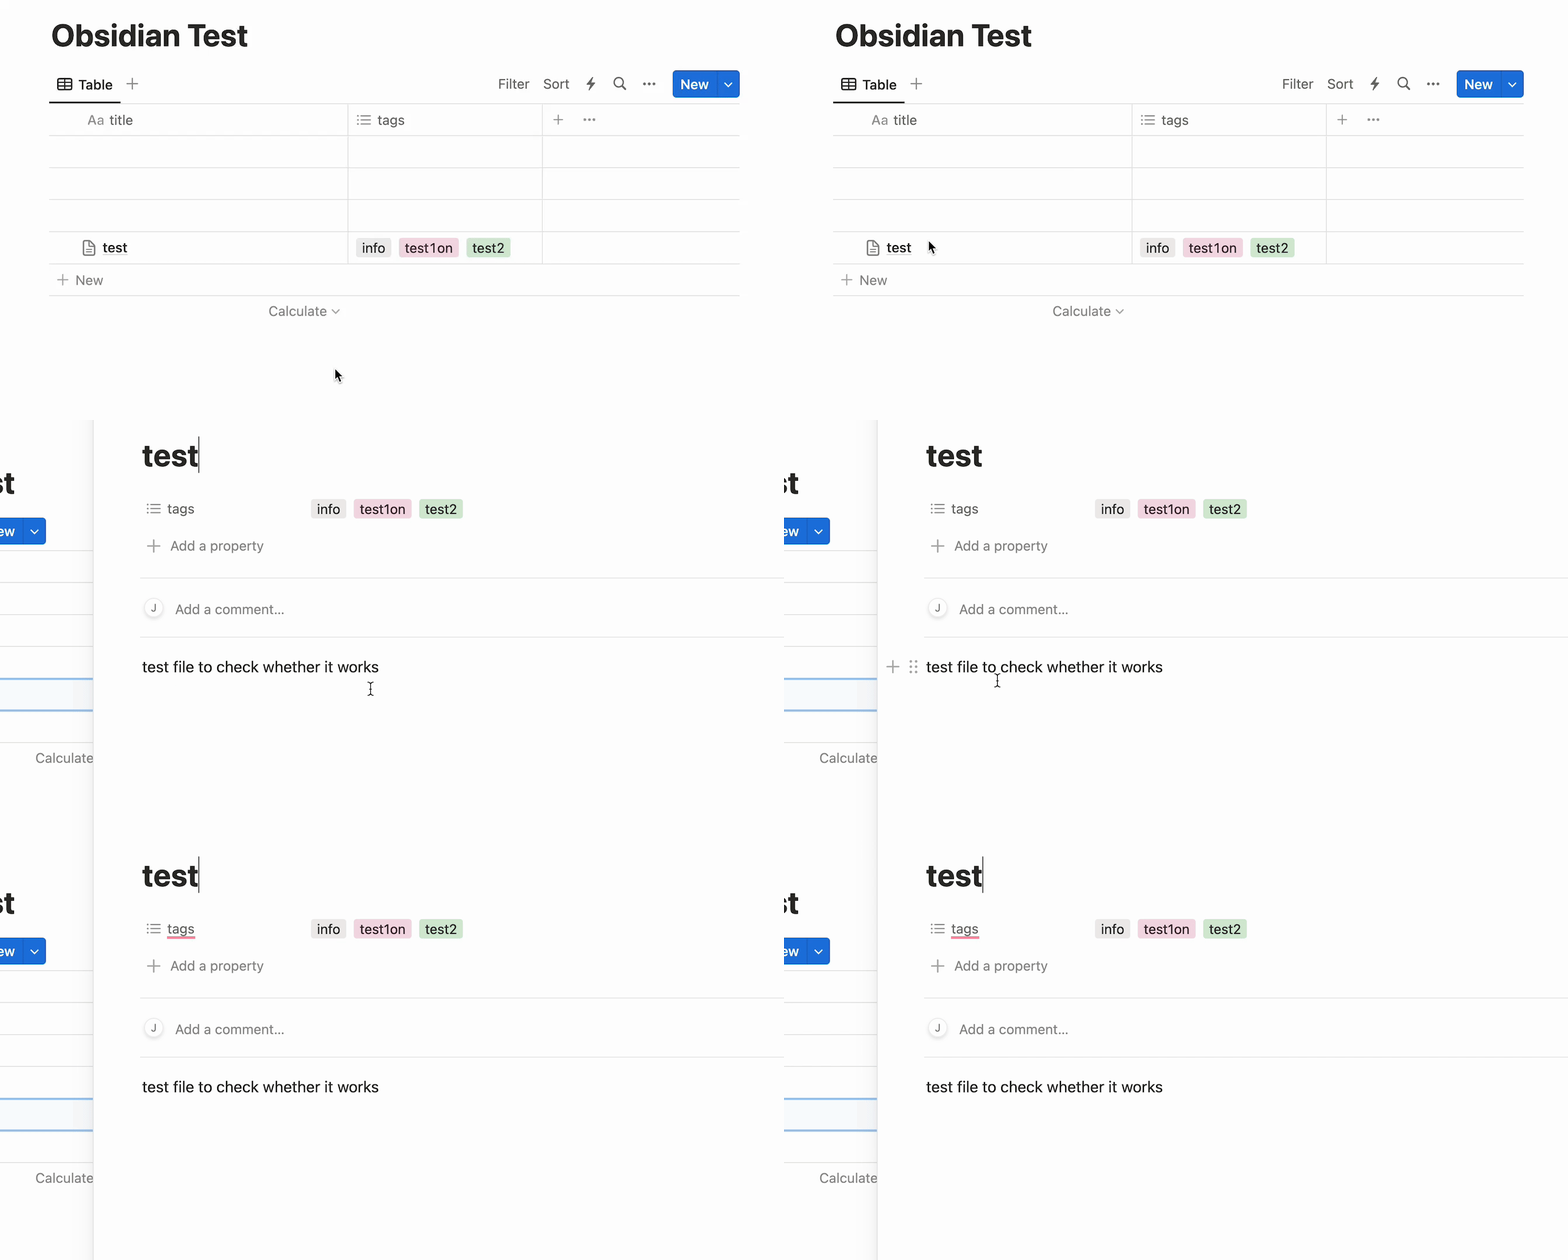
- 普通Notion数据库的同步方式和原作者的一样,只同步`title`和`tags`。**如果使用普通数据库功能,你需要保证你的数据库中有`title`和`tags`这两个表头。必须使用小写。**
|
||||
|
||||

|
||||
|
||||
|
||||

|
||||
|
||||
|
||||
### 0.2.1
|
||||
|
||||
@@ -181,10 +181,10 @@ Contents Below
|
||||
```
|
||||
|
||||
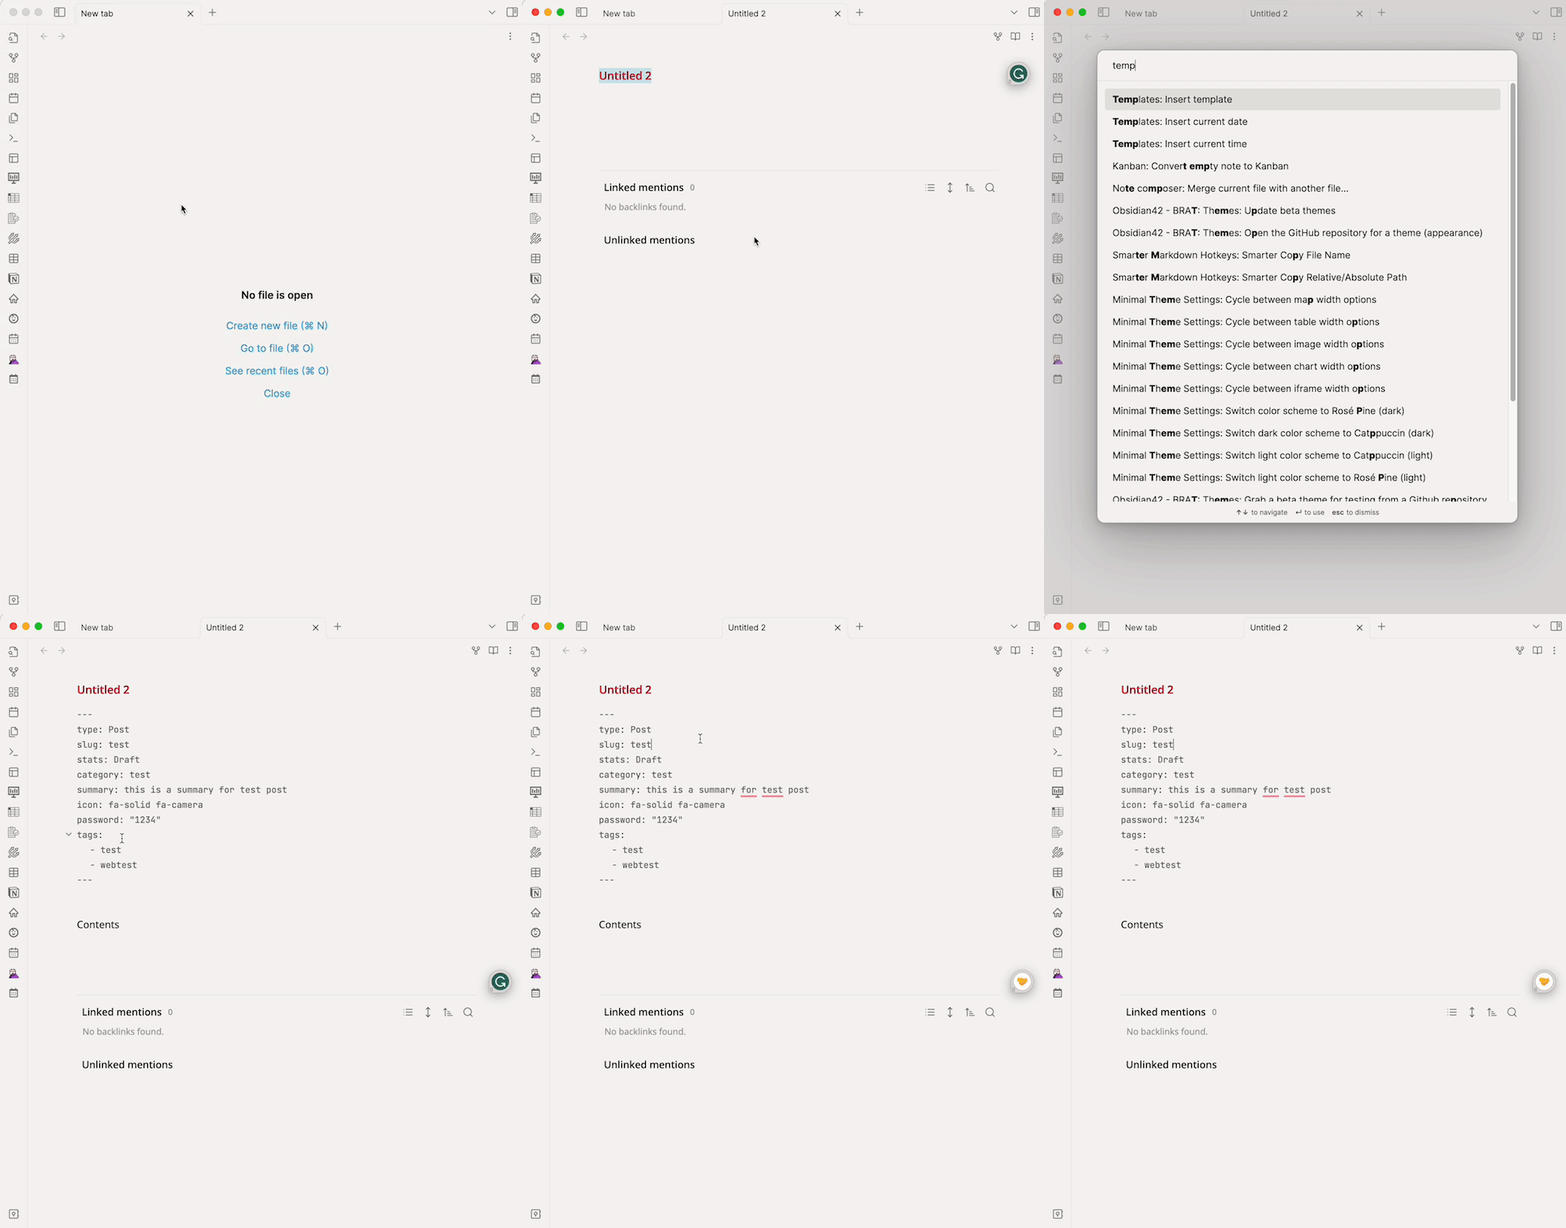
模板使用如下:
|
||||

|
||||
|
||||
|
||||
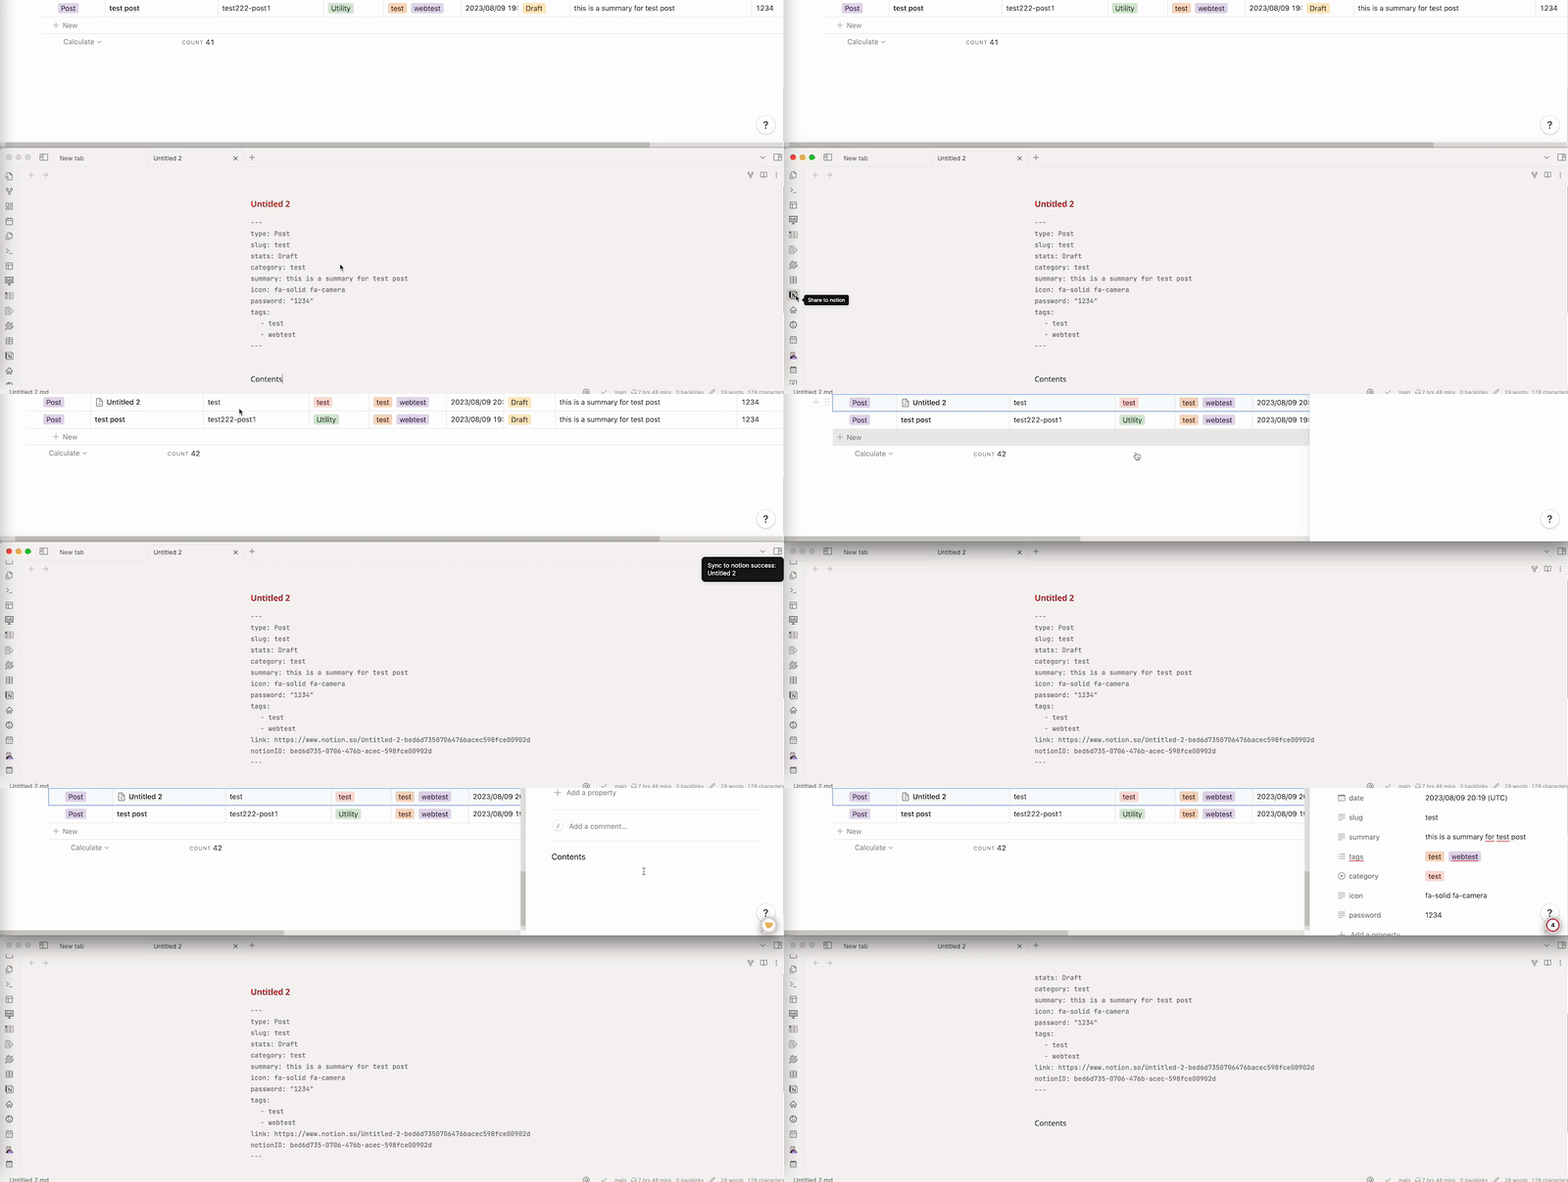
**插件预览如下**
|
||||

|
||||
|
||||
|
||||
---
|
||||
|
||||
|
||||
48
README.md
48
README.md
@@ -40,38 +40,38 @@ If you want to use this plugin, you need to follow the following steps to set up
|
||||
|
||||
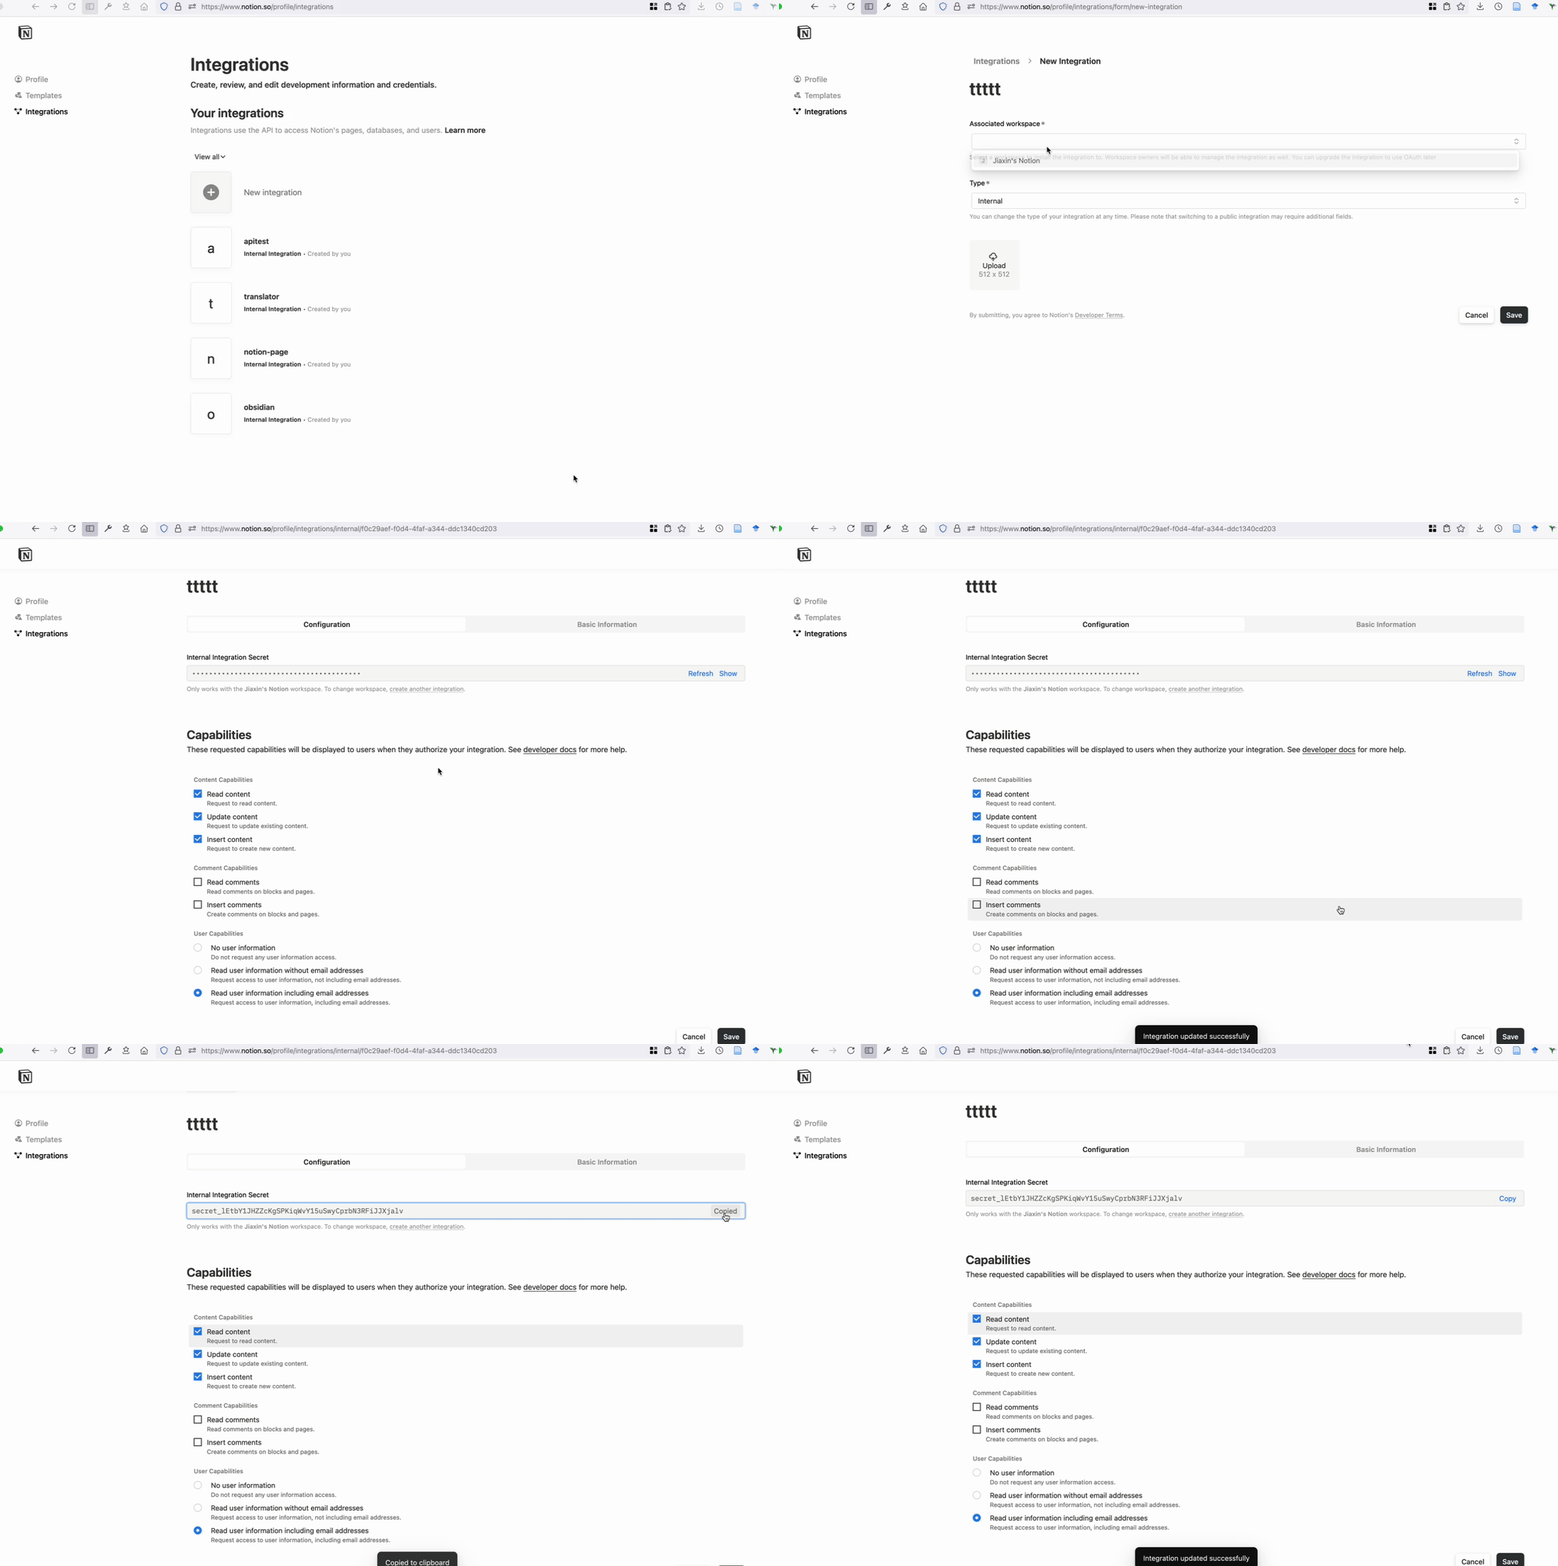
1). Go to [Notion API](https://www.notion.com/my-integrations) to create a new integration, and **copy the token**.
|
||||
|
||||

|
||||
|
||||
|
||||
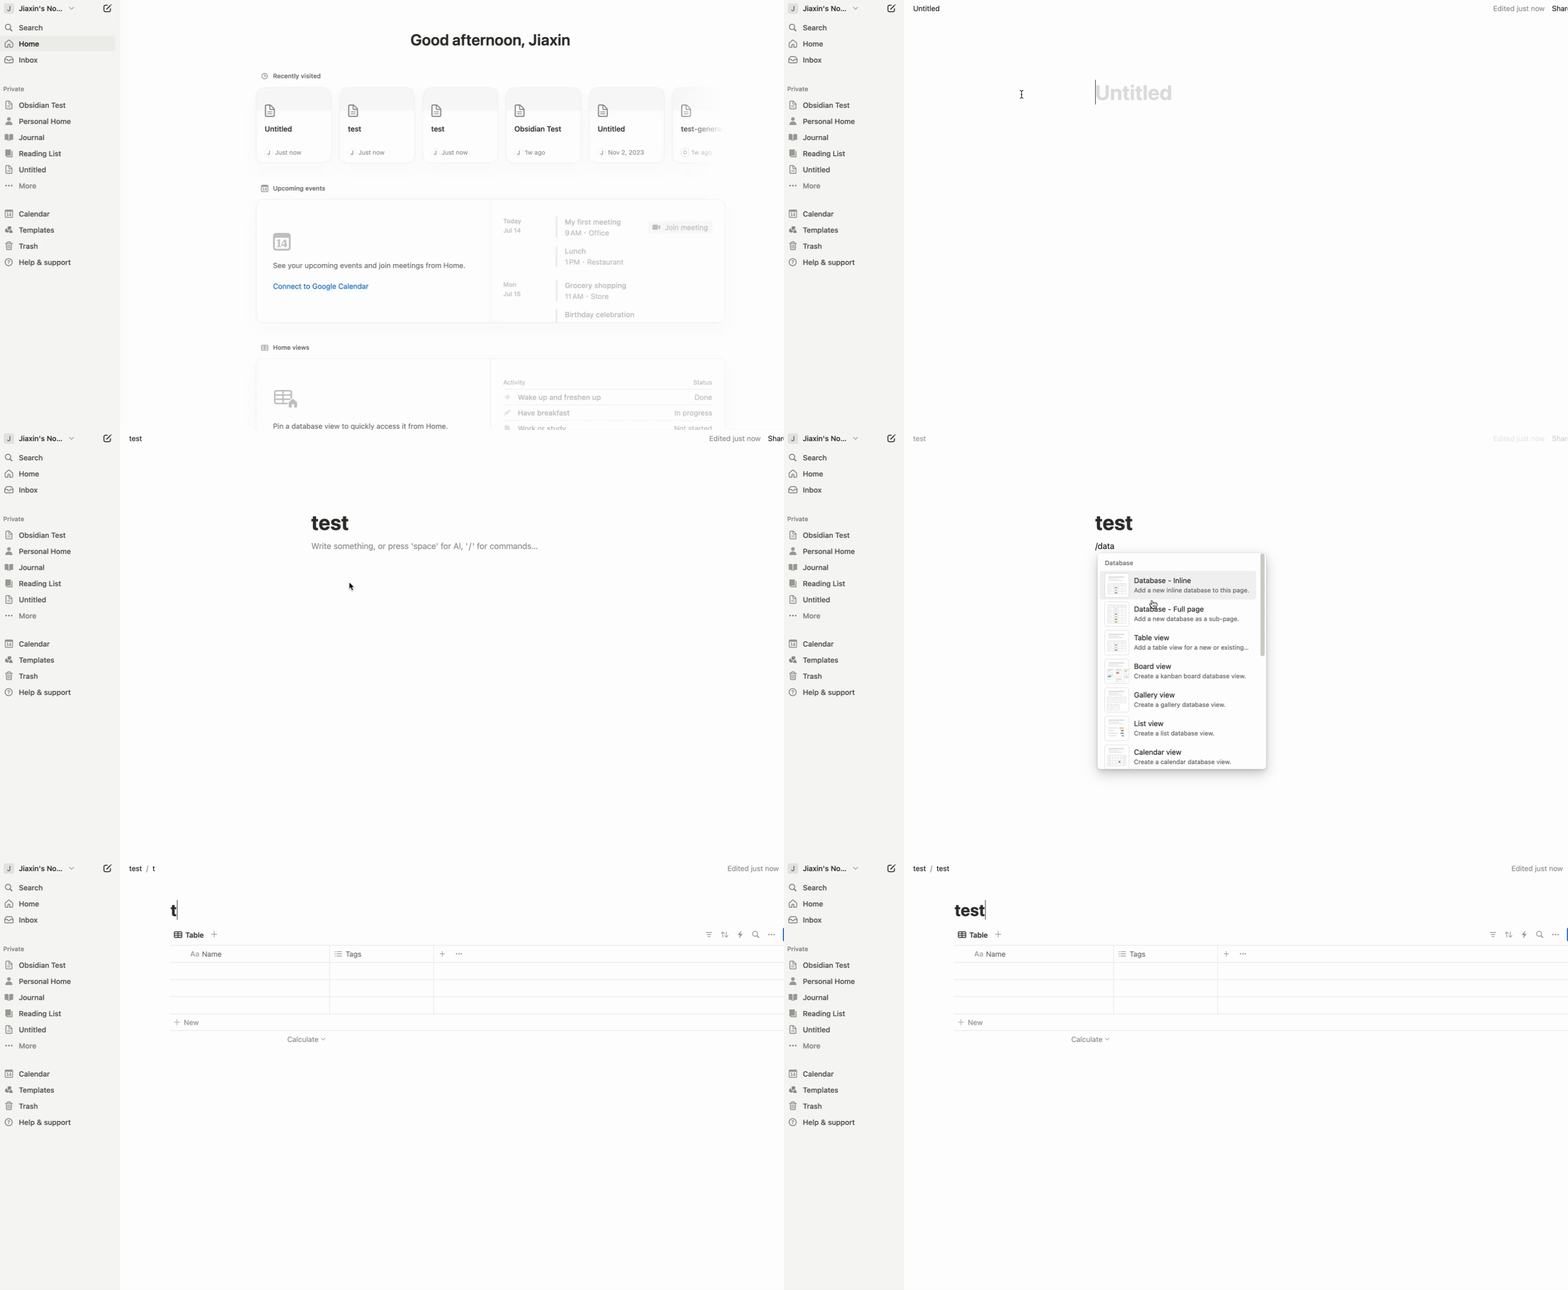
2). Create a database in your Notion workspace.
|
||||
|
||||
Open Notion, click top-left `Create` a new page` -> You can give a title for the page and press "/" Select 'Database - Full page'.
|
||||
|
||||

|
||||
|
||||
|
||||
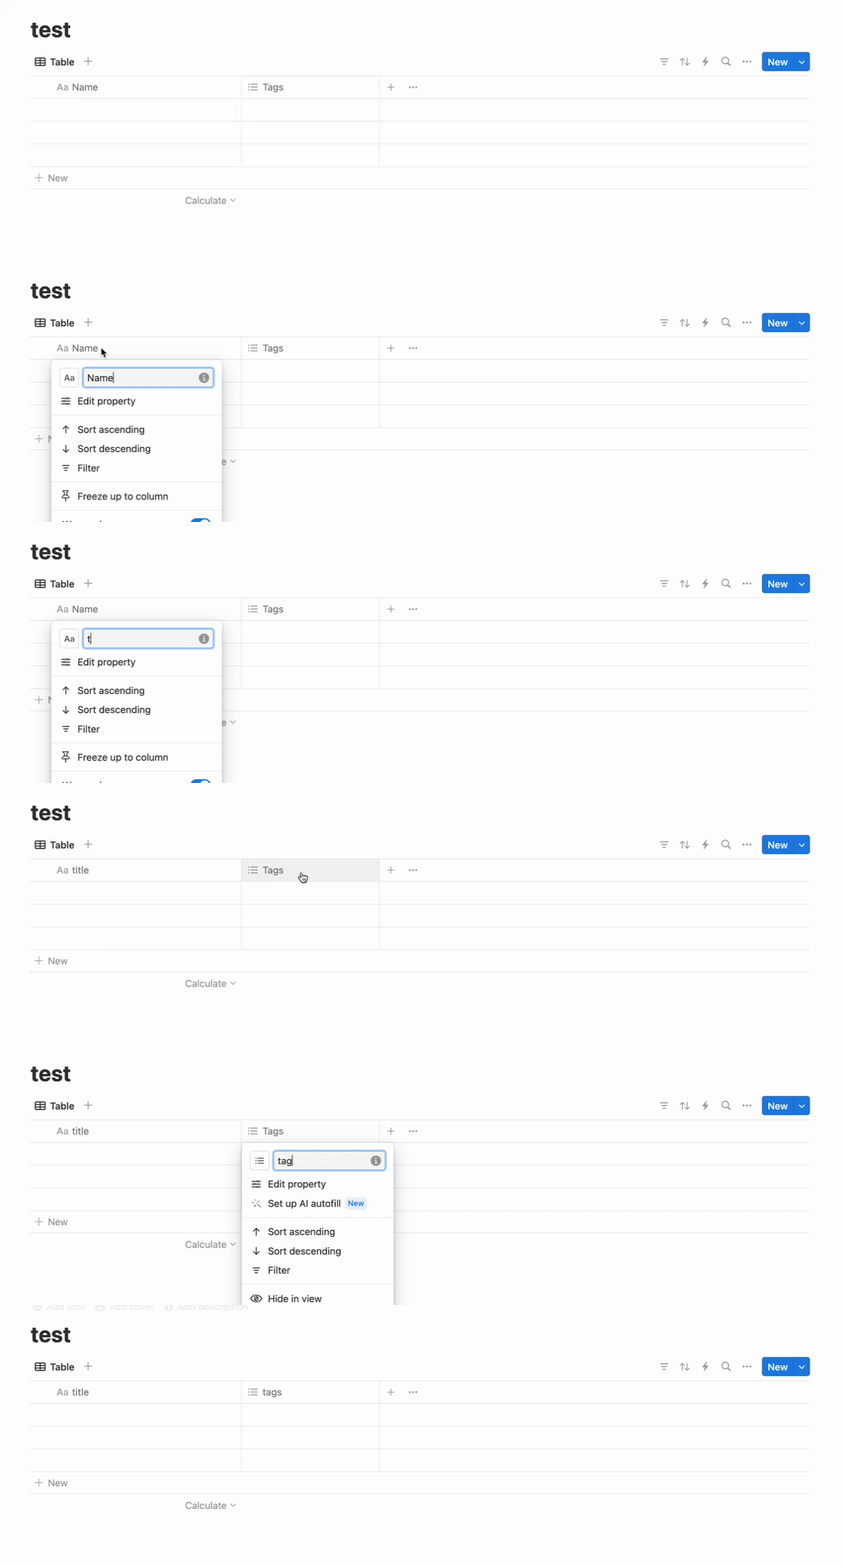
Rename the database properties to `title` and `tags`.
|
||||
**⚠️⚠️`title` is the title column! `tags` is lower case⚠️⚠️**
|
||||
|
||||

|
||||
|
||||
|
||||
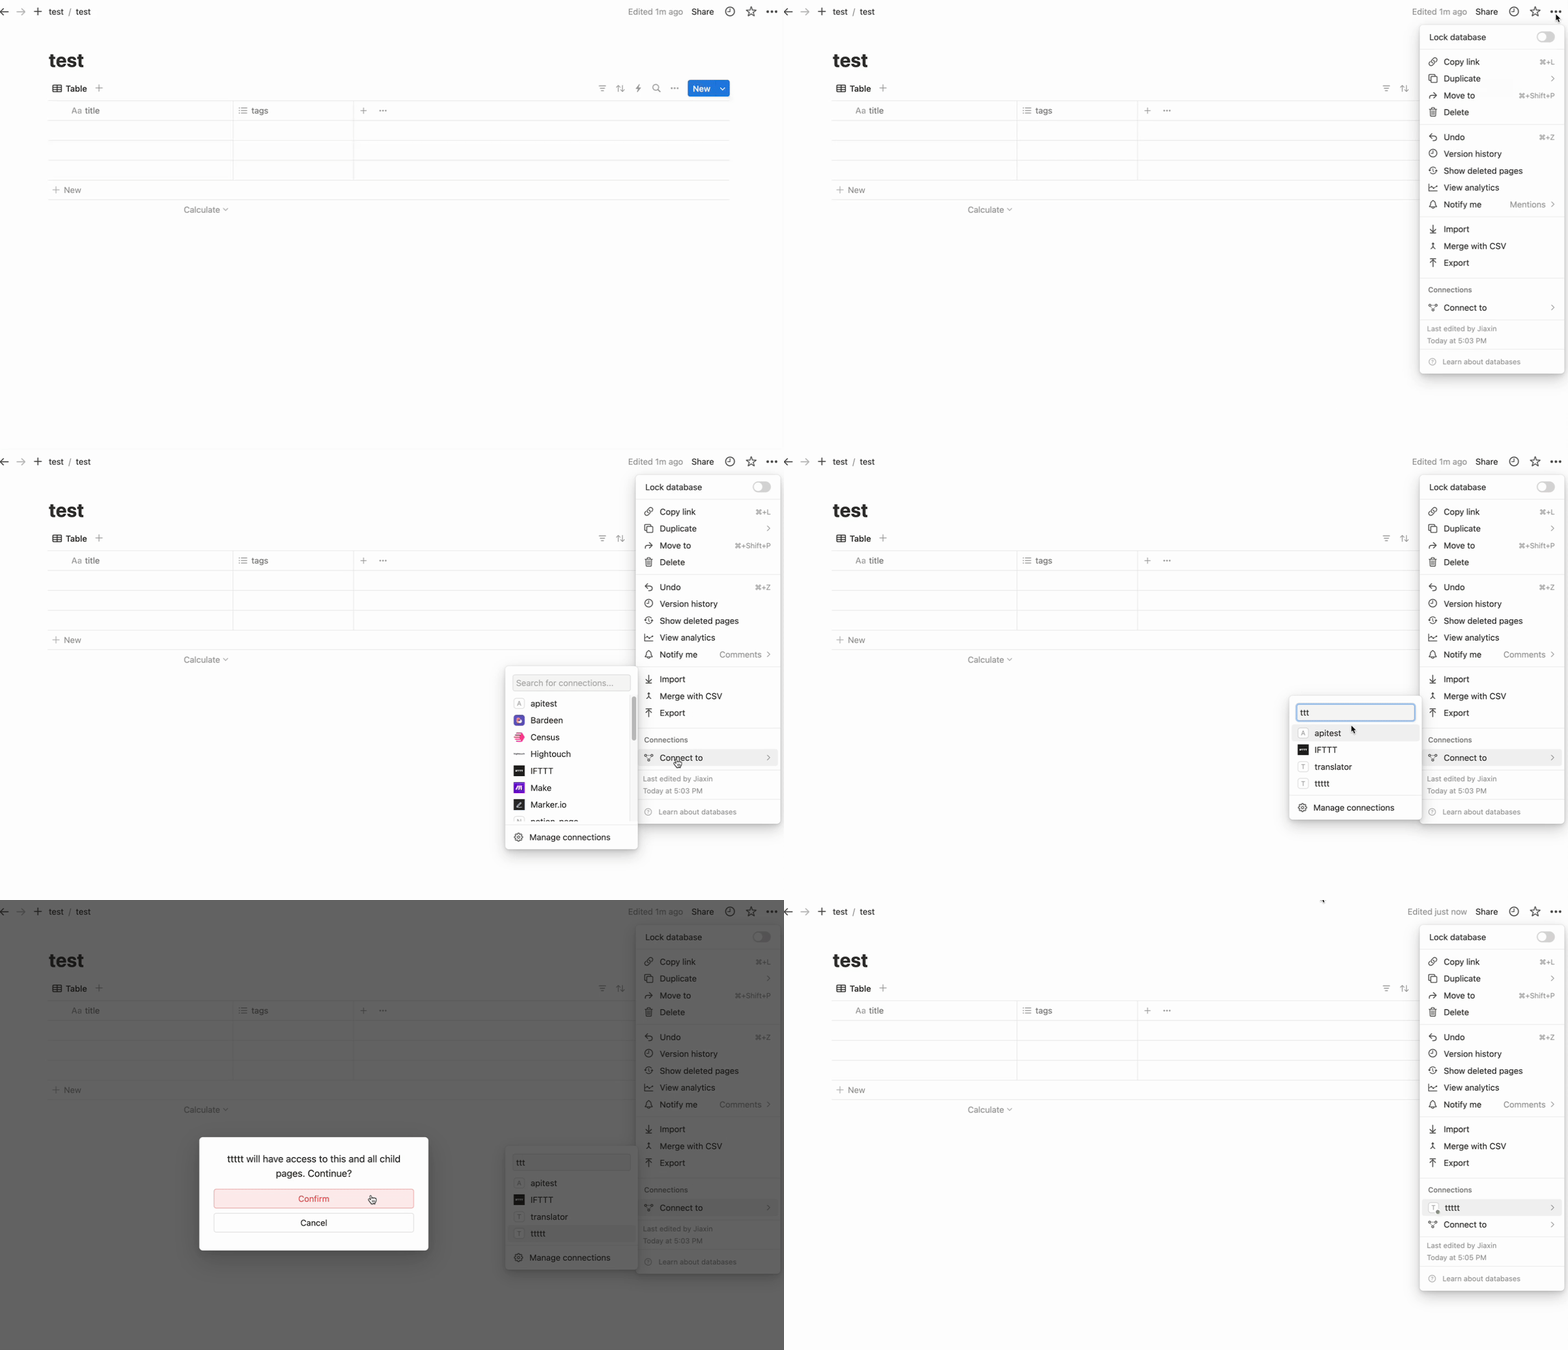
3). Add the Notion API integration.
|
||||
|
||||
Click the right-top '...' -> connections -> connect to -> find the integration you created and connect it.
|
||||
|
||||

|
||||
|
||||
|
||||
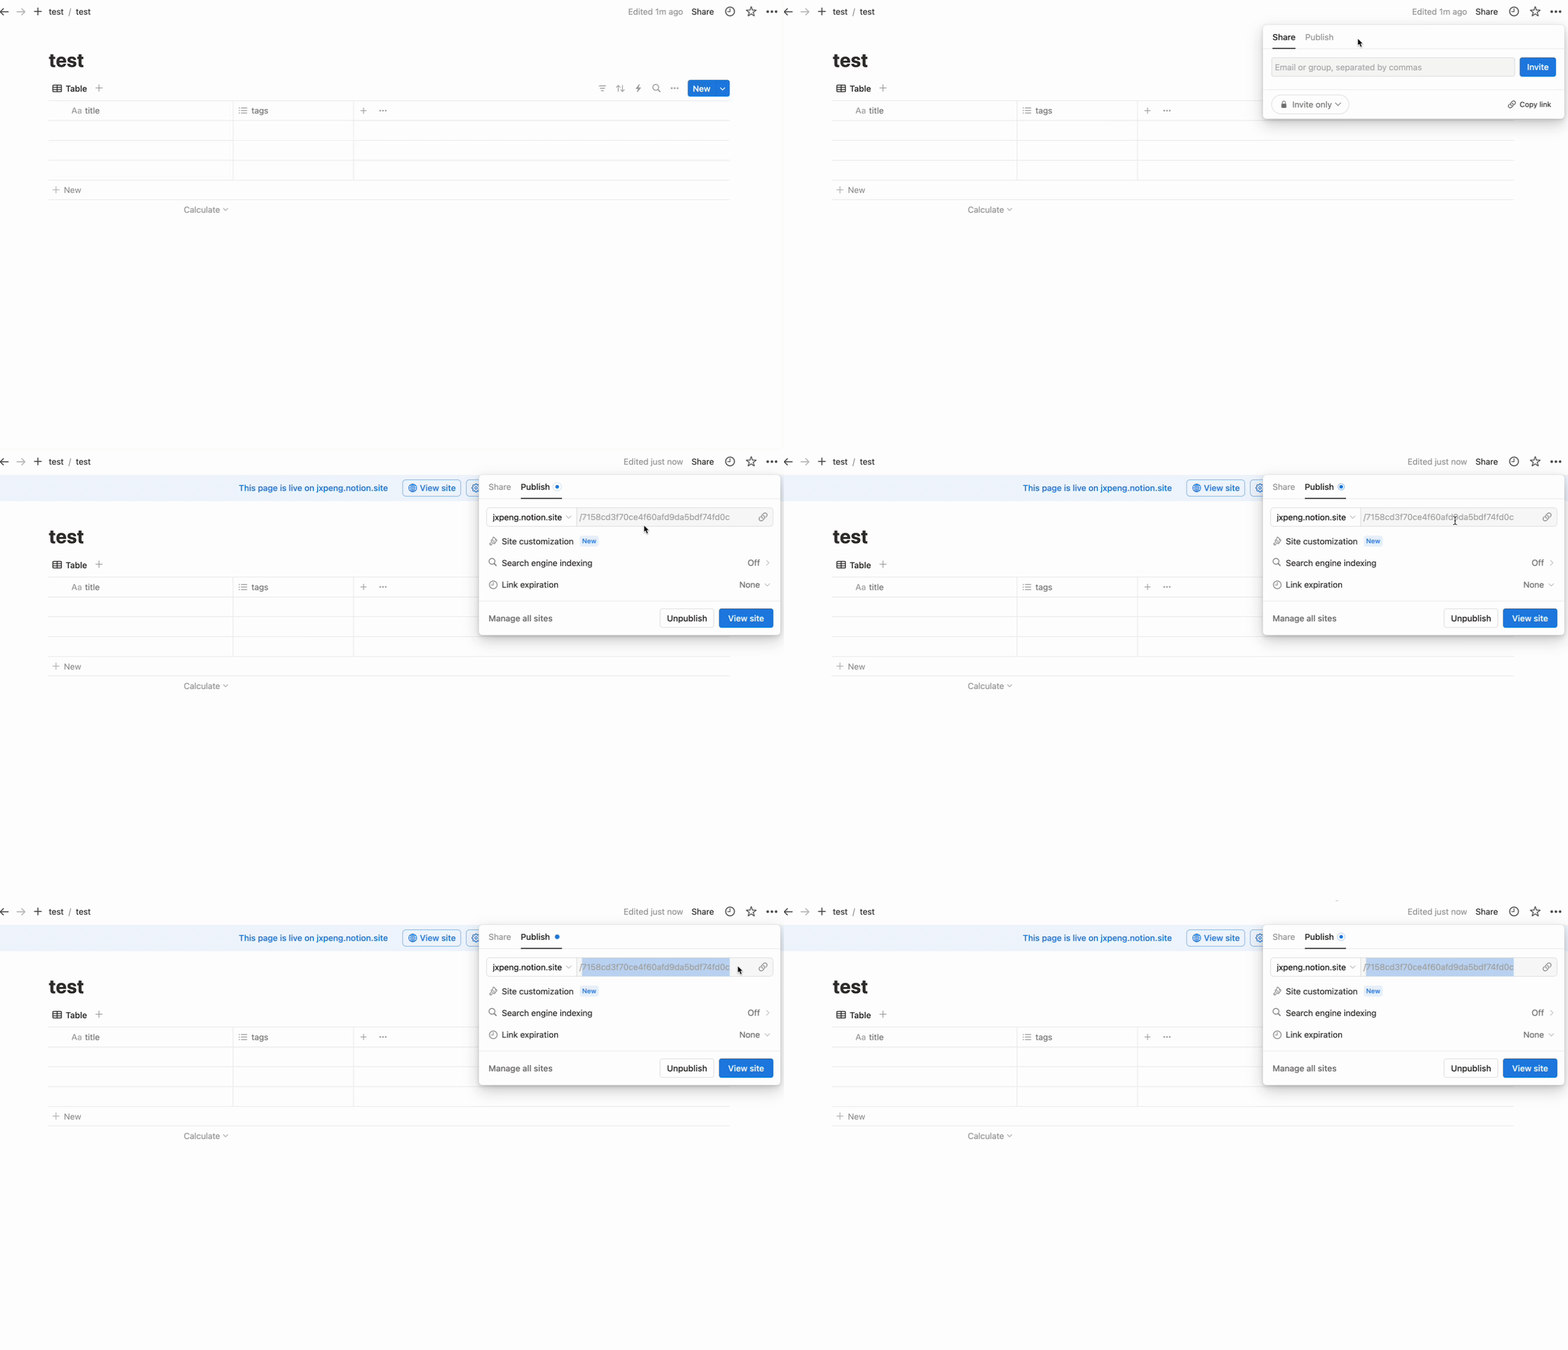
4). Publish the database to the public.
|
||||
Click the 'Share' -> 'Publish' -> 'Publish' -> **copy the database id from the URL**.
|
||||
|
||||

|
||||
|
||||
|
||||
### 2. Setting up the plugin in Obsidian
|
||||
|
||||
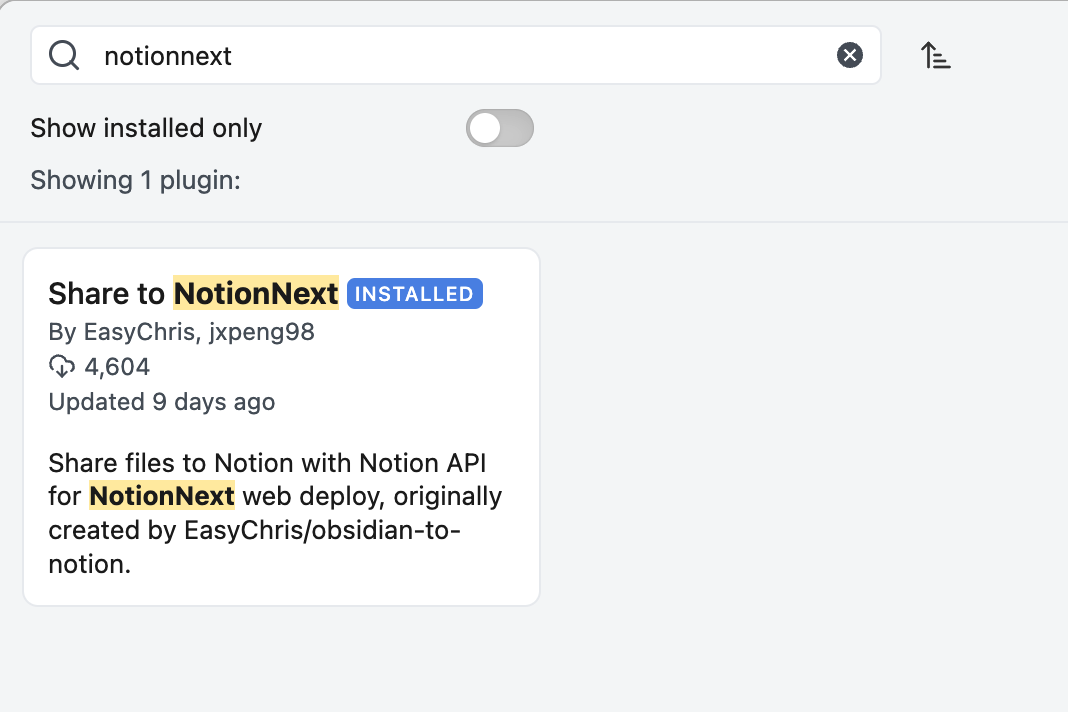
1). Go to Obsidian settings -> community plugins -> search 'NotionNext' -> install it.
|
||||

|
||||
|
||||
|
||||
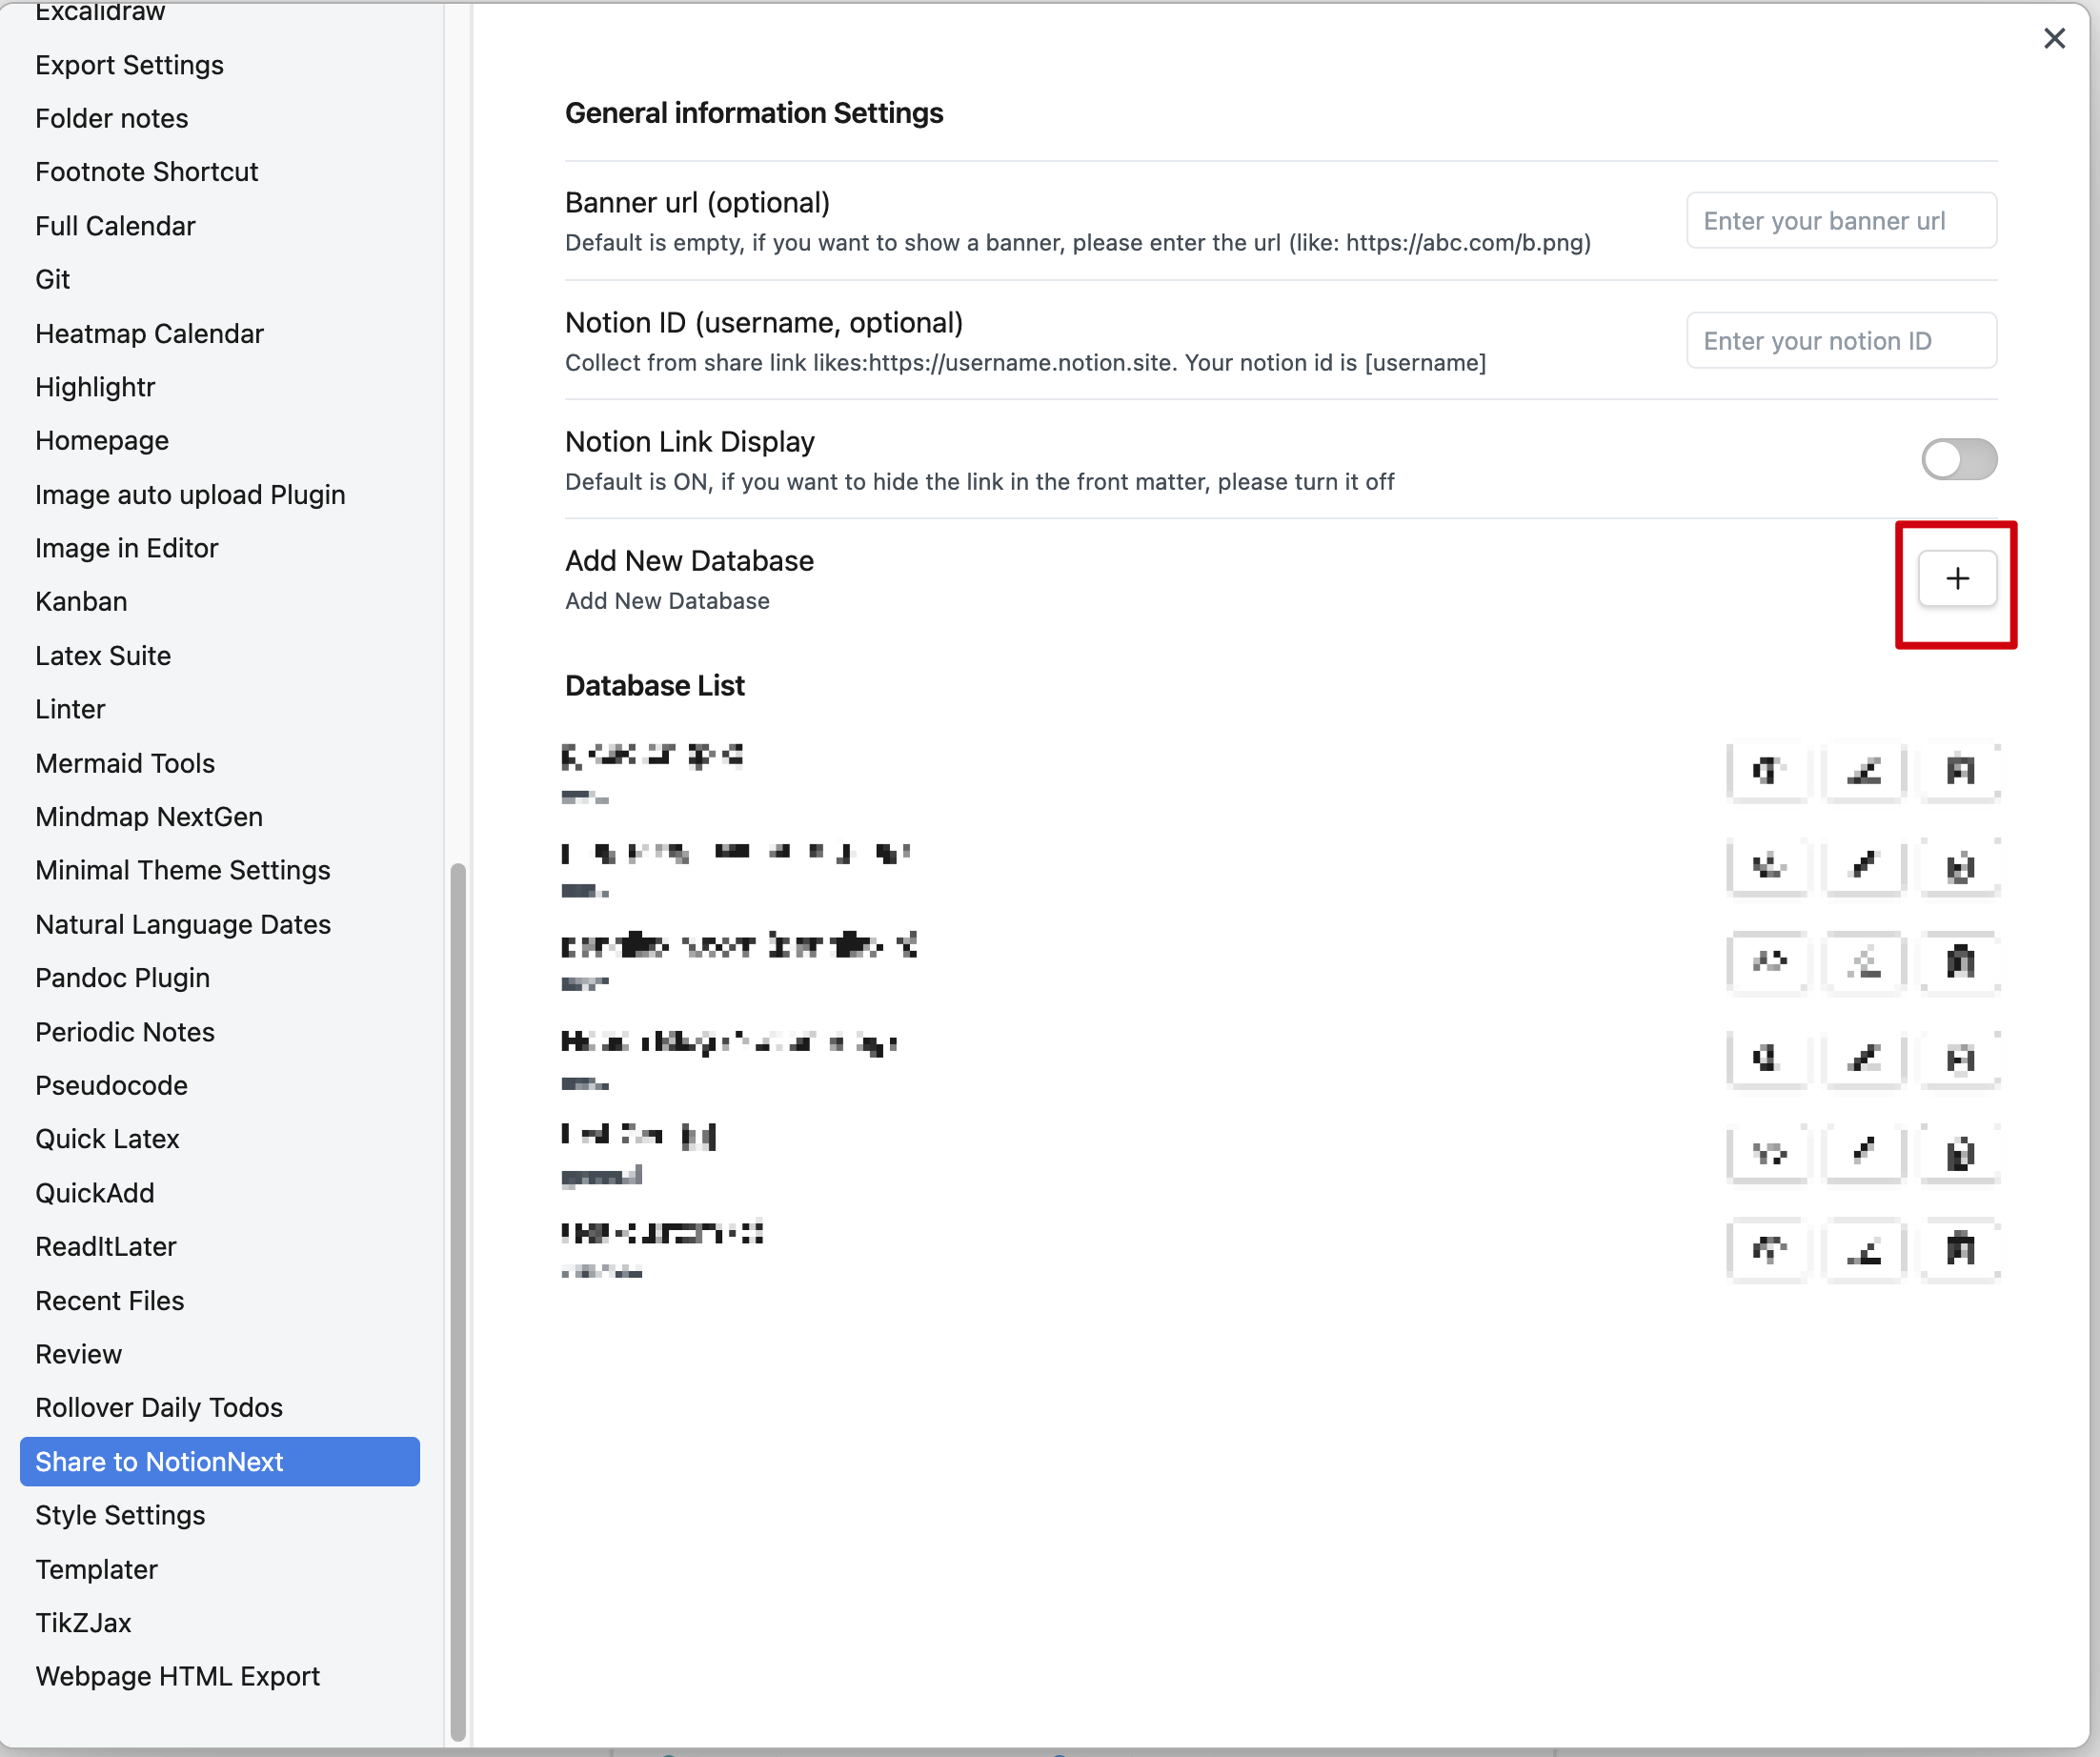
2). Open the plugin settings and create a new database.
|
||||
|
||||

|
||||
|
||||
|
||||
### 3. Create a database
|
||||
|
||||
@@ -81,7 +81,7 @@ Click the 'Share' -> 'Publish' -> 'Publish' -> **copy the database id from the U
|
||||
|
||||
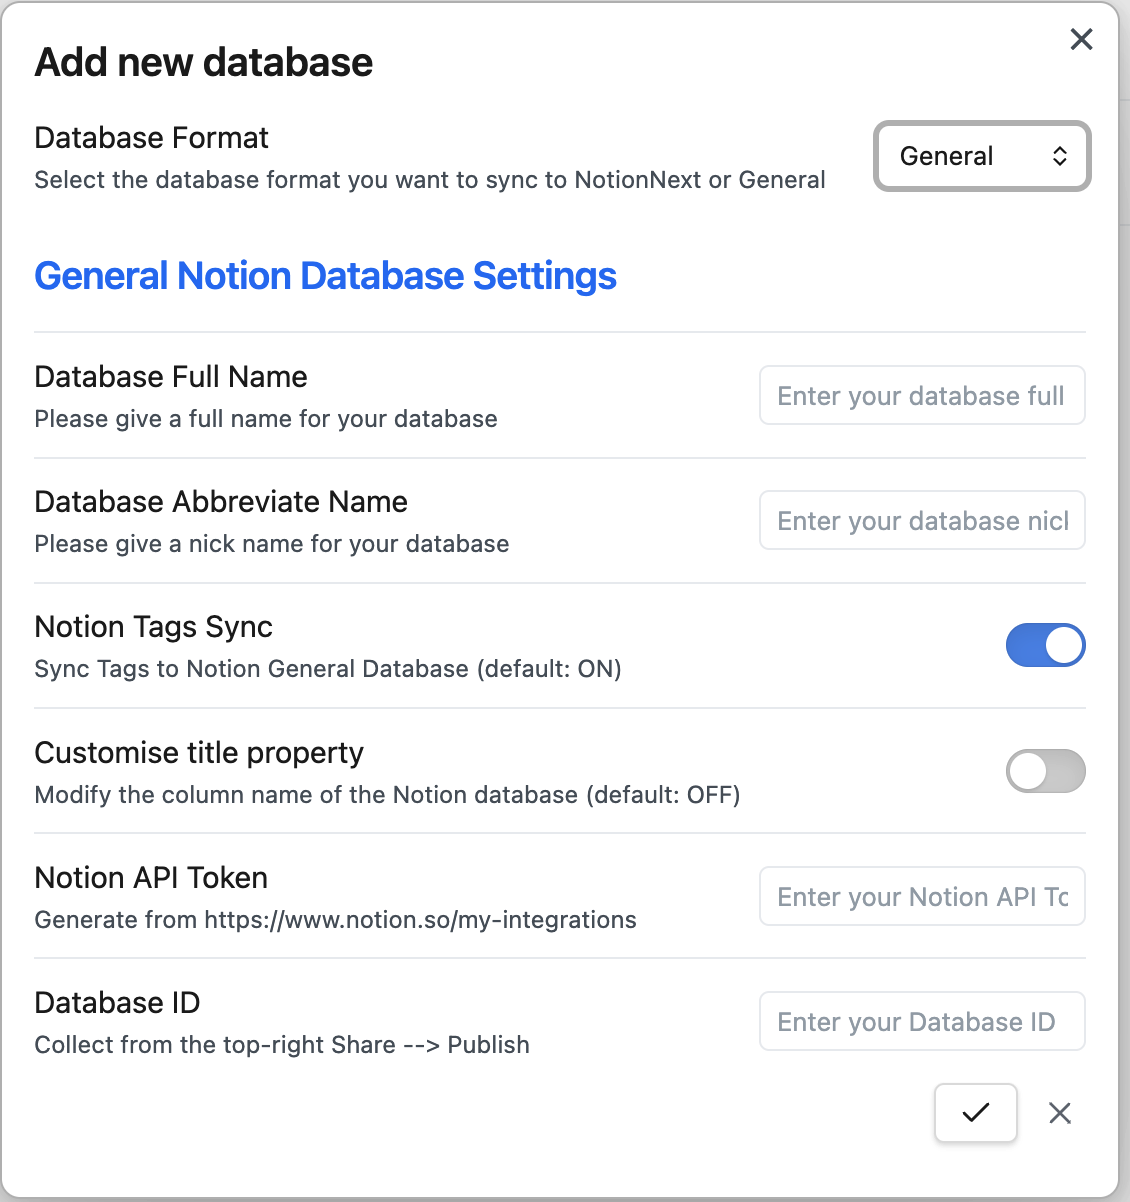
General database is the default database, which only has the `title` and `tags` columns. **⚠️⚠️`title` and `tags` are lowercase⚠️⚠️**
|
||||
|
||||

|
||||
|
||||
|
||||
The general is as follows:
|
||||
|
||||
@@ -94,17 +94,17 @@ The general is as follows:
|
||||
|
||||
After setting, it should look like this:
|
||||
|
||||

|
||||
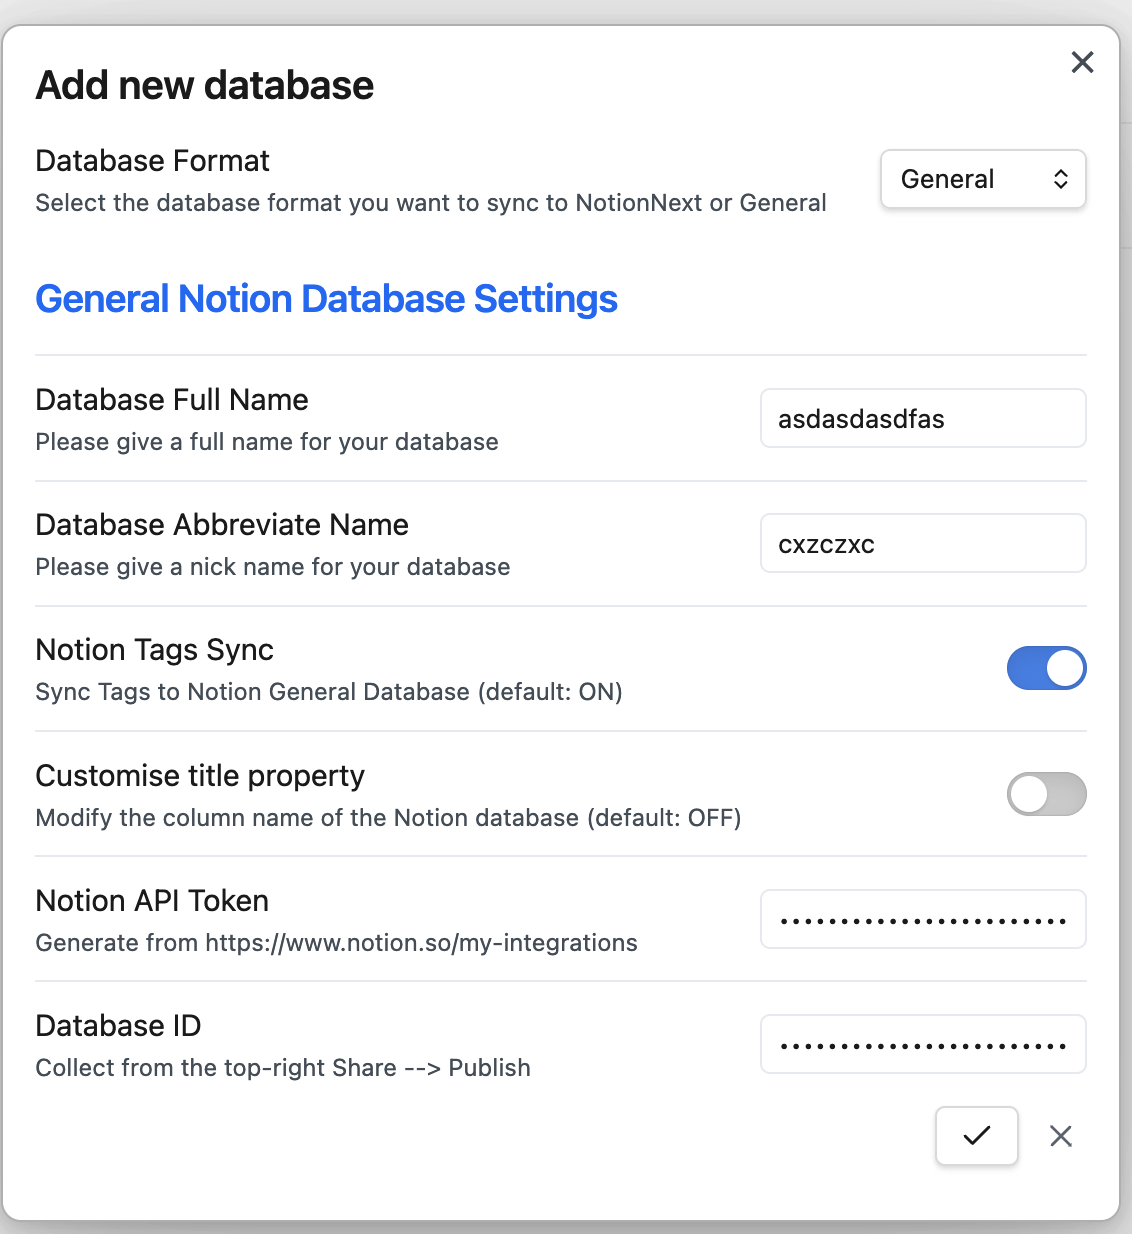
|
||||
|
||||
Once you click `save`, the new database will be created in the plugin settings and display in the detabase list.
|
||||
|
||||

|
||||

|
||||
|
||||
#### 2️⃣ NotionNext database
|
||||
|
||||
If you use [NotionNext](https://github.com/tangly1024/NotionNext) to set up your website, you can use the NotionNext database. (**All the properties are in lowercase, and you do not need to change the properties**)
|
||||
|
||||

|
||||
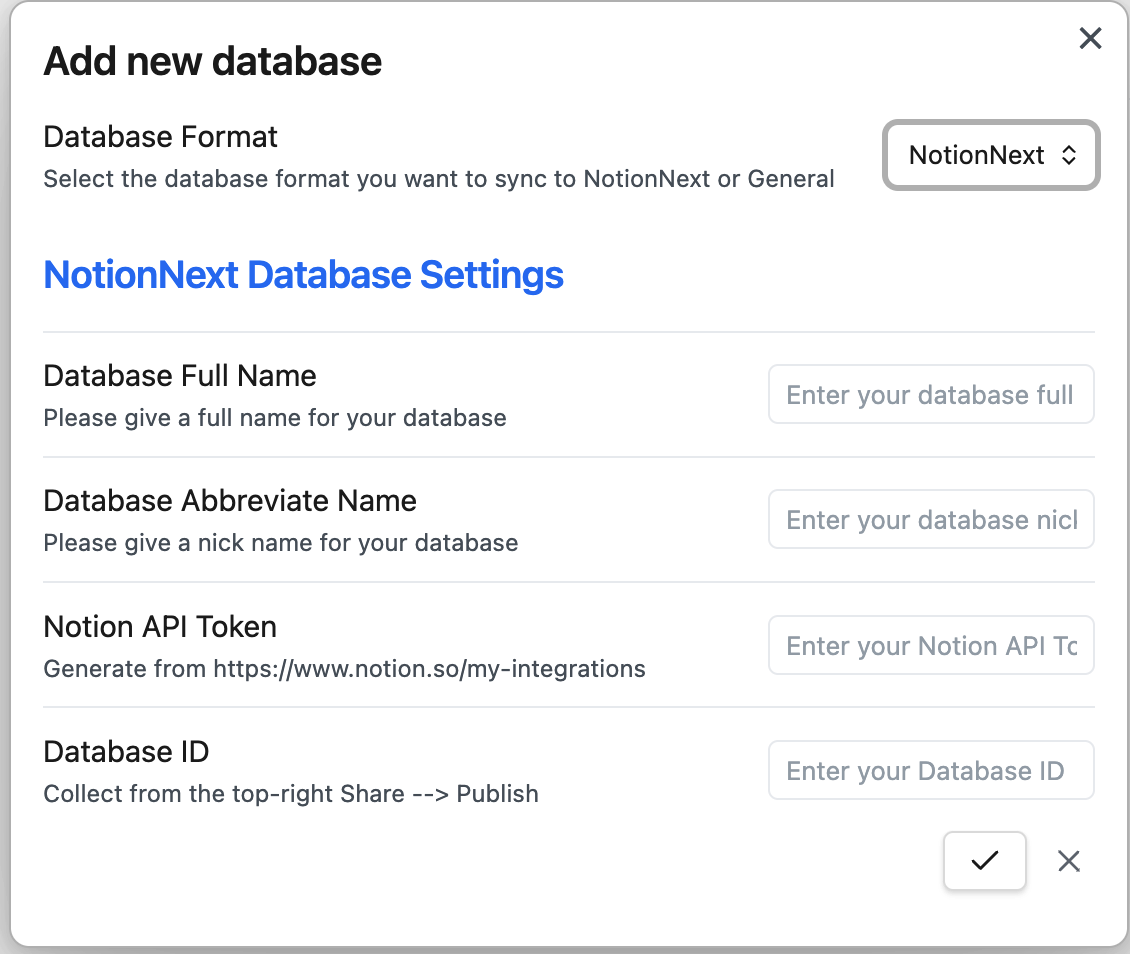
|
||||
|
||||
Like the general database, you need to fill in the following information:
|
||||
|
||||
@@ -117,7 +117,7 @@ Like the general database, you need to fill in the following information:
|
||||
|
||||
The custom database is purely customised, and you can customise the properties you want to sync. (**All the properties are in lowercase, and you do not need to change the properties**)
|
||||
|
||||

|
||||
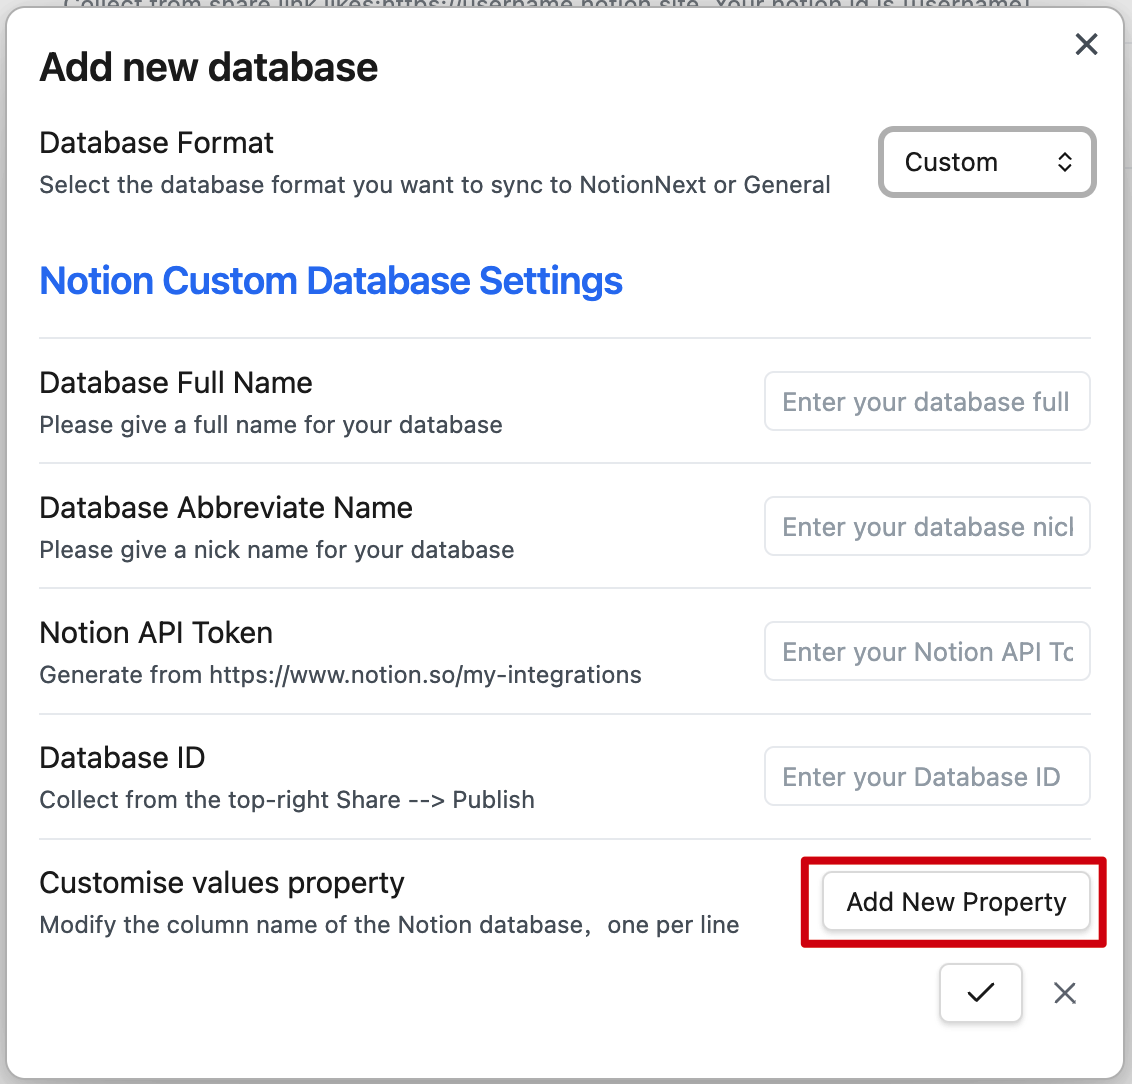
|
||||
|
||||
The basic information is identical to the general database and NotionNext database. You need to fill in the following information:
|
||||
|
||||
@@ -128,15 +128,15 @@ The basic information is identical to the general database and NotionNext databa
|
||||
|
||||
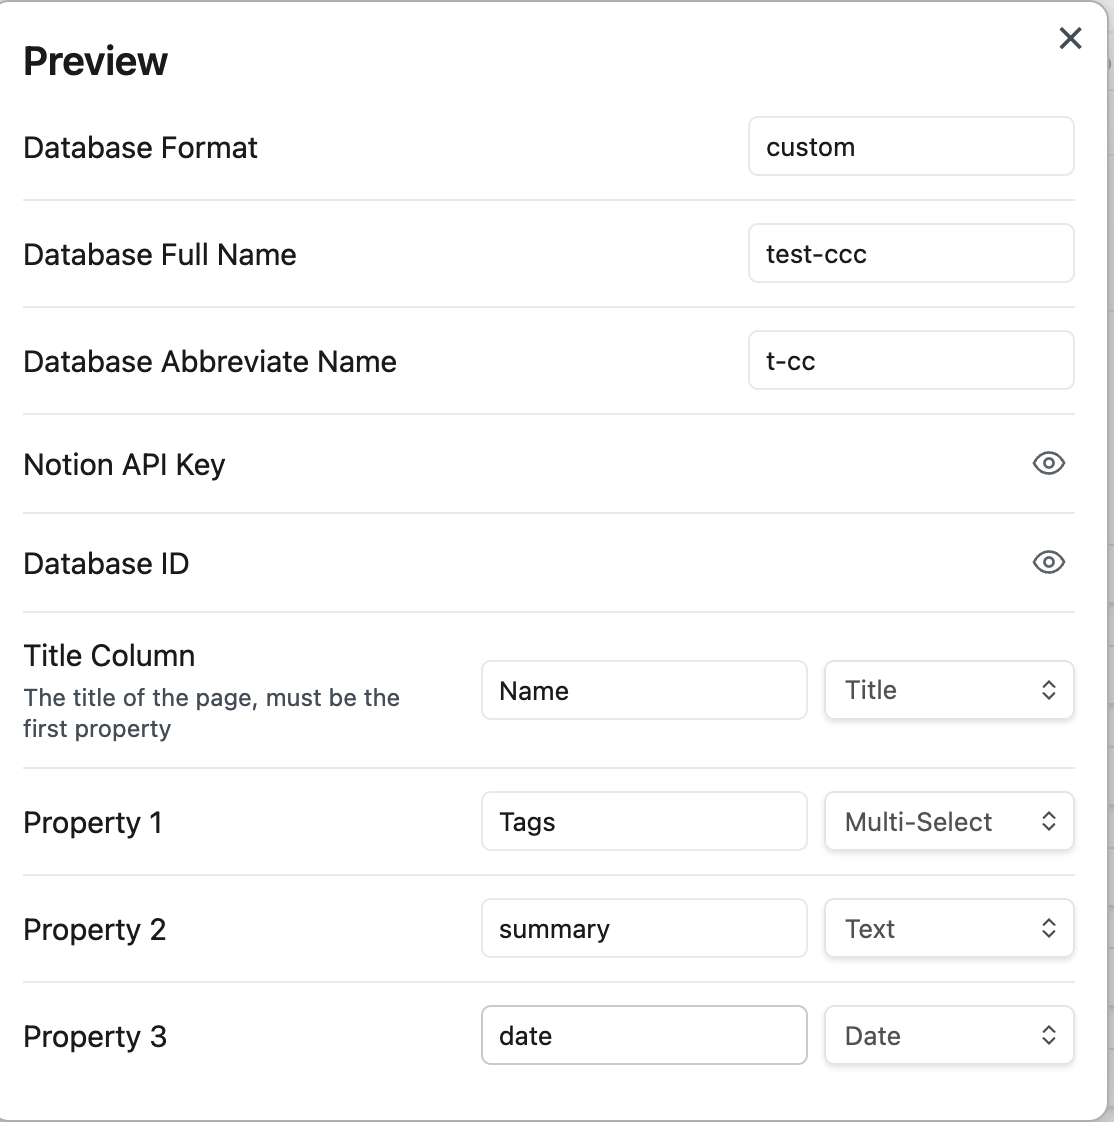
After adding the information, You can click `Add New Property` to add the properties you want to sync. There is no limit to the number of properties you can add.
|
||||
|
||||

|
||||
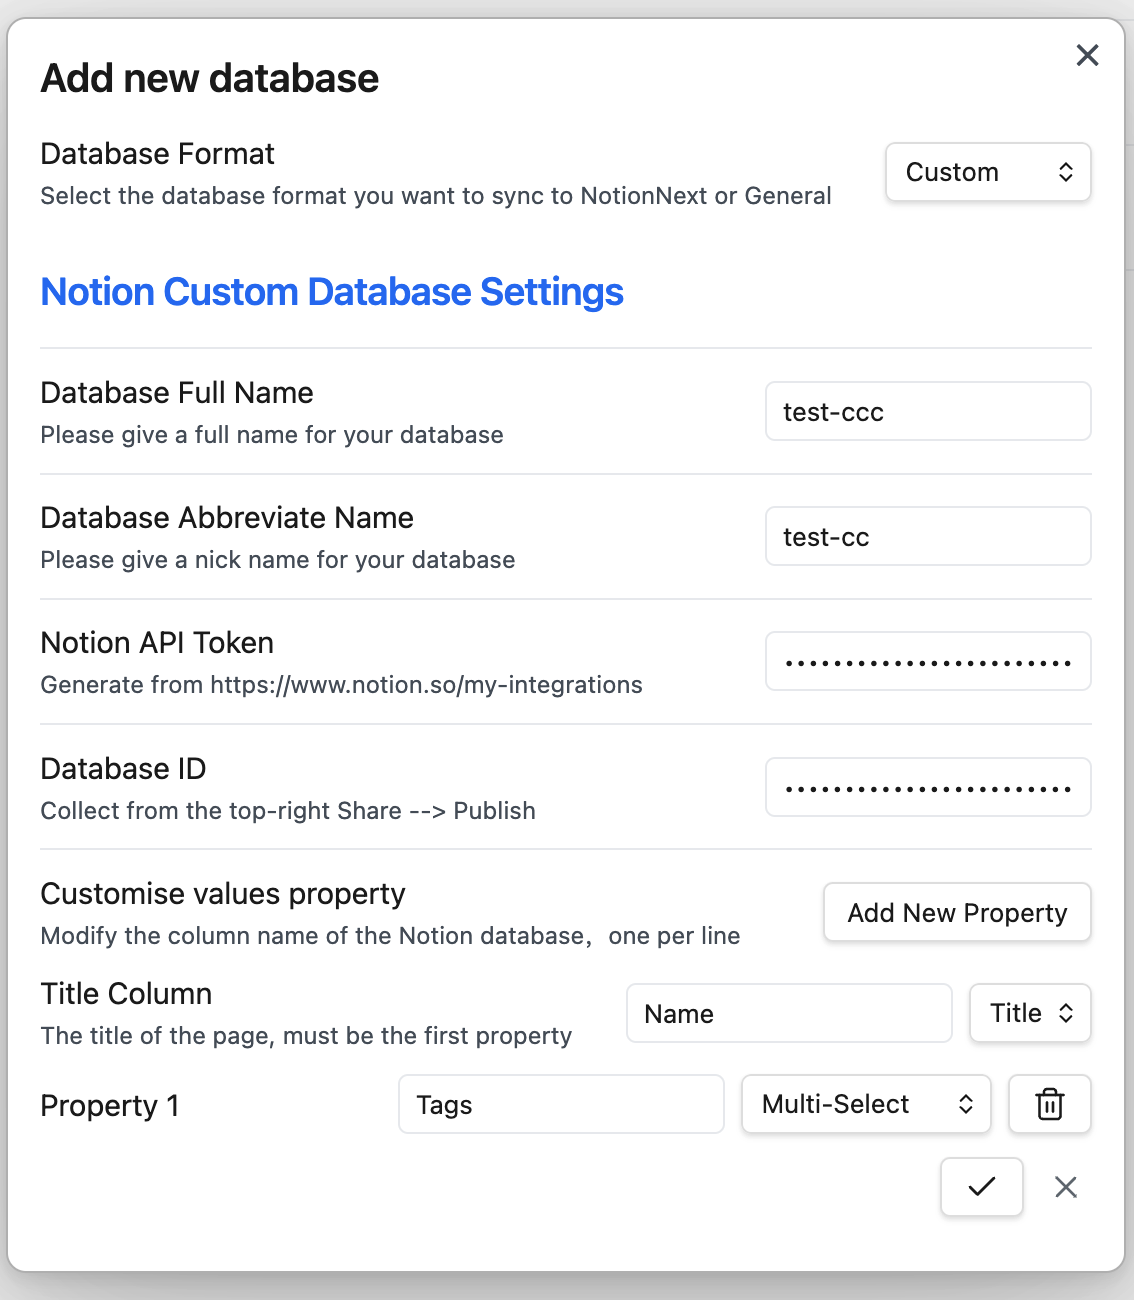
|
||||
|
||||
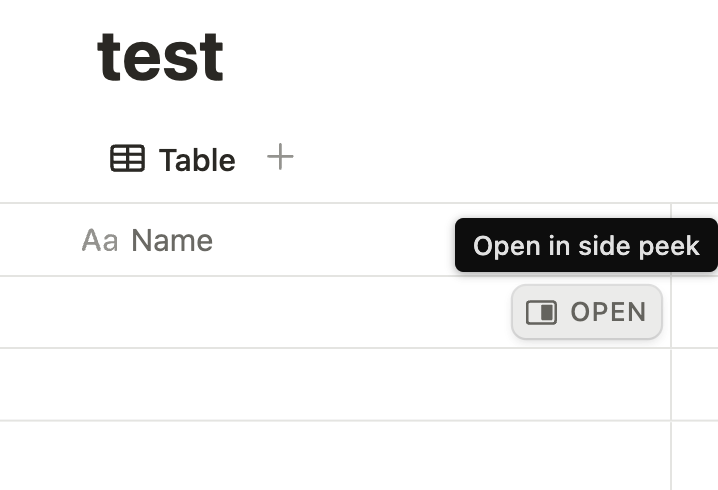
**⚠️⚠️⚠️**: **`Title column` is the main property in the Notion database, which has the open button to open the underlying page.** You can select the type of all other properties. **⚠️⚠️⚠️**
|
||||
|
||||

|
||||
|
||||
|
||||
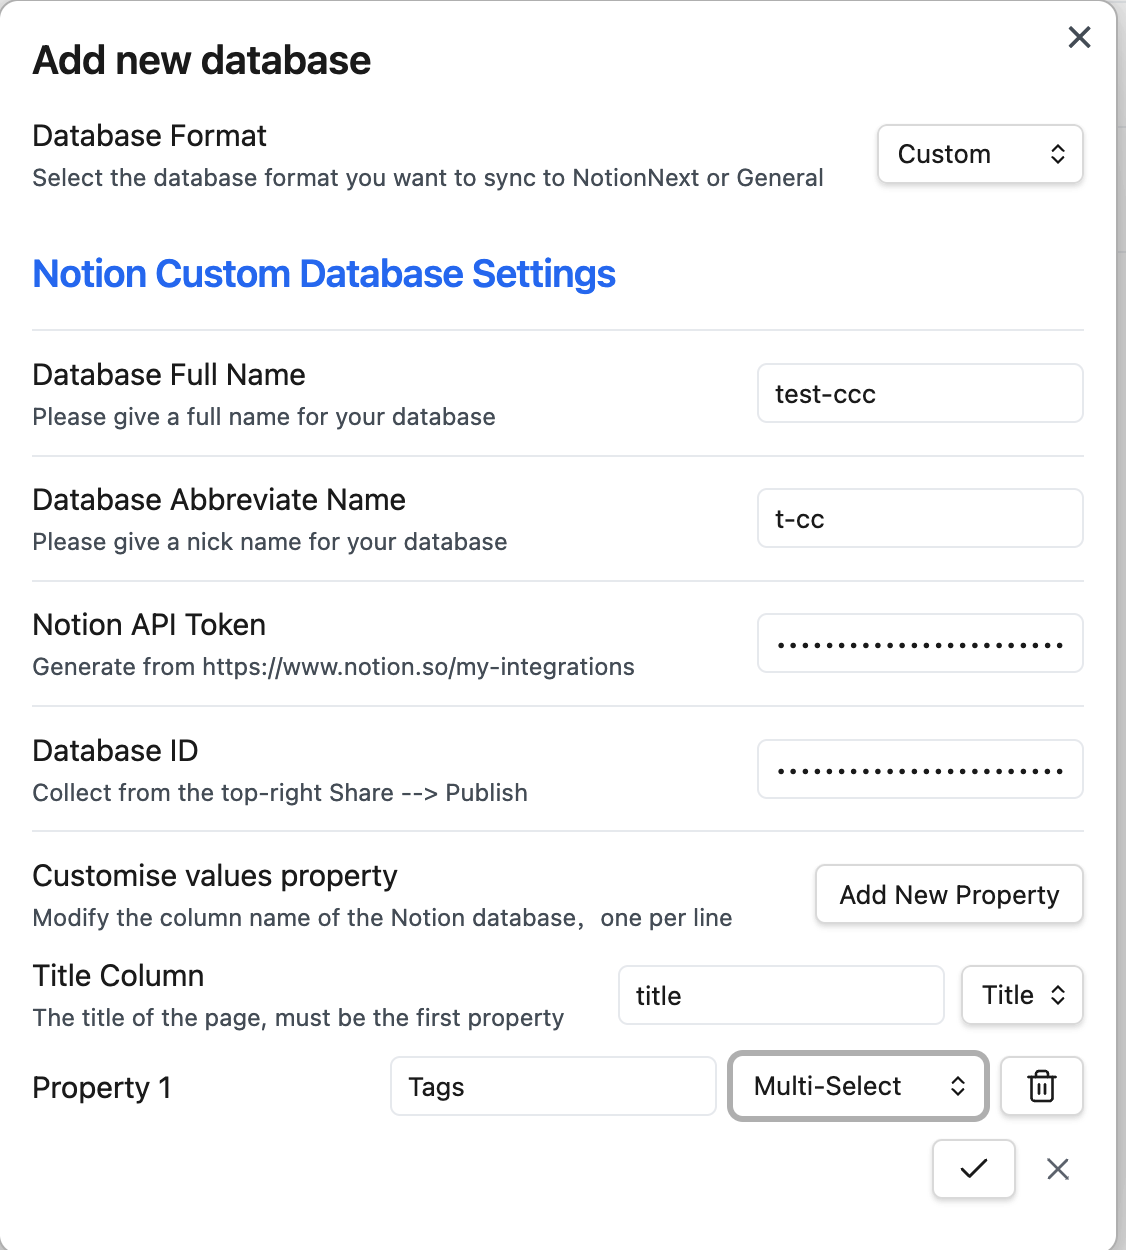
According to the previously shown database, you can use `title` as the `Title column`, and `Tags` as the property 1.
|
||||
|
||||

|
||||
|
||||
|
||||
**Until now, you have set up the plugin in Obsidian. You can start syncing your notes to Notion.**
|
||||
|
||||
@@ -160,7 +160,7 @@ This is a test file.
|
||||
|
||||
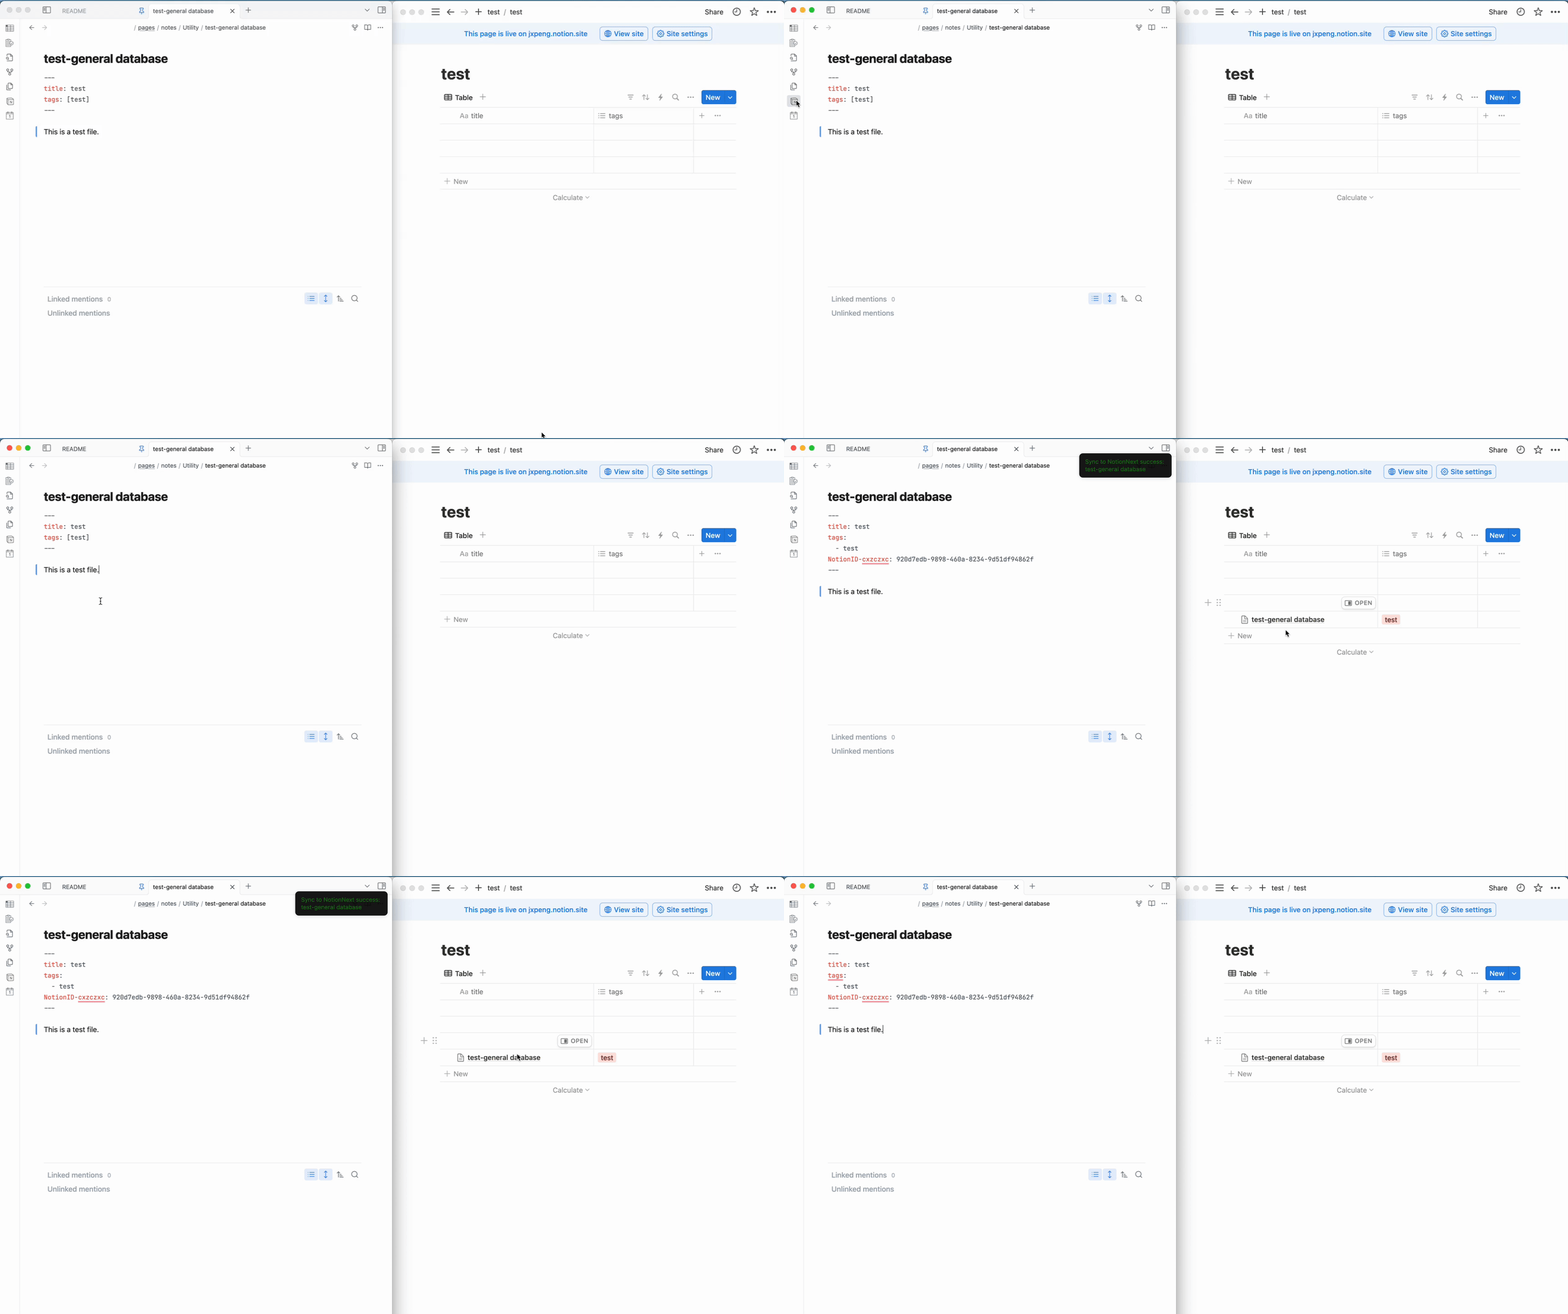
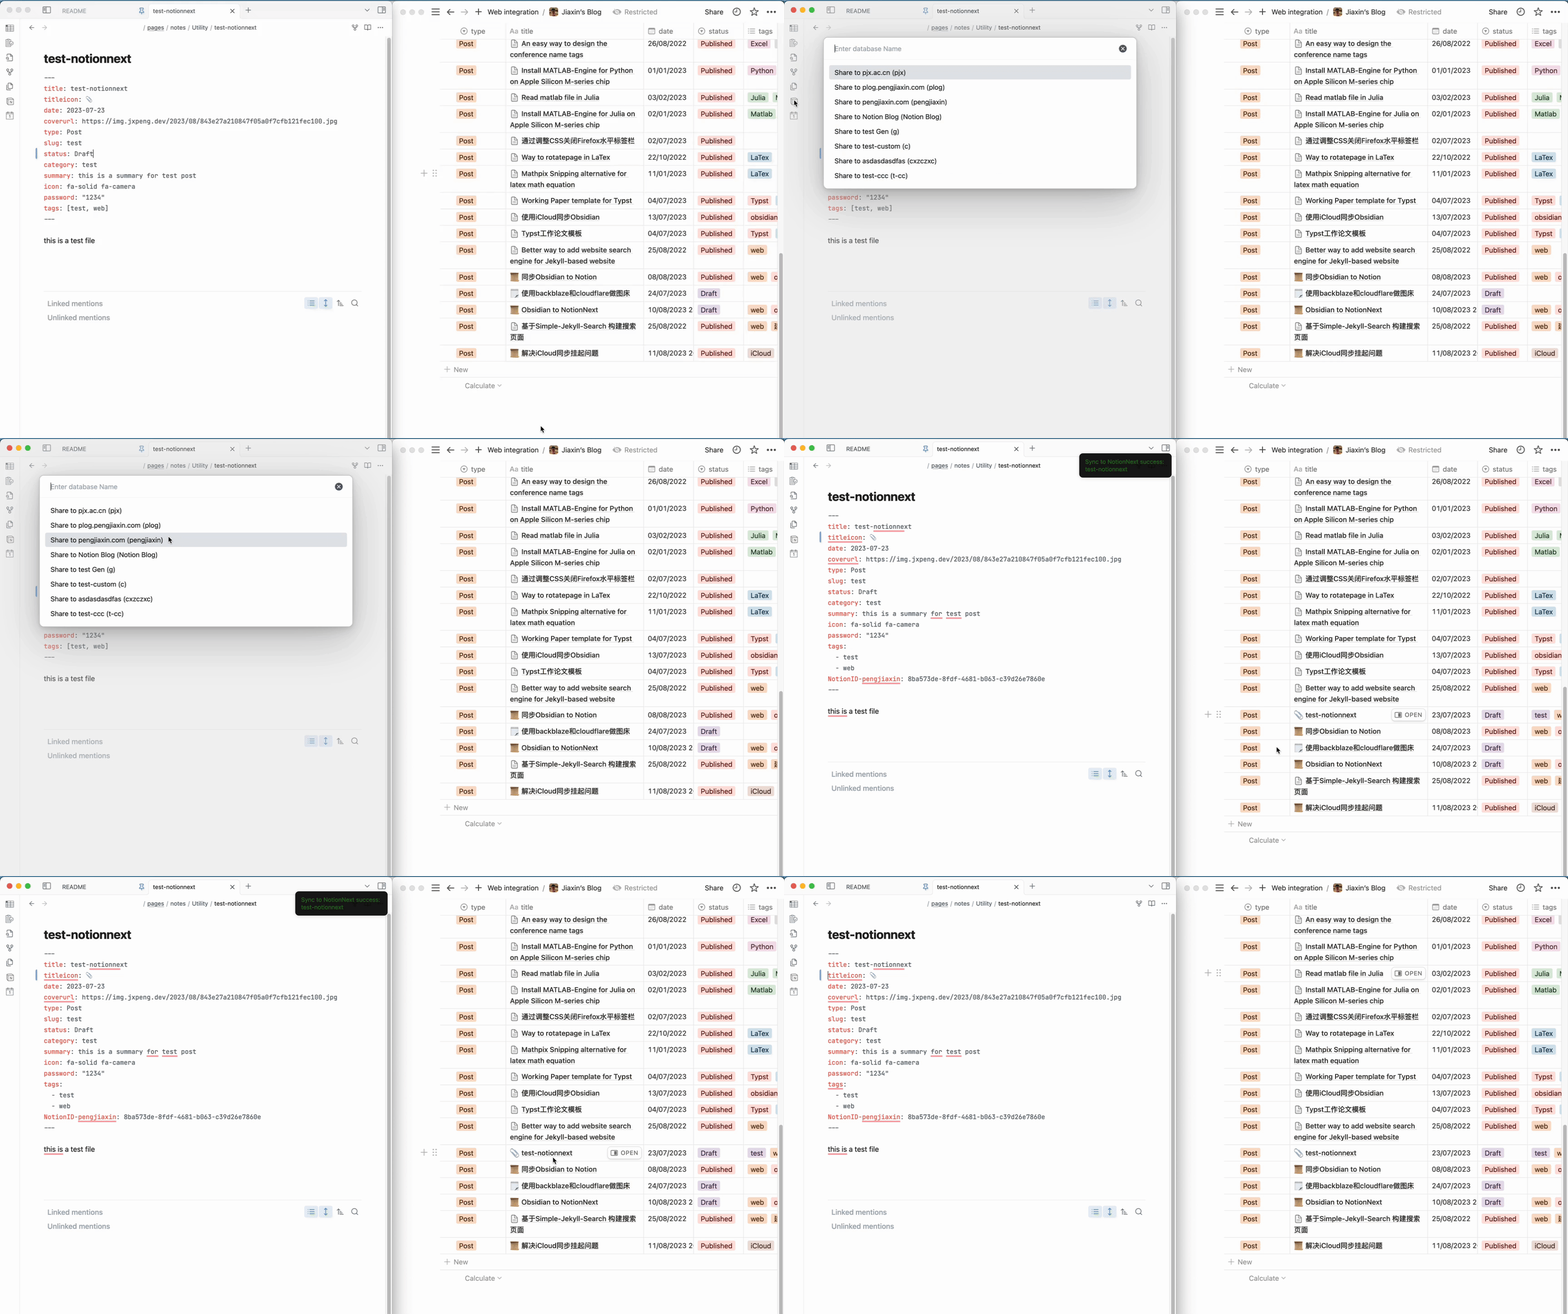
After creating the note, you can click the `Share to NotionNext` button on the left sidebar to sync the note to Notion.
|
||||
|
||||

|
||||
|
||||
|
||||
#### 2️⃣ note for NotionNext database
|
||||
|
||||
@@ -188,7 +188,7 @@ NotionID-pengjiaxin: 8ba573de-8fdf-4681-b063-c39d26e7860e
|
||||
this is a test file
|
||||
```
|
||||
|
||||

|
||||
|
||||
|
||||
#### 3️⃣ note for custom database
|
||||
|
||||
@@ -196,7 +196,7 @@ this is a test file
|
||||
|
||||
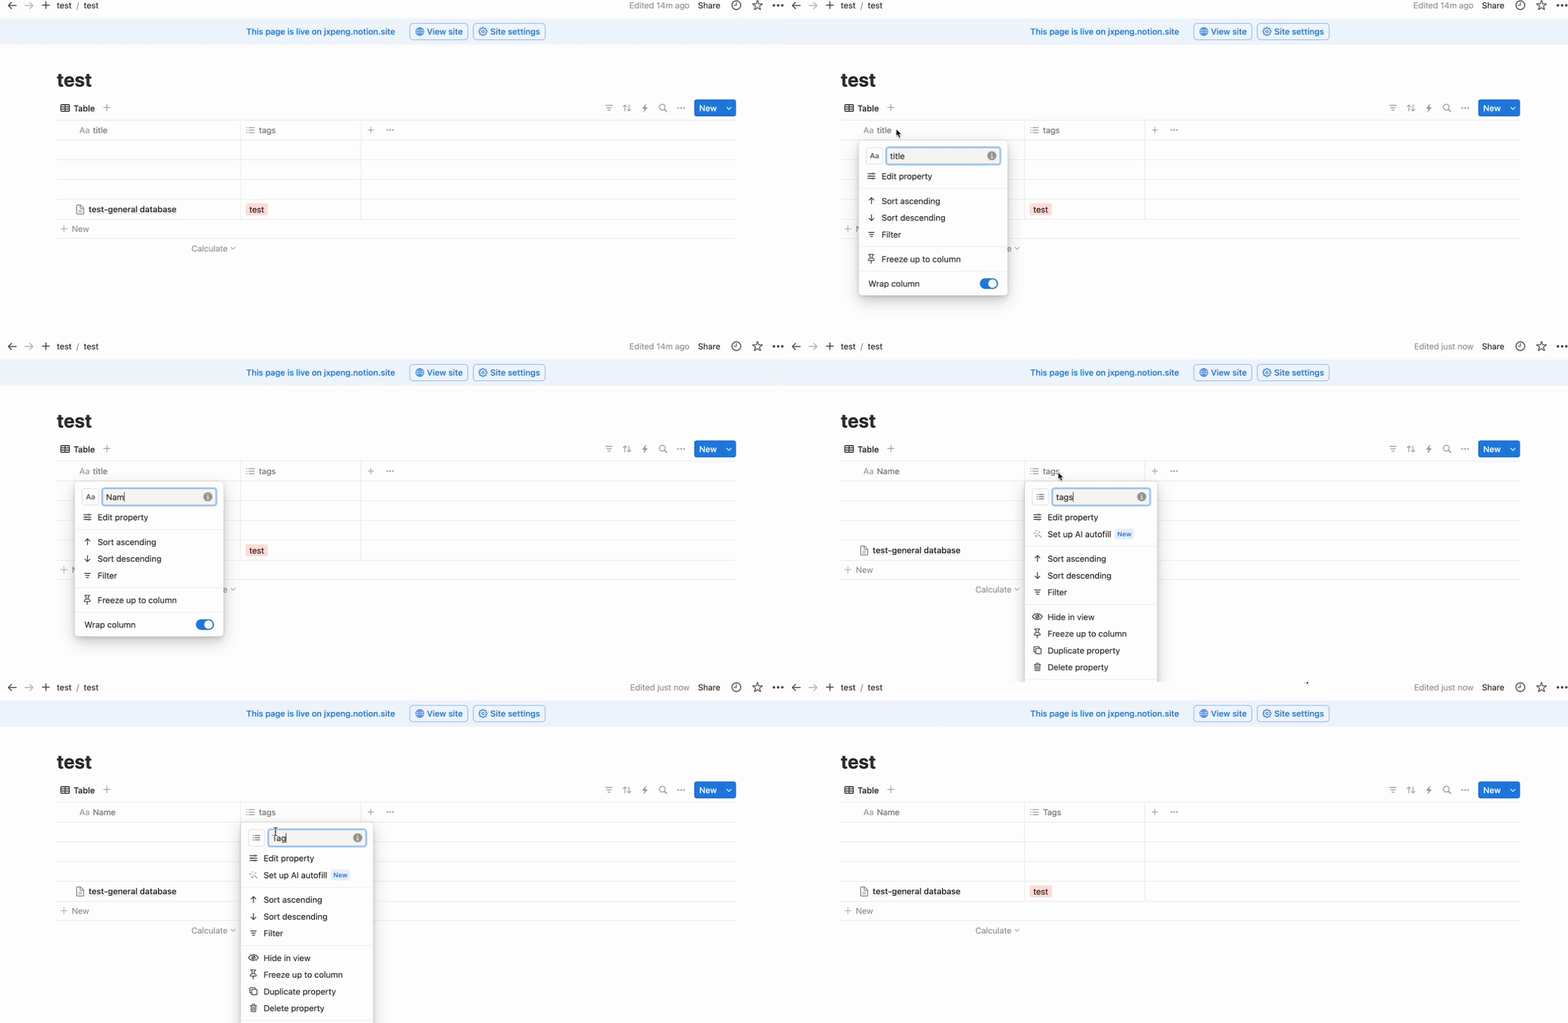
Use the previously created general database and rename `title` to `Name` and `tags` to `Tags` in Notion.
|
||||
|
||||

|
||||
|
||||
|
||||
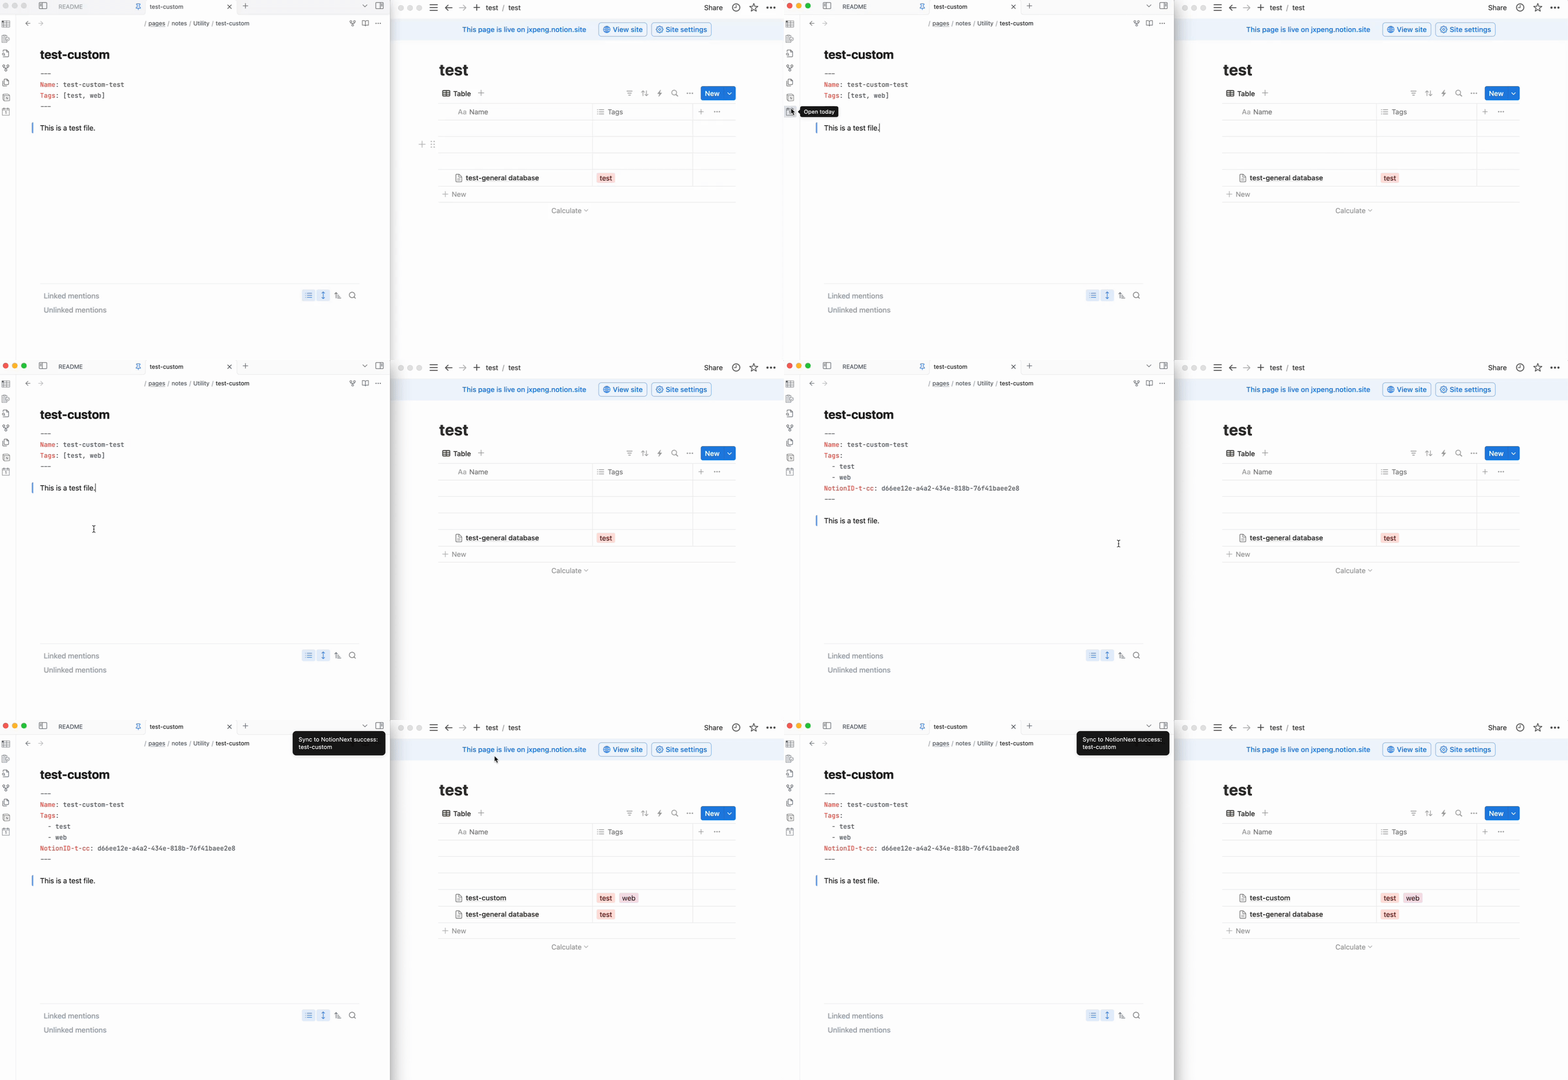
The front matter for the custom database is as follows:
|
||||
|
||||
@@ -211,23 +211,23 @@ Tags:
|
||||
This is a test file.
|
||||
```
|
||||
|
||||

|
||||
|
||||
|
||||
##### sync more properties
|
||||
|
||||
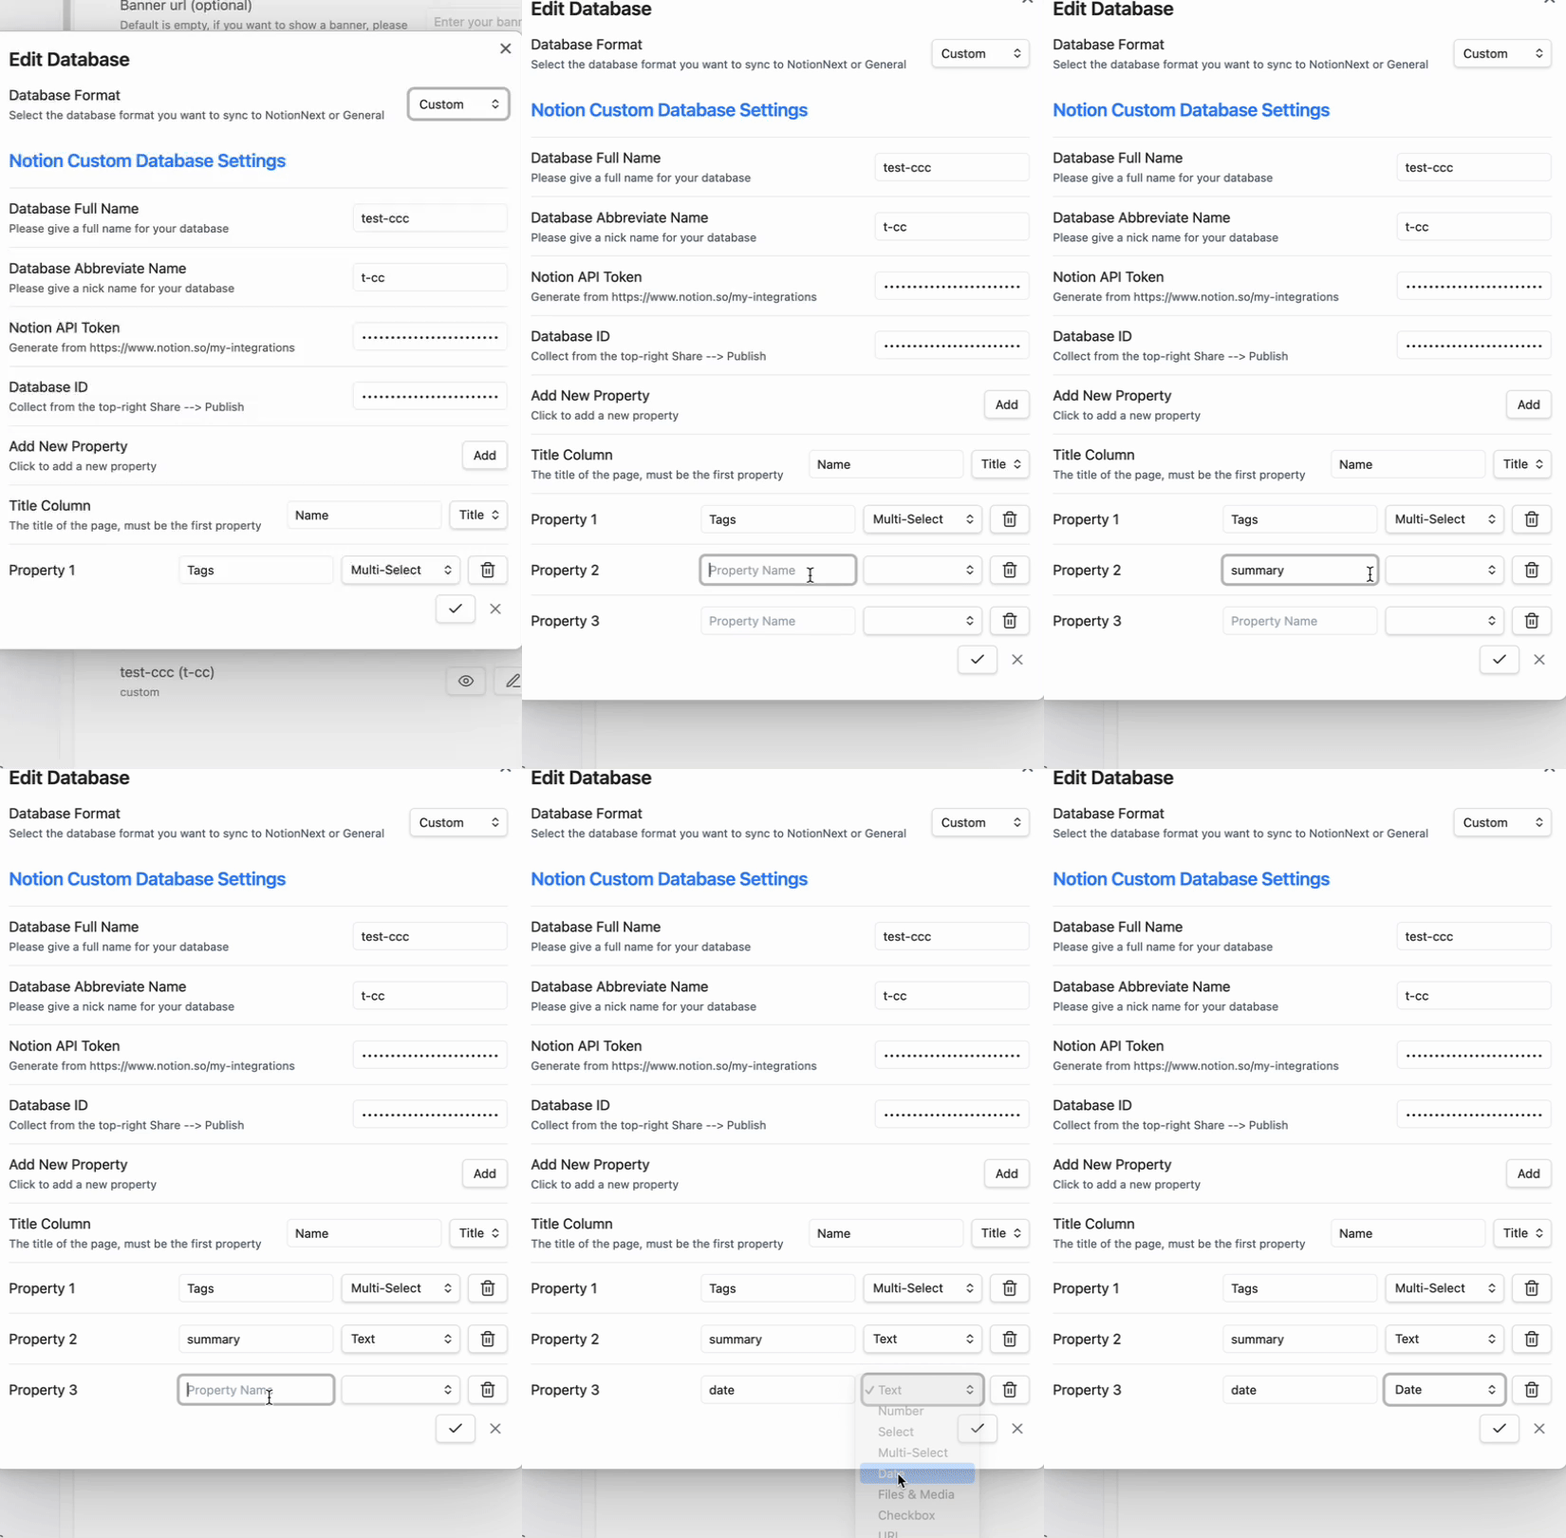
Add more property to the custom database. For example, we can add a `summary` and `date` property to the custom database.
|
||||
|
||||
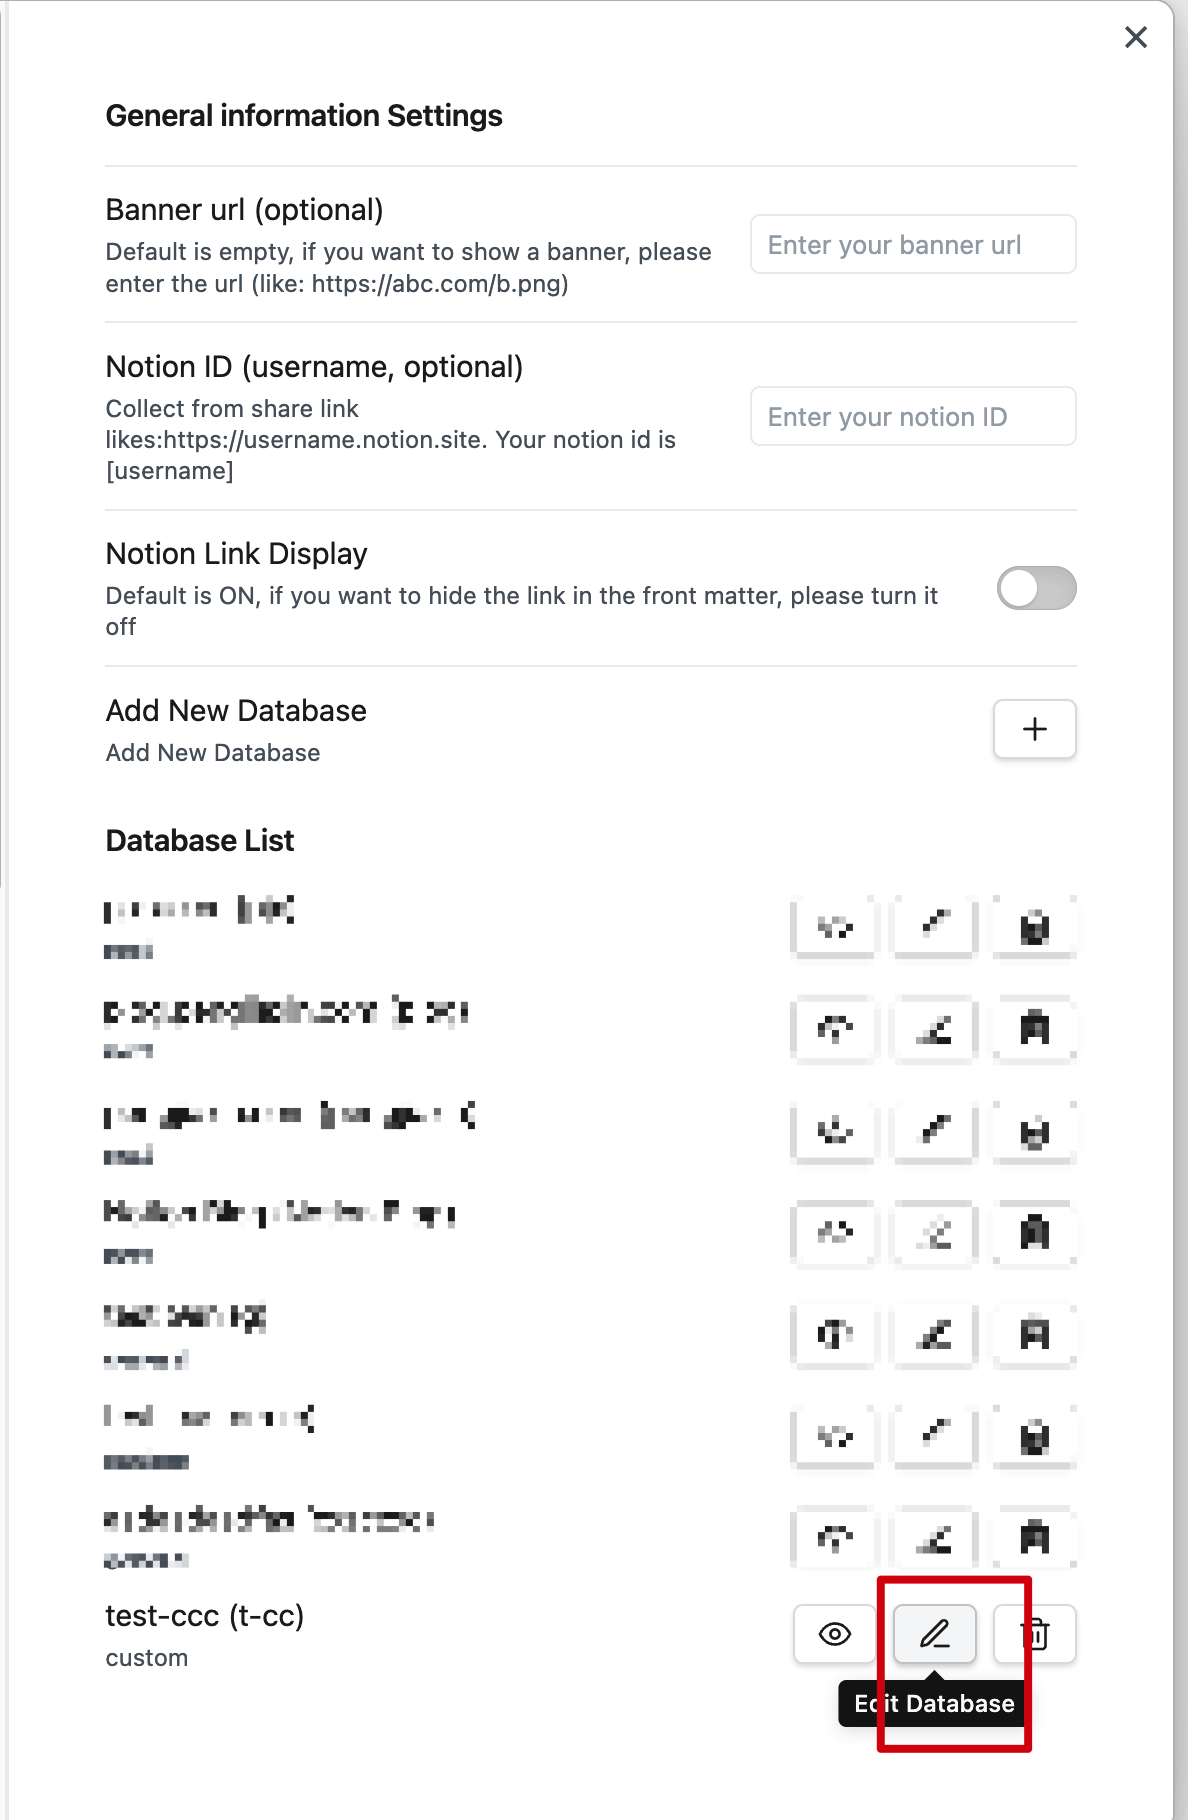
1). Click `Edit` in the plugin settings.
|
||||

|
||||
|
||||
2). Click `Add` and add the `summary` and `date` property.
|
||||
|
||||

|
||||
|
||||
|
||||
3). After adding the properties, you can see the properties in the plugin settings.
|
||||

|
||||
|
||||
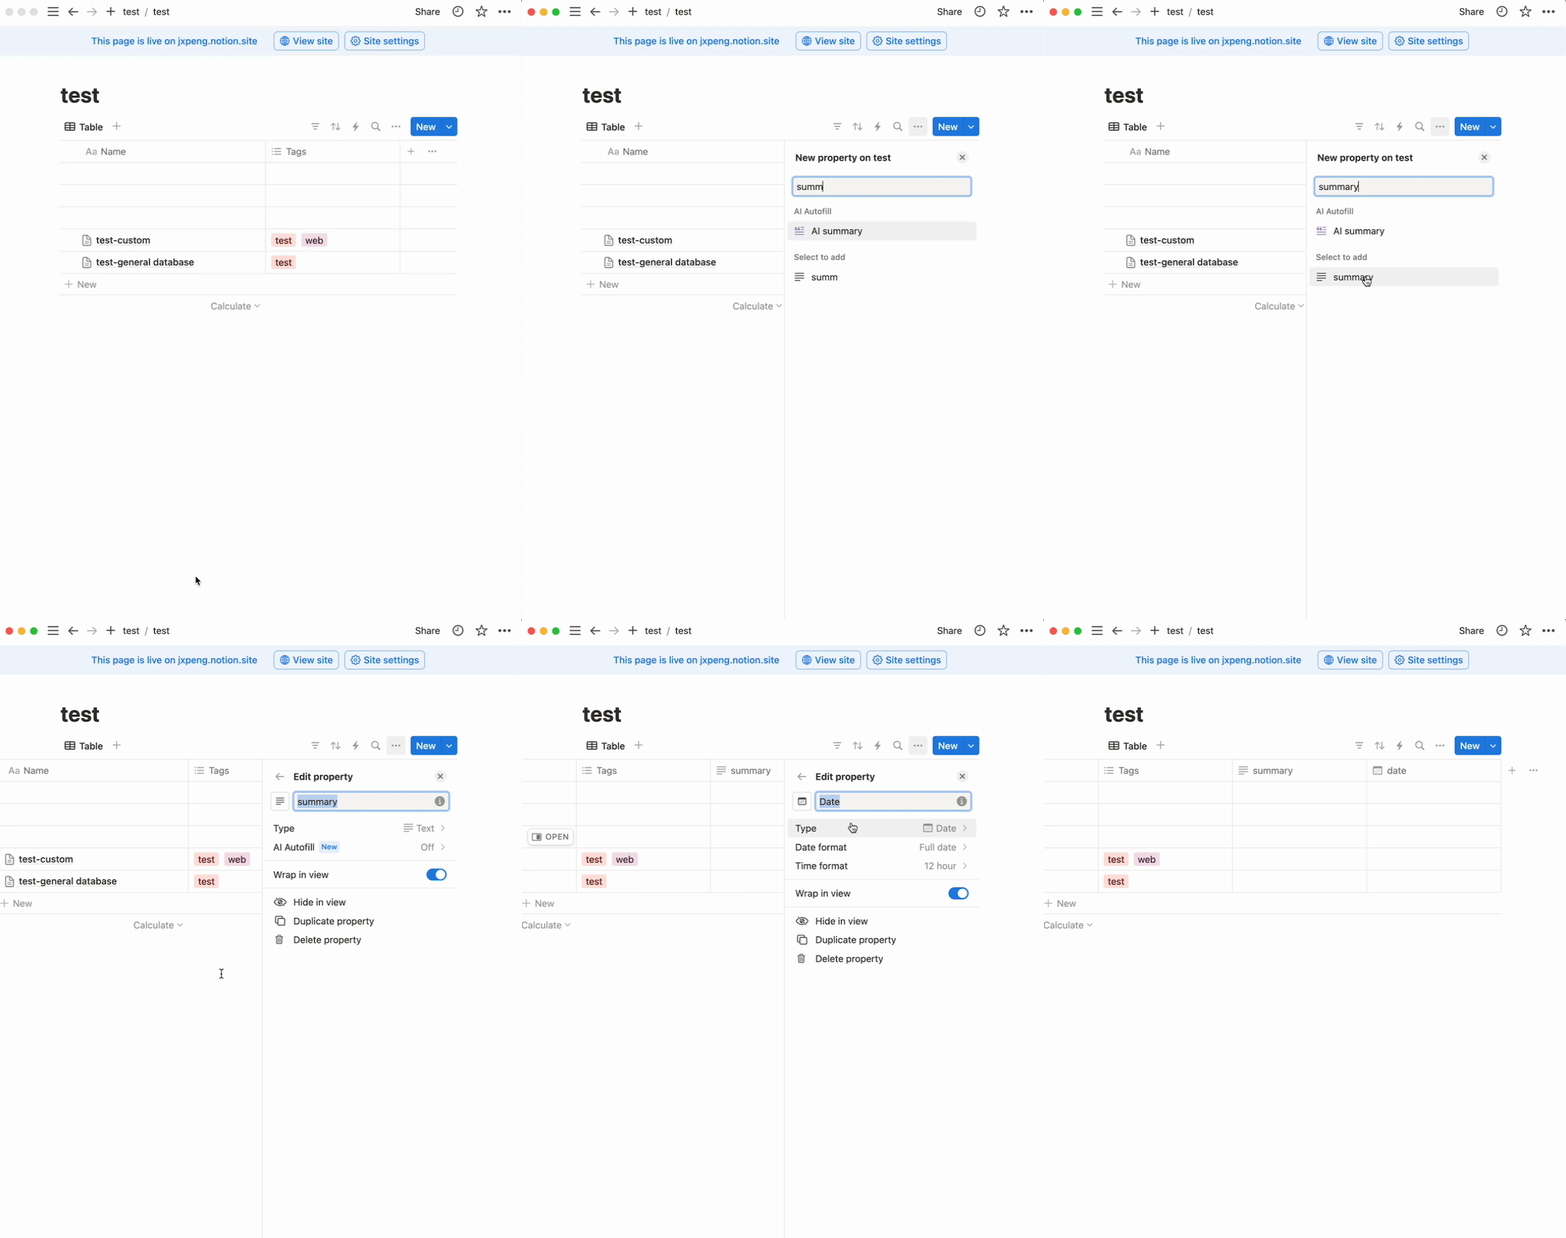
4). Add the `summary` and `date` in Notion
|
||||
|
||||

|
||||
|
||||
|
||||
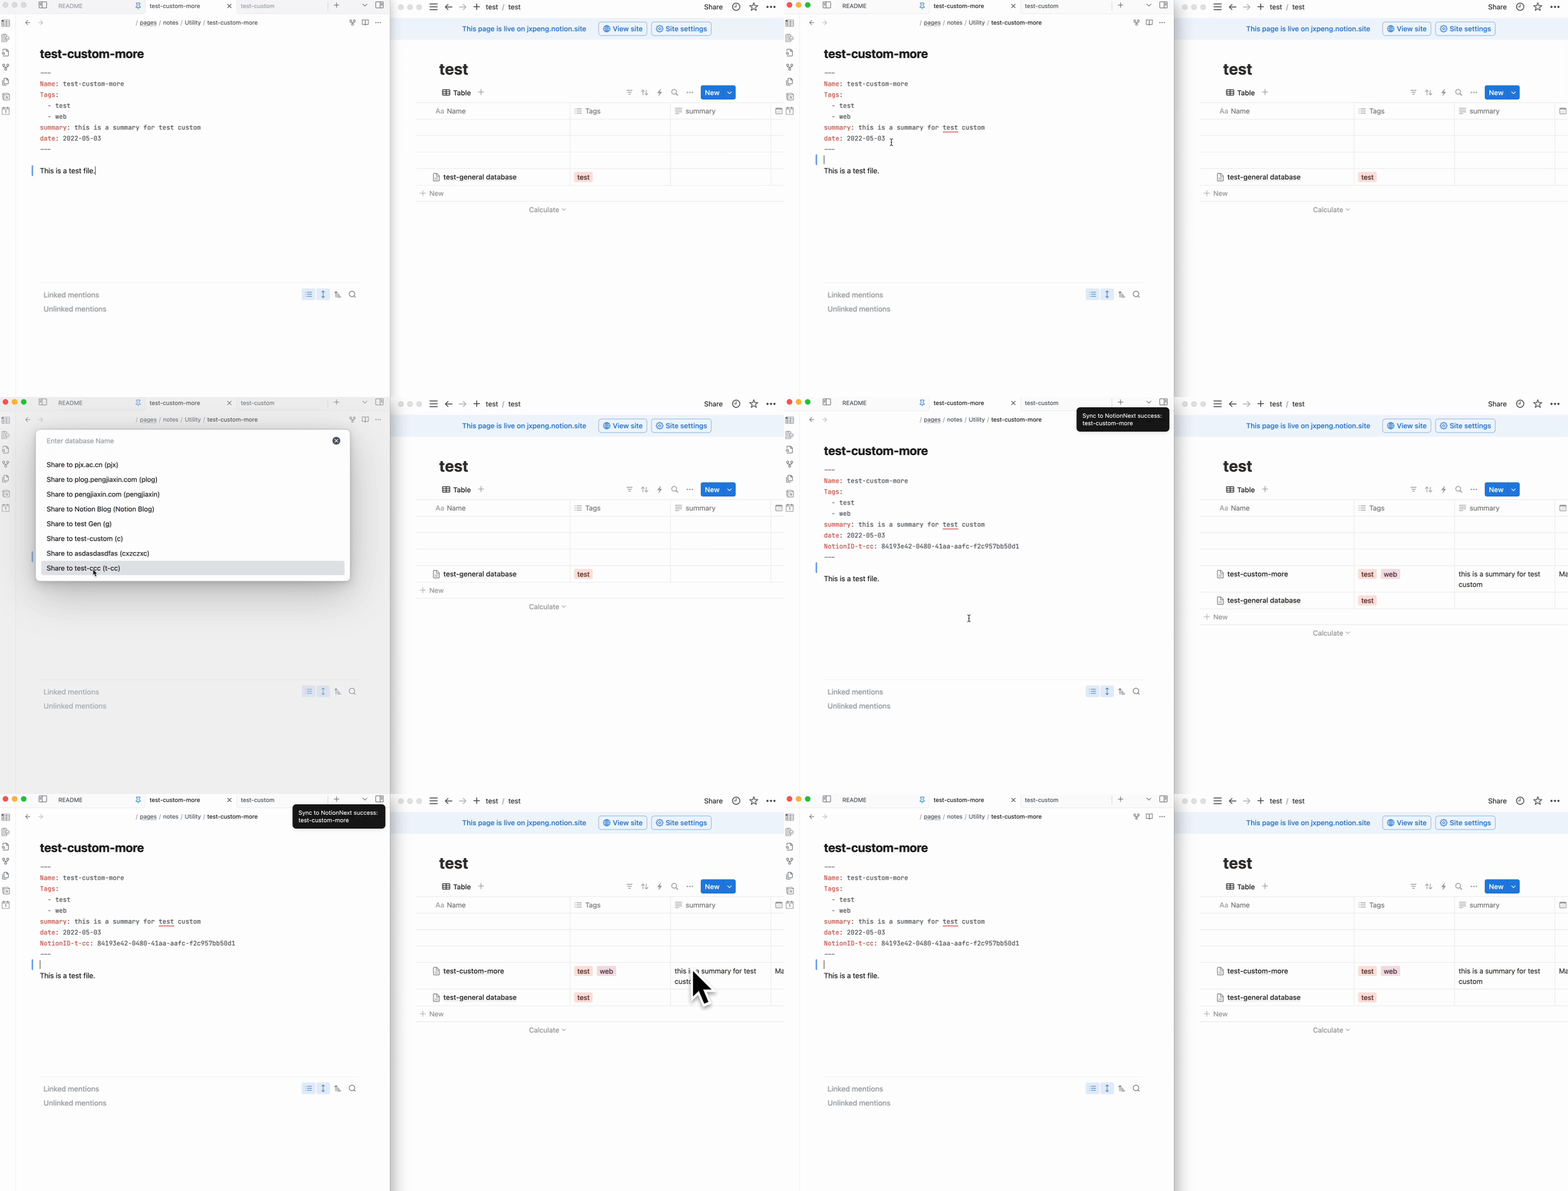
5). Create a new note with the `summary` and `date` property.
|
||||
|
||||
@@ -246,7 +246,7 @@ Add more property to the custom database. For example, we can add a `summary` an
|
||||
|
||||
6). Sync the note to Notion.
|
||||
|
||||

|
||||
|
||||
|
||||
---
|
||||
|
||||
|
||||
Reference in New Issue
Block a user