mirror of
https://github.com/jxpeng98/obsidian-to-NotionNext
synced 2026-07-29 16:35:57 +08:00

308 lines
13 KiB
Markdown
308 lines
13 KiB
Markdown
# Obsidian share to NotionNext
|
||
|
||
感谢[原作者](https://github.com/EasyChris/obsidian-to-notion)开发出了这么好用的插件,能够将obsidian同步到notion。 但是原仓库只能同步Name和Tags信息,如果像我一样通过[NotionNext](https://github.com/tangly1024/NotionNext)来搭建自己的网页,就有一些局限性。每次导入之后都需要进行大量的修改。
|
||
|
||
所以我在[原作者](https://github.com/EasyChris/obsidian-to-notion)的基础之上,增加了匹配[NotionNext](https://github.com/tangly1024/NotionNext)模板的功能。这样可以直接在Obsidian编辑,整理好之后一键发布。
|
||
|
||
## 更新说明
|
||
### 1.1.2
|
||
- 修复了一个拼写错误,导致无法同步`status`到NotionNext。现在你可以使用`stats`或者`status`来同步文章的状态到NotionNext。这个更新不会影响到同步到General数据库的功能。
|
||
- **`stats`和`status`都可以使用,但是你只能使用其中一个。**
|
||
|
||
```yaml
|
||
stats: Draft # Draft, Invisible, Published, default is Draft, 默认是Draft
|
||
# or
|
||
status: Draft # Draft, Invisible, Published, default is Draft, 默认是Draft
|
||
# both of them will work, but you can only use one of them.
|
||
```
|
||
|
||
### 1.1.1
|
||
- 修复了在日语系统下,无法显示设置按钮的错误。
|
||
- 增加日语翻译。
|
||
### 1.1.0
|
||
- 修复设置中自定义标题的显示问题。
|
||
- 增加了标签同步的控制按钮。以减少空标签集造成的上传失败。
|
||
|
||
如果你不想使用同步标签功能,你可以在设置中关闭。不论你在md文件表头添加了tags与否,都不会将标签同步到Notion数据库中。
|
||
|
||
如果你需要同步标签到Notion数据库中,**你需要通过如下格式添加表填到md表头中。**
|
||
|
||
```yaml
|
||
tags: #空标签,选项1
|
||
tags: [test,test1,test2] # 用中括号将所有的标签括起来,选项2
|
||
tags:
|
||
- test
|
||
- test1
|
||
- test2 # 每个标签单独一行,选项3
|
||
```
|
||
|
||
### 1.0.1
|
||
|
||
- 修复了自定义标题在设置菜单中显示错误的问题。
|
||
|
||
### 1.0.0 (大更新)
|
||
|
||
- 这个版本开始,你可以**任意修改第一列表头的名字 (标题列,默认:'title')**。 (**注意:你必须保证你的Notion数据库中有'tags‘这一列的存在,并且在markdown文件中把`tags:`添加到你的YAML表头中。否则会返回`400 错误`。但是你可以`tags:`设置为空。**)
|
||
|
||

|
||
例如这样:
|
||

|
||
- 增加了一个控制按钮来控制是否开启当前数据库同步命令的功能。如果你关闭了这个按钮,你在上传命令列表中就不会出现当前数据库的选项。
|
||
|
||

|
||
|
||
### 0.2.6
|
||
|
||
- 增加一个按钮用来控制是否在名列列表中显示如下数据库。
|
||
|
||

|
||
如果你关闭普通数据库的按钮,你在上传命令列表中就不会出现普通数据库的选项。如果你关闭NotionNext数据库的按钮,你在上传命令列表中就不会出现NotionNext数据库的选项。
|
||
|
||

|
||
|
||
### 0.2.3
|
||
|
||
- 修复了一个bug,现在可以正常更新了。
|
||
|
||
### 0.2.2
|
||
|
||
- 支持NotionNext 和 普通Notion 数据库的同步。
|
||
- 你可以有一个NotionNext和一个普通Notion数据库。
|
||
- 普通Notion数据库的同步方式和原作者的一样,只同步`title`和`tags`。**如果使用普通数据库功能,你需要保证你的数据库中有`title`和`tags`这两个表头。必须使用小写。**
|
||
|
||

|
||
|
||

|
||
|
||
### 0.2.1
|
||
|
||
- 重构代码。
|
||
|
||
### 0.2.0
|
||
|
||
- 从这个版本开始,重构了交互逻辑。现在当你点击左侧的按钮,会弹出可同步的数据库选项。你可以选择你想要同步的数据库,然后点击同步按钮。**但是,现在仅支持同步单个数据库,如果你的数据库不是NotionNext,你可以不用更新。**
|
||
|
||
### 0.1.10
|
||
|
||
- 修正了设置中的中文显示。
|
||
|
||
### 0.1.8
|
||
|
||
- 重新整理了代码,增加了一个仓库转换按钮为之后的多数据库支持作准备。**但是现在还不支持多数据库,如果你的数据库不是NotionNext,你可以不用更新。**
|
||
|
||
### 0.1.7
|
||
|
||
- [x] 删除了设置中`convert tags`的选项。 你现在可以直接添加tags,而不需要考虑是否开启tags选项。如果你不需要tags,可以直接删除tags选项或者留白。
|
||
|
||
## 使用方式
|
||
|
||
### 注意事项
|
||
|
||
本插件现在暂时只能用于匹配[NotionNext](https://github.com/tangly1024/NotionNext)。如果你不是使用这个模板,你只会无限返回`error 400`.
|
||
|
||
所以没有NotionNext需求的,请使用原作者的[Obsidian-to-notion](https://github.com/EasyChris/obsidian-to-notion)
|
||
|
||
### 准备安装
|
||
|
||
在安装插件之前,你必须配置好了以下内容:
|
||
|
||
1. 你的NotionNext数据库。
|
||
2. 根据原作者的readme.md,配置好了Notion API,并且已经和你的NotionNext仓库关联。
|
||
3. NotionNext Database ID
|
||
4. 你的NotionNext数据库有如下内容:
|
||
- type
|
||
- title
|
||
- slug
|
||
- category
|
||
- tags
|
||
- date
|
||
- status
|
||
- summary
|
||
- password
|
||
- icon
|
||
|
||
在最新的0.0.6版本,我还增加了以下内容:
|
||
|
||
- titleicon: 标题的emoji图标,暂时只能支持emoji
|
||
- coverurl: 封面图片的url, url可以是任何一种图片的url, 例如jpg,png,svg等等。
|
||
|
||
**如果你是直接复制的NotionNext的模板,这些内容应该已经有了。我在原作者的基础之上对本插件的内容进行了更改,所以你只需要保证你的数据库有如上内容,并且所有的字母都是小写!!!**
|
||
|
||
**⚠️⚠️⚠️:表头全部小写!!!顺序无所谓!**
|
||
|
||
### 安装插件
|
||
|
||
#### 社区插件市场下载
|
||
|
||
打开`Obsidian -> 设置 -> 社区插件 -> 浏览 -> 搜索Share to NotionNext`, 然后点击安装。
|
||
|
||
#### 手动安装
|
||
|
||
1. 关闭Obsidian
|
||
2. 从Release下载插件文件,解压到你的obsidian插件目录下。
|
||
3. 重新打开Obsidian,进入设置,启用插件。
|
||
4. 在设置中,找到Obsidian to NotionNext,填入你的NotionNext Database ID 和 API token。
|
||
|
||
### 使用插件
|
||
|
||
在仓库中我上传了一个模板,你可以直接复制到你的模板文件夹中。然后使用Obsidian的模板功能一键生成新笔记。
|
||
|
||
如果你不想使用模板,你也可以直接在Obsidian中创建一个新的文件,然后复制下边的内容。然后保存。
|
||
|
||
```markdown
|
||
---
|
||
# default value has been set.
|
||
# for any unwanted value, you can delete it or set it to empty.
|
||
# for example, if you donot want to set password, you can delete password: "1234" or set it to password: ""
|
||
# 我已经在插件中设置了默认值,如果有不需要的选项,可以直接删除。
|
||
# 例如你不需要密码选项,你可以将password: "1234"删除,或者将它设置为空。
|
||
# !!!!!!!!!!!!
|
||
# 现在阶段一定不要修改表头的名字, please do not change the name of the header in YAML front matter
|
||
# !!!!!!!!!!!!
|
||
titleicon: 📎 # emoji icon, default is 📜, 默认是📜
|
||
date: 2023-07-23 # default is today, 默认是今天。 Format is YYYY-MM-DD, 格式是YYYY-MM-DD
|
||
coverurl: https://img.jxpeng.dev/2023/08/843e27a210847f05a0f7cfb121fec100.jpg # default is empty, 默认是空
|
||
type: Post # Post or Page, default is Post, 默认是Post
|
||
slug: test # slug for url, default is empty, 默认是空
|
||
stats: Draft # Draft, Invisible, Published, default is Draft, 默认是Draft
|
||
category: test # default is 'Obsidian', 默认是'Obsidian'
|
||
summary: this is a summary for test post # default is empty, 默认是空
|
||
icon: fa-solid fa-camera # you can ignore this, default is empty, 默认是空,可直接删除
|
||
password: "1234" # if you donot want to set password, you can delete this line, default is empty, 默认是空,可直接删除
|
||
# 现在必须开启tags选项,否则会报错
|
||
tags:
|
||
- test # tags for post
|
||
- web # add more tags if you want
|
||
---
|
||
|
||
Contents Below
|
||
|
||
|
||
```
|
||
|
||
模板使用如下:
|
||

|
||
|
||
**插件预览如下**
|
||

|
||
|
||
---
|
||
|
||
**以下为原README.md**
|
||
|
||
非常感谢原作者的开发,我只是在原作者的基础之上进行了修改,增加了一些功能。如果你觉得这个插件对你有帮助,可以给[原作者](https://github.com/EasyChris/obsidian-to-notion)一个star。
|
||
|
||
# Obsidian to Notion
|
||
|
||
[](https://github.com/Easychris/obsidian-to-notion/actions/workflows/CI.yml)
|
||
[](https://github.com/Easychris/obsidian-to-notion/actions/workflows/release.yml)
|
||
[](https://raw.githubusercontent.com/EasyChris/obsidian-to-notion/master/LICENSE)
|
||
[](https://GitHub.com/Easychris/obsidian-to-notion/releases/)
|
||
[](https://github.com/Easychris/obsidian-to-notion/releases)
|
||
|
||
Obsidian share to Notion [English](README.md)
|
||
|
||
将obsidian文件一键分享到Notion,并在obsidian中添加Notion分享链接
|
||
|
||
如果能对你有所帮助,欢迎给一个star支持。
|
||
|
||

|
||
|
||
# 使用方式
|
||
|
||
## 安装插件
|
||
|
||
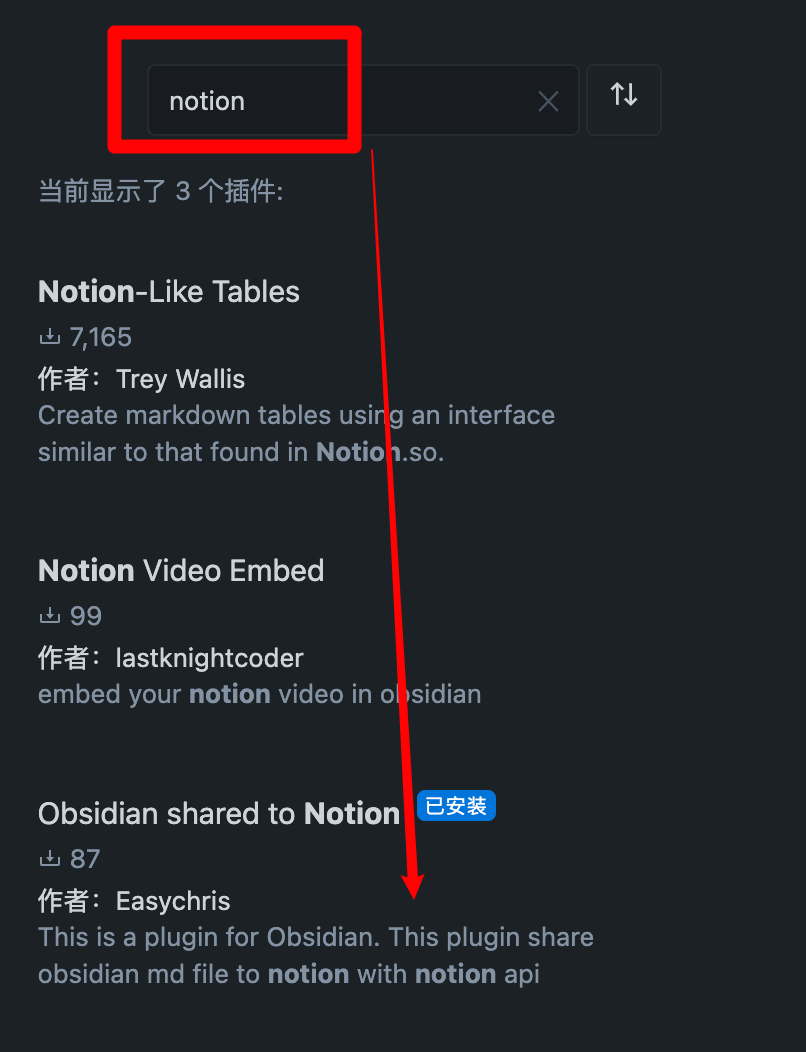
### 市场下载
|
||
|
||
插件市场搜索 noiton 即可下载
|
||
|
||
|
||
|
||
### BRAT
|
||
|
||
插件中中心搜索 BRAT
|
||
添加 `EasyChris/obsidian-to-notion` 到 BRAT 插件安装列表中
|
||
返回插件中心启用即可
|
||
|
||
### 手动安装
|
||
|
||
```
|
||
cd YOUR_OBSIDIAN_FOLDER/.obsidian/plugins/
|
||
git clone https://github.com/EasyChris/obsidian-to-notion.git
|
||
```
|
||
|
||
## 申请 Notion API
|
||
|
||
官方参考文档:[https://developers.notion.com/docs](https://developers.notion.com/docs)
|
||
|
||
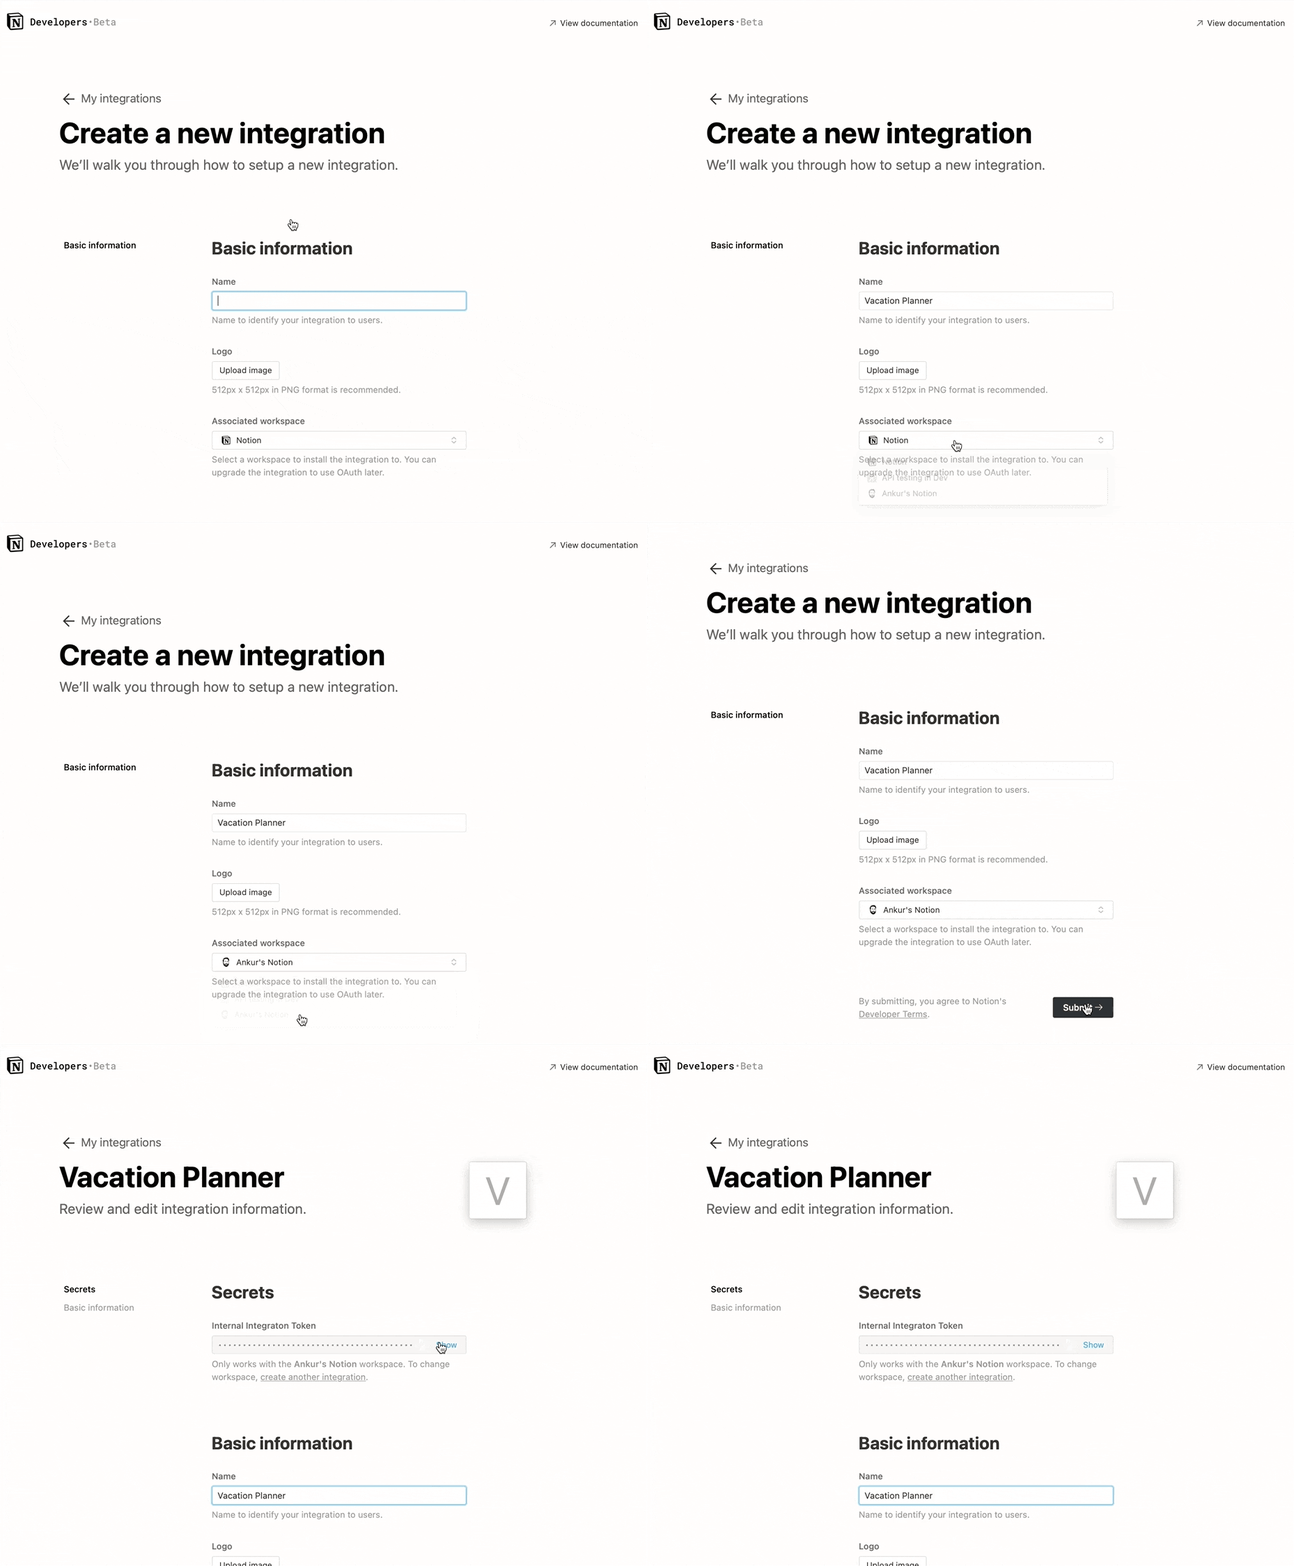
### 第 1 步:创建integration
|
||
|
||
转到 [https://www.notion.com/my-integrations](https://www.notion.com/my-integrations)
|
||
创建完成之后,复制`secrets toekn`
|
||
|
||
|
||
### 第2步:与你的集成共享一个数据库
|
||
|
||
新建一个的page(权限为公开)
|
||
在page中新建一个数据库 -> 需要`full page database`
|
||

|
||
|
||
将`integration`添加到你的新建的数据库中
|
||
|
||

|
||
|
||
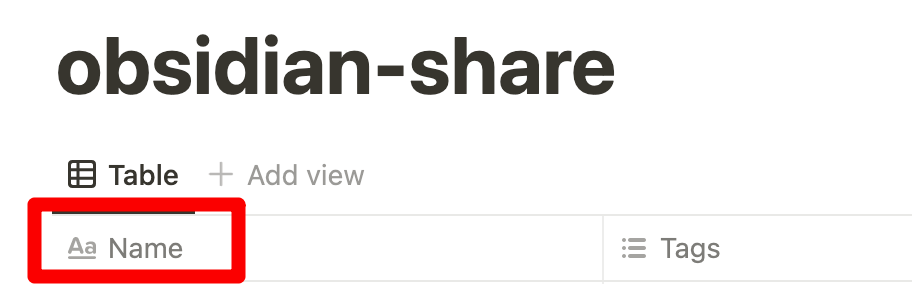
#### 注意
|
||
|
||
数据库的第一个自定义名称必须是 "Name",否则同步会失败。
|
||
|
||
|
||
|
||
### 第三步:复制database ID
|
||
|
||
```
|
||
https://www.notion.so/myworkspace/a8aec43384f447ed84390e8e42c2e089?v=...
|
||
|--------- Database ID --------|
|
||
|
||
```
|
||
|
||
## 打开插件配置
|
||
|
||
将得到的 `NOTION_API_KEY` 和 `DATABASE_ID`填入配置当中
|
||

|
||
|
||
## 上传文件内容到notion
|
||
|
||
点击上传notion的按钮
|
||

|
||
上传成功之后会自动生成一个分享链接
|
||

|
||
|
||
## 页面 Banner 链接[可选]
|
||
|
||
默认可以不填写
|
||
横幅URL必须是图像URL,例如:https://i.imgur.com/xxx.jpg
|
||
|
||
## Notion ID [可选]
|
||
|
||
Notion ID是你想分享文件的页面ID。
|
||
如果你不写它,notion将分享到默认的链接,如:<https://www.notion.so/myworkspace/a8aec43384f447ed84390,访问这个页面将重定向到你的网站页面。>
|
||
如果你写了Notion ID,它将分享到页面链接如:<https://your_user_name.notion.site/myworkspace/a8aec43384f447ed84390。不需要重定向网址。>
|
||
|
||
## 同步图片
|
||
|
||
使用 [Obsidian Image Auto Upload Plugin](https://github.com/renmu123/obsidian-image-auto-upload-plugin) 插件,配置你自己的 cos 或者 oss,将图片存储到你自己的云存储,然后在 obsidian 中使用图片链接即可。该插件会自动帮你上传图片,并替换成链接。
|
||
|
||
# 请我喝杯咖啡
|
||
|
||
[顿顿饭](https://dun.mianbaoduo.com/@easy)
|
||
|
||
# 感谢
|
||
|
||
[开发流程 | Obsidian 插件开发文档](https://luhaifeng666.github.io/obsidian-plugin-docs-zh/zh/getting-started/development-workflow.html)
|
||
|
||
[GitHub - devbean/obsidian-wordpress: An obsidian plugin for publishing docs to WordPress.](https://github.com/devbean/obsidian-wordpress)
|
||
|
||
[GitHub - obsidianmd/obsidian-api](https://github.com/obsidianmd/obsidian-api)
|
||
|
||
[GitHub - zhaohongxuan/obsidian-weread-plugin: Obsidian Weread Plugin is an plugin to sync Weread(微信读书) hightlights and annotations into your Obsidian Vault.](https://github.com/zhaohongxuan/obsidian-weread-plugin)
|